Nagios can be installed in multiple ways. Many users prefer package installations, but this tutorial will cover a source installation of Nagios Core because of its platform independence and consistency with the Nagios Core documentation. Nagios requires knowledge of certain key files and directories, so having these locations match the Core documentation should simplify the learning process. The instructions for these section are tested and verified for RHEL/CentOS based Linux distributions, and all commands in the following sections should be run as the root user.
In five easy steps, you can install Nagios, and get it set up on your system. If you wish to skip manual installation altogether, you can also download a pre-installed virtual machine from http://www.nagios.org/download, which includes Nagios Core, Nagios plugins, PNP performance graphing, and several other key add-ons.
Before you install Nagios, you will need to check that you have all of the required elements, listed as follows:
A freshly installed Linux platform, I recommend CentOS. Nagios should generally be installed on a dedicated server, either a physical machine or virtual machine.
Memory: 256 MB (min), 1 GB (recommended).
Nagios requires the
wget httpd php gcc glibc glibc-common gd gd-devel make net-snmppackages (or their platform equivalents).Hardware based on environment size. There's no easy formula to determine hardware specs for larger Nagios environments, but the general rule is—the larger the environment, the faster the disks, and the more CPU cores you'll need. Plan on a minimum of one CPU core per 500 hosts being monitored.
The following code example will describe how to install prerequisite packages for both CentOS/RHEL-based distributions, and create users that are necessary for Nagios to run.
Run the following command from a command-line shell to install required packages for source installation:
yum install -y autoconf wget httpd php gcc glibc glibc-common gd gd-devel make net-snmp xinetd openssl-devel unzip
Now let's set up user permissions for the Nagios process using the following commands:
useradd nagios
groupadd nagcmd
usermod -a -G nagcmd nagios
Tip
Downloading the example code
You can download the example code files for all Packt books you have purchased from your account at http://www.packtpub.com. If you purchased this book elsewhere, you can visit http://www.packtpub.com/support and register to have the files e-mailed directly to you.
The easiest way to download Nagios is as a compressed tarball from http://www.nagios.org/download.
The following example demonstrates downloading the latest packages at the time of writing this book. We suggest that you download the most current stable build of both the Nagios Core and Nagios plugins tarballs. Lets get both of these packages downloaded and extracted into the /tmp directory:
cd /tmp
wget http://prdownloads.sourceforge.net/sourceforge/nagios/nagios-3.5.0.tar.gz
wget http://prdownloads.sourceforge.net/sourceforge/nagiosplug/nagios-plugins-1.4.16.tar.gz
tar zxf nagios-3.5.0.tar.gz
tar zxf nagios-plugins-1.4.16.tar.gz
A typical Nagios installation is made up of more than just the Nagios Core monitoring engine. The list of available add-ons for Nagios is quite large, but the following steps will guide you through the installation and setup of the key packages required for almost all Nagios installations. The following steps will guide you through installing Nagios Core, Nagios plugins, NRPE for remote agent monitoring, and NRDP for passive monitoring.
The following commands will demonstrate how to compile Nagios Core and Nagios plugins from the source tarballs downloaded from the previous step, and how to install all the necessary files for Nagios Core to run and begin monitoring:
cd /tmp/nagios
./configure -–with-command-group=nagcmd
make all
make install
make install-init
make install-config
make install-commandmode
make install-webconf
As mentioned earlier, Nagios monitors hosts and services through the execution of check commands, so let's go ahead and install the Nagios plugins bundle as well using the commands:
cd /tmp/nagios-plugins-1.4.16
./configure
make
make install
The following commands will verify the Nagios object configuration and start the monitoring engine:
/usr/local/nagios/bin/nagios -v /usr/local/nagios/etc/nagios.cfg
/etc/init.d/nagios start
From here, the monitoring engine should be up and running.
The locations for Nagios files will vary depending on whether or not you've installed from source or a packaged version, and most Nagios add-ons require knowledge of where many of these key files are located. The following list outlines some key files and locations in your Nagios installation for a source installation:
/usr/local/nagios/etc: This directory contains all configuration files related to the monitoring configuration./usr/local/nagios/var: This directory contains Nagios logs and all runtime data files such asstatus.dat,nagios.lock, andobjects.cache. These files are commonly used by various Nagios add-ons as a data source./usr/local/nagios/libexec: This directory contains all of the Nagios plugins that can be run for the various host or service checks./usr/local/nagios/bin: This directory contains all of the binary executable files used by Nagios and often by key add-ons that may get installed./usr/local/Nagios/sbin: This directory contains all compiled web CGI's used by the web interface./usr/local/Nagios/share: This directory contains all web-accessible files such has PHP, HTML, CSS, and image files.
The preceding steps are required for all the Nagios installations to function at any level. However, most environments will require monitoring data for information that cannot be accessed externally on a host machine. For example, CPU load or memory usage are sets of data that can't be accessed on a remote machine without some sort of agent or internal script that has access to that data. Some users utilize SNMP or WMI to access this data for Nagios, but both of these methods require more advanced setup methods, and don't scale as well as the two methods described in the following sections. The latest versions for both of these add-ons can be obtained from http://exchange.nagios.org.
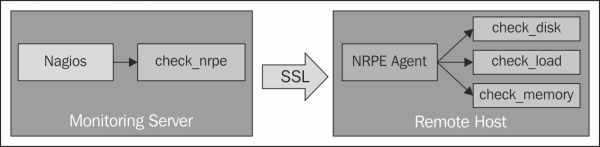
NRPE allows you to remotely execute Nagios plugins as active checks on remote machines by means of an agent. NRPE can communicate with agents on both Windows and Linux/Unix machines. NRPE contacts the agent on the remote machine, asks it to run a check command, and returns the results back to Nagios, as illustrated in the following diagram:
The following commands will install the NRPE listener on the system and add it as a sub-service of the
xinetddaemon:cd /tmp wget http://prdownloads.sourceforge.net/sourceforge/nagios/nrpe-2.13.tar.gz tar zxf nrpe-2.13.tar.gz cd nrpe-2.13 ./configure –-enable-command-args make all make install-plugin make install-daemon make install-xinetd make install-daemon-config /etc/init.d/xinetd restart
The following commands make sure that the
xinetdservice will be running each time we reboot:chkconfig –-add xinetd chkconfig –-level 35 xinetd on
The two key configuration files related to NRPE are
/etc/xinetd.d/nrpeand/usr/local/nagios/etc/nrpe.cfg. Be sure to review these settings to make sure they are suitable for your environment.
Getting started with NRPE and active checks will be covered in the Top features you need to know about section.
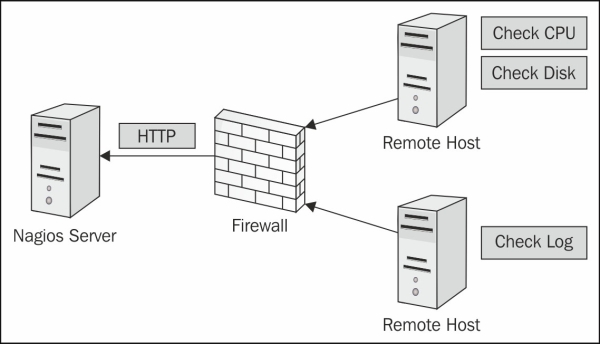
NRDP functions as a form of web API to submit both check results and commands using POST and GET over standard HTTP and HTTPS ports. Using NRDP, Nagios acts as a listener for results for a host or service, while cron or some other processes run the check on their own schedule. This is known as a passive check. NRDP allows for batch submissions of passive checks, and uses an XML format for data transport. NRDP is considered to be the most lightweight way to submit passive checks to Nagios.
The following steps will guide you through the installation process for NRDP:
To install NRDP, download the latest version from Nagios and extract the files using the following commands:
cd /tmp
wget http://assets.nagios.com/downloads/nrdp/nrdp.zip
unzip nrdp.zip
 Copy files to the installation directory with new permissions.
mkdir /usr/local/nrdp
cd nrdp
cp -r * /usr/local/nrdp
chown -R nagios.nagios /usr/local/nrdp
Set up web access to NRDP by adding the apache alias.
Note
Note that on Ubuntu/Debian machines, the apache configuration directory is
/etc/apache2/conf.d, while RHEL based systems store configuration files in/etc/httpd/conf.d.cp nrdp.conf /etc/httpd/conf.d /etc/init.d/httpd restart
Add at least one authorization token for remote senders to submit results or commands. Open the
/usr/local/nrdp/server/config.inc.phpfile in a text editor and add a new token to theauthorized_tokensarray.The following example shows two tokens added to the authorization array:
// NOTE: tokens are just alphanumeric strings - make them hard to guess!
$cfg['authorized_tokens'] = array(
"asd7fjk3l34",
"df23m7jadI34",
);
Save the
config.inc.phpfile and close it. From here you can test the NRDP API, by accessing it from the following address:http://<your_nagios_server_address>/nrdp
There are a few remaining steps that should be completed after Nagios is installed to make sure everything is accessible after installation.
The following commands will verify that the apache web server is running, and will create a default account for accessing the Nagios web interface. The htpasswd command will prompt for an initial password for the nagiosadmin user.
/etc/init.d/httpd start
htpasswd -c /usr/local/nagios/etc/htpasswd.users nagiosadmin
For RHEL/CentOS systems, the Nagios and httpd processes should be added to the chkconfig list so that they're started automatically each time the system boots. This can be accomplished by the following commands:
chkconfig –-add nagios
chkconfig –-level 35 nagios on
chkconfig –-add httpd
chkconfig –-level 35 httpd on
Note
Firewall and security rules are an important consideration for a monitoring server. Typically, most Linux distributions ship with both iptables and SElinux projects. Security is an important consideration with Nagios because it essentially has access keys to the entire infrastructure. For now, the following steps will disable SElinux, and open specific firewall ports to allow access for the Nagios web interface, as well as the standard ports that Nagios uses for external communication with other systems.
SELinux functions as a secondary layer of system security in addition to firewall rules and user account privileges. However, if you are unfamiliar with black box of SELinux, it just tends to make a lot of system events fail with little to no trail on what prevented it from working, and acts more like an unnecessary middle manager. For simplicity's sake, we'll be disabling SELinux to prevent complications. Disable SELinux by updating /etc/selinux/config to match the following settings:
SELINUX=disabled
SETLOCALDEFS=0
Then run the following command to immediately disable SELinux:
setenforce 0
Firewall settings are ultimately up to the administrator with regards to which ports should be allowed, but the following settings are some basic guidelines as to which ports need to be opened, and their corresponding services. On a CentOS/RHEL-based system, the following lines can be added to the /etc/sysconfig/iptables file somewhere before the COMMIT statement:
# HTTP/HTTPS
-A INPUT -m state --state NEW -m tcp -p tcp --dport 80 -j ACCEPT
-A INPUT -m state --state NEW -m tcp -p tcp --dport 443 -j ACCEPT
# NRPE
-A INPUT -m state --state NEW -m tcp -p tcp --dport 5666 -j ACCEPT
# NSCA
-A INPUT -m state --state NEW -m tcp -p tcp --dport 5667 -j ACCEPT
Once the firewall rules are in place, the iptables service will need to be restarted to apply the settings using the following command:
/etc/init.d/iptables restart
By this point, you should have a working installation of Nagios and you are now free to explore and discover more about it. You can access the Nagios Core interface by entering the following URL in your web browser. Replace the IP address with the IP address or host name of the machine that Nagios is installed on.
http://<your_nagios_server_address>/nagios
Enter nagiosadmin as the username, and the initial password created upon installation to log into the interface.