
In this chapter we'll download, install, and configure a simple OSSEC local profile. This profile incorporates all of the OSSEC's features into a single installation that will work on its own. OSSEC also supports a server-agent model, where a dedicated server profile provides aggregation and analysis for every agent profile.
So, what is it we're getting ourselves into? OSSEC is an acronym for Open Source SECurity Event Correlator. OSSEC monitors systems for events in logfiles and processes on the filesystem through the use of commands and outputs. It decodes the data, extracting valuable information, and analyzes it in context.
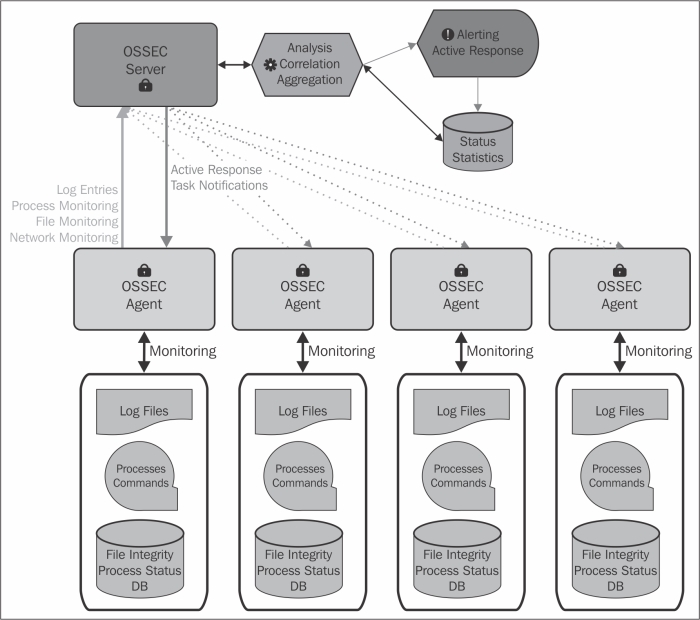
As the previous diagram shows, the analysis and correlation is used to generate alerts, either e-mails or logs, or active responses. Active response is a simple framework for running a script or program within the context of the alert. Using active response, we can call a firewall script with the source IP that just failed to log in to our server via SSH.
The functionality of the local profile is identical to that of the server-agent model, except all components function locally. Let's start out with a simple local profile installation.
To install OSSEC from source, you will need only a C compiler available on the system and the superuser access. OSSEC does not require any external libraries and builds its own self-contained binaries to avoid corruption or deception should your server be compromised.
Generally, most Linux/BSD operating systems ship with or have a C compiler available. It's usually the GNU C compiler (GCC). If GCC isn't already installed, you can simply consult your system's package manager to install it on any Linux- or BSD-based systems.
Now the only thing left to prepare is downloading and extracting the source tarball. You can retrieve the proper archive file from http://www.ossec.net/?page_id=19. Download the latest stable release, extract it, and change its directory into the folder created for extracting the archive.
OSSEC developers provide a wrapper script to encapsulate the configure, build, and install process into a single, prompted installation. The installation is guided, but we can look at a few important prompts along the way:
To get started, run the installation script with superuser privileges as follows:
$ sudo ./install.shThe first important question is what type of installation we will be performing:
1- What kind of installation do you want (server, agent, local, hybrid or help)?The simplest configuration is the
localprofile. This configures OSSEC as a standalone daemon analyzing and correlating only locally to this system. It's a good starting point to get familiar with OSSEC.After a few simple questions, check for a prompt asking which analyzers to enable:
3.2- Do you want to run the integrity check daemon? (y/n) [y]:The integrity check daemon monitors your critical files and binaries for changes. This is usually referred to as file integrity monitoring or FIM.
3.3- Do you want to run the rootkit detection engine? (y/n) [y]:The rootkit detection engine is a combination of signature- and anomaly-based checks to discover the presence of popular or yet-to-be-discovered rootkits on Linux/BSD systems. It looks for out-of-place or hidden files and strange-network behavior.
3.4- Do you want to enable active response? (y/n) [y]:Active response provides a functionality to run scripts when alerts are triggered. This feature provides the capacity for OSSEC to move beyond a detection system into a prevention system. There are a few tested responses that come standard with OSSEC.
- Do you want to enable the firewall-drop response? (y/n) [y]:If you have an active response enabled, OSSEC ships with a firewall-drop response that works on almost every operating system, without modification, and creates a firewall rule to drop traffic coming from IPs identified by the rules as attackers.
- Do you want to add more IPs to the white list? (y/n)? [n]:If you have the firewall-drop response enabled, you'll be prompted to create a whitelist of IPs that will never be blocked by the active response system. If you have networks or IPs that you'd prefer not to be blocked, you can configure them here. Generally, critical systems should be excluded: DNS servers, LDAP servers, and mail servers. Without this protection, OSSEC may interrupt key communication channels during an attack. If you selected yes, use spaces to separate IPs and/or networks in CIDR notation, for example:
- IPs (space separated):
 192.168.0.0/23 10.0.0.0/8 1.2.3.4
OSSEC will now be built based on your answers to questions and information attained through the build tools on your system. If everything goes successfully, the last message you see should look something similar to the following:
Installation Completed.
If you don't see this message, check the error message and correct the issue. OSSEC is designed to build without external libraries but failures will occur if there's no C compiler found.
So, what just happened? There's a lot of output, so let's cover the highlights. The script configures and builds the OSSEC binaries. Once the compilation has completed, the OSSEC users and groups are created on the system if they do not exist. The OSSEC installation directory is created, and the binaries and configuration files we complied are copied into their permanent location on the filesystem. The script then verifies and repairs permissions in the OSSEC installation directory to ensure a working installation. If everything completes successfully, the last step starts the OSSEC daemons and begins analyzing your logs.
It's important that system administrators are aware of the user and group creation as they might be utilizing configuration management software and may wish to create the users and groups prior to running the installation script. The users created are:
ossec: This is the default OSSEC userossecm: This is the OSSEC mailer daemonossecr: This is the OSSEC remote daemon
A single group named ossec containing all these users is also created.
The end result of the process is a default configuration of OSSEC. By now, OSSEC is already gathering log data and analyzing your filesystem.
Congratulations! You just installed, configured, and started OSSEC to protect your server. An excellent first step in the mastery of OSSEC! You might also be thinking that there is a lot of work to run this setup process on each server, and you're right. It's not always desirable or possible to perform source installs on every server in your network. Luckily for us, there's a speedier way!
On most production systems, a C compiler may not available. Don't worry, it is still possible to deploy it on these systems without requiring administrators to install hefty development packages.
OSSEC provides a binary installer for Windows on the Downloads page (http://www.ossec.net/?page_id=19) of the site. This is an agent-only binary, so you will still require a Linux/BSD server to manage any Windows agents.
For Linux systems, there are two major package managers, RPM and APT. Distributions based on Red Hat use a binary package called an RPM. Atomicorp provides a handy installer for their nicely packaged OSSEC RPMs, which you can install using the following command on your Red Hat server:
$ wget -q -O - https://www.atomicorp.com/installers/atomic |sudo sh
After that, you'll be able to install the OSSEC server or agent through yum:
$ sudo yum install ossec-hids-server
Or for a client install, use the following command:
$ sudo yum install ossec-hids-client
If you intend to install it on a Debian-based Linux distribution, Nicolas Zin has packaged OSSEC for Ubuntu. His work is available at the following link:
https://launchpad.net/~nicolas-zin/+archive/ossec-ubuntu
Follow his instructions to enable the source in APT. Install OSSEC server by running the following command:
$ sudo apt-get install ossec-hids-server
Or for a client install, use the following command:
$ sudo apt-get install ossec-hids-agent
Integrating the deployment of OSSEC into your organization's configuration management solution is much easier with binary packaging. Servers receiving a binary package do not require a C compiler to be installed. This often fits within the organization's requirements to remove unnecessary software from its infrastructure.
Even though OSSEC may already be running, we need to make sure that we configure our installation to start during the operating system's boot sequence. This step varies depending on the operating system you're running. The easiest way to start OSSEC on Linux/BSD is to add the /var/ossec/bin/ossec-control start command to the /etc/rc.d/rc.local file, which is executed at boot.
If you've chosen the binary package install, chances are that the package provides an initialization script for your operating system. Most modern systems use an initialization script usually installed as /etc/init.d/ossec-hids, and the following commands will enable it:
Red Hat-based:
/sbin/chkconfig ossec-hids onDebian-based:
/sbin/update-rc.d ossec-hids defaults
The Microsoft Windows binary installer configures OSSEC to run at startup, so no additional steps are necessary.