
Lync Phone Edition uses digital certificates during the log-on phase to initialize the connection with the Lync Server. The next step for the logon with a desk phone will be to verify the user with a password (or PIN) authentication. In our deployment, we usually have certificates that come from more than one Certification Authority (CA), including internal and third-party CAs. The scenario becomes increasingly complex if we are going to use a CA for Exchange Server that is different from the one we used for our Lync Server certificate. Lync Phone Edition usually has a limited number of embedded root CA certificates that are already trusted. The list is available in the Trusted Authorities Cache paragraph in the TechNet post, Certificates for Lync Phone Edition found at http://technet.microsoft.com/en-us/library/gg398270(v=ocs.14).aspx. We have to work with the Certificate Provisioning Service to deploy additional root CA certificates.
We will use a Lync Standard Edition certificate issued from an internal CA as an example. Kevin Peters did a good job explaining the process for Lync Server 2010 at http://ocsguy.com/2012/05/19/lync-phone-edition-connection-to-microsoft-exchange-is-unavailable/. We have to follow the same steps for Lync Server 2013.
Open MMC, navigate to Add or Remove Snap-ins, and add Certificates.
Select Computer Account and go to Local Computer, and then click on Finish.
Navigate to Certificates (Local Computer) | Personal | Certificates and select the server certificate.
Go to Certification Path and select the root CA, as shown in the following screenshot:
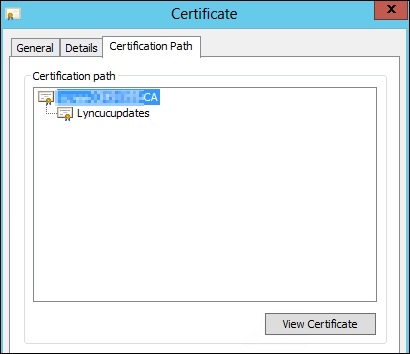
Select the Details tab and go to Thumbprint. Copy the thumbprint value (Ctrl + C).
Paste the value in the notepad, remove the empty spaces, and copy the new value.
Launch the Lync Management Shell and type
$cert = New-CsWebTrustedCACertificate -Thumbprint "Thumbprint" -CAStore TrustedRootCA.The thumbprint is the value we copied at step 6. For example, consider the following:
$cert = New-CsWebTrustedCACertificate -Thumbprint "7a06f5b75287f17d4596118418b77004b4cd4d92" -CAStore TrustedRootCA
Set-CsWebServiceConfiguration -TrustedCACerts @{Add=$cert}Use the following cmdlet to verify that the thumbprint has been added to the
TrustedCACertsparameter:Get-CSWebServiceConfiguration
Repeat the preceding steps for all the intermediate and root CA required in our deployment.
The desk-phones configuration works on the parameters received from the Dynamic Host Configuration Protocol (DHCP) server. In particular, options 43 and 120 define the path to the Certificate Provisioning Service on the Lync Server. The steps in this recipe are also required to enable the desk phone to open the necessary URI.
Note
For a deep dive into desk-phone configuration, a blog post from Jeff Schertz is definitely a must read. The Configuring Lync Server for Phone Edition Devices post found at http://blog.schertz.name/2010/12/configuring-lync-server-for-phone-edition-devices/ contains a complete overview of the parameters required to make Lync desk phones work in a smooth manner.