
Before we start, please make sure you have checked the following checklist:
Make sure you have sufficient disk space available for your repository on the server where Veeam Backup & Replication v7 is being installed.
Download the latest version from www.veeam.com; you will need to register an account to download, but this also gives you a 30-day trial version to play around with. At the time of writing, v7.0.0.690 is the current version. Before installing, you should always check for updates or hotfixes, and you can do so easily by visiting http://www.veeam.com/patches.html.
The download comes as a
.isofile, essentially a disk image, which you need to mount to be able to access the installer. Since we are installing on a Microsoft Windows Server 2012 R2 server, all you need to do is to double-click on the downloaded ISO file to mount it.
Thankfully this is a pretty standard Microsoft Windows-based installation procedure, so most steps will be familiar to anyone who has installed software on Microsoft Windows already.
Once downloaded and mounted on your server, perform the following steps to install:
Open the drive that contains the mounted ISO file.

Click on Install under Veeam Backup & Replication to get started. The Veeam Backup & Replication welcome screen pops up; click on Next to continue, and accept the license agreement on the following screen. Click on Next again to continue.
Now we need to provide a valid license file. If you have a license file available, browse to it now and add it. If you don't have one, don't worry, you can still install it, but it will be limited to operating in free mode until you provide one. Note that if you have a valid license, you can always log into www.veeam.com and request that a new copy to be e-mailed to the support contact.

The next step is to select which components you want to have installed. The default option of installing Veeam Backup & Replication and Veeam Backup Catalog is fine. The Veeam Backup & Replication PowerShell SDK is only needed if you want to use the same server as an entry point for the PowerShell scripting of Veeam.
The installer then proceeds to do a system configuration check, where it checks if the prerequisites have been met. Thankfully, the installer is pretty clever, and if anything is missing, it will notify you and install the required components directly from the installer.
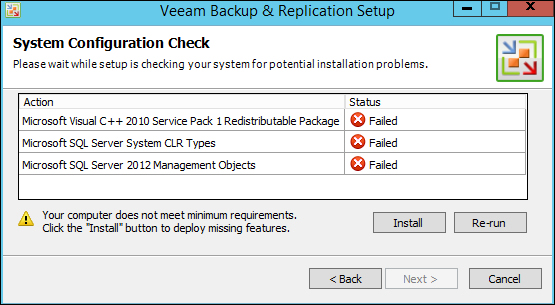
Click on Install to install the missing components.
The next step is to define a user account that the Veeam Backup & Replication services run, which is usually referred to as a service account. During setup, it is recommended to use an account that has local administrator permissions on the Veeam backup server. Note that this user also needs to have database owner rights on the Veeam database, and it is especially important to note if you are planning on using an external SQL server instance for Veeam Backup &Replication. The user account also requires full-control NTFS permissions on the catalog folder (repository) on the Veeam Backup & Replication Server. For details on the required permissions for the different components, visit http://helpcenter.veeam.com/backup/70/vsphere/required_permissions.html.

In this setup, I'm using a domain administrator account, but in real-world scenarios, a dedicated service account should be created in the Active Directory before running the installer, and that user should be assigned during the installation. Note that this is not necessarily the same account which will be communicated to vCenter or the ESXi hosts. That is a designated account setup after the install.
Now we need to select a SQL Server instance. My lab setup runs using a local SQL Server instance that the installer sets up during installation, but if you want to use an external SQL Server instance, now is the time to provide its details. For large enterprise environments, having an external SQL Server instance is highly recommended, whereas for smaller setups and test environments, the locally installed instance would do.

Once that part is done, continue the installation by yet again finding the Next button.
The next screen shows the Veeam Backup & Replication TCP/IP port configuration; if required in your environment, these can be changed but for most installs, the default ports are fine. There is only one step left now before the installation starts. Clicking on the Next button moves us along to the Directory Configuration screen.

This step lets you configure the location for the vPower NFS root folder, which is used when mounting VM disks from backup for restore processes, and the Guest file system catalog, which is used for indexing of backed-up files inside the VMs. A dedicated, minimum 10 GB space for vNFS is recommended. In my environment, I have used a dedicated volume that has 50 GB storage space for this purpose. And that's it; the install is now ready to start with the installation of a local MS SQL Server 2008 R2 Express instance. If you are using, as recommended, a special service account for Veeam, make sure that the user account has Full Control permissions for the folders.

Review the setup, and click on Install for the installation to start.
Next, we need up is to upgrade Veeam Backup & Replication to the latest R2 version, which is required for Microsoft Windows 2012 R2 and vSphere 5.5 support. Make sure you visit http://www.veeam.com/patches.html for the latest releases and patches before installing.
For now, the R2 version comes as a separate download from www.veeam.com, which needs to be installed after the main v7.0 installation is done. R2 is a patch release, and Veeam has not yet provided an ISO download that has this update included in the installation media. Thankfully updating to R2 is simple. Run the R2 upgrade file,
veeam_backup_7.0.0.764.R2_setup.exe, and it will upgrade to 7.0 Cumulative Patch 2 without any input required at all.
Finally we have Veeam Backup & Replication installed and patched with the latest update. Start Veeam Backup & Replication from the icon on the desktop, or from the start menu, and on the first run after running the patch, the Components Update screen appears. Click on Next to update the installed components to the new versions included in R2.

Let the installer work its magic and upgrade the components to the latest version by clicking on Next, and you should be ready to go!
By default, Veeam Backup & Replication creates a backup repository at C:\backup.The first thing we need to do is to change that and make sure the repository is stored on a volume with enough free space. Perform the following steps for configuring a repository:
Click on Backup Infrastructure to bring up the configuration pane. Right-click on the right-hand side pane and select Add Backup Repository. This brings up the New Backup Repository configuration window.

Give the repository a name and click on Next. Since this is a Microsoft Windows server, go with the default Microsoft Windows Server option and click on Next. The next screen configures which server the repository resides on; since this is on the local server, the default of this server is fine. Click on Next.

Now we can specify the location of the repository. Click on Browse to pick a location; in my case, I have a dedicated volume for this backup repository (
G:\), which has a folder on it calledBackup. For larger setups and environments, you might want to name the folder something less generic. The folder naming is entirely up to you, so choose something that makes it easy to identify in your environment. Select your desired backup repository location, and as the rest of the default settings are ok, so click on Next.The vPower NFS setup is the next step; the settings we selected during the initial installation still apply, so the default options here are fine. Click on Next to advance to the review screen.
Go over the review screen to make sure everything is correct, and click on Next to create the repository. The new repository is created, and we can now delete the default one to make sure that the
C:\volume on the server doesn't get filled with backup data. As we all know, a Microsoft Windows server with a fullC:\drive is not a happy server, so changing this location is a very good idea.Before we can remove it, we need to move Backup & Configuration (configuration backup) as well, as this by default is located in the default backup repository. To do this, select the configuration backup option from the menu, and change the backup repository from the default to the newly created one. Once that is done, right-click on the Default Backup Repository and select Remove.
Click on Yes on the pop up to remove it. New configuration backups should now be directed to the new backup repository along with other backup jobs that we configure later.
Now we can connect to our VMware vCenter and configure up backup jobs! Click on Virtual Machines and then on Add Server. A new window appears, where you can select the type of server you want to register with Veeam Backup & Replication. Select VMware vSphere, and enter your vCenter fully qualified domain name (FQDN) or IP address.

Next up is your VMware vCenter credentials. Click on Add…, enter your details, and click on Next to continue. The credentials vary from environment to environment, so if you are unsure which credentials to use, contact your VMware administrator, but vCenter administrator access is required. It is recommended that you create and use, a dedicated Veeam Backup & Replication user account for this. Once the connection is successful, a summary screen appears, and you can finish the configuration. You can now expand VMware vSphere and see your vCenter and its clusters, hosts, vApps, and VMs directly in the Veeam Backup & Replication console.

And that's it! You now have a working Veeam Backup & Replication v7 installation set up, which is connected to your vSphere infrastructure and is ready for the configuration of new backup jobs.