
Your organization might want a high availability robust setup that can serve many users. This means you might need more than one GIS server on your Server site. You may want a dedicated Web server that you can configure so that you can publish your services on the public World Wide Web more securely. This requires applying security measures, network load balancing (NLB), or failover clusters. The Production Installation Track equips you with necessary knowledge, tools, and best practices to ensure a stable production setup. You can also use this track for your preproduction testing environment, where you can simulate your setup in a virtualized environment and then replicate the installation on the actual production environment. If you are planning to use virtual machines, you can read through the Virtualized Environment Installation Track section to learn how to set up a virtual machine for Server.
Note
Active Directory Domain Controller (ADDC)
ADDC is required to perform this installation.
NLB
NLB is the ability to balance network traffic between two or more nodes by using a virtual address.
Failover cluster
Also known as a high available cluster, a failover cluster is a group of servers arranged together to provide minimum downtime. If a server is down, another server from the cluster takes over.
Unlike Testing Installation Track, you need at least three servers for the Production Installation Track. The following is the configuration I will be using in this track:
|
Machine Name |
Operating System |
Description |
|---|---|---|
|
|
Windows Server 2008 R2 SP1 x64 |
Web Server and Configuration Store |
|
|
Windows Server 2008 R2 SP1 x64 |
First GIS server |
|
|
Windows Server 2008 R2 SP1 x64 |
Second GIS server |
You may create virtual machines to mimic the three servers; refer to the Virtualized Environment Installation Track section to learn how to create the virtual machines.
We will require one Web server and two GIS servers running any of the following operating systems:
Windows Server 2012 Standard and Datacenter (64-bit EM64T)
Windows Server 2008 R2 Standard, Enterprise, and Datacenter (64-bit EM64T) SP1
Windows Server 2008 Standard, Enterprise, and Datacenter (64-bit EM64T) SP2
Windows Server 2003 Standard, Enterprise, and Datacenter (64-bit EM64T) SP2
Esri no longer supports Windows Server 2003. Even if you manage to get it to work, I strongly recommend upgrading to Windows 2008 or later.
ArcGIS for Server requires a 64-bit instruction-set CPU in order to run. Your Server can run effectively on a quad-core 64-bit processor with minimum 8 GB of RAM. Although, as services and users increase, the 8 GB will be drained quickly. A 16 GB RAM GIS server can serve up to 100 users if you were planning to have five services on one GIS server. You can replace that GIS server with two 8 GB RAM as well. I have developed a rule of thumb to determine how much memory you require for each GIS server.

Here, the variables represent the following values:
|
Variable |
Description |
|---|---|
|
R |
RAM in Gigabytes |
|
S |
Maximum number of services anticipated |
|
U |
Maximum number of users expected (non-concurrent) |
|
G |
Number of GIS servers on the site |
As we can see from the previous table, R is the minimum amount of memory in a single GIS server to make an optimal setup, S is the number of web services you are planning to have, U is the maximum number of users you expect, and G is the number of GIS servers that will split the load. If you would like to learn more, you can read through Appendix A, Selecting the Right Hardware, where I explain this formula thoroughly; there are also some tips on which hardware is best for your production environment.
To install Server, we will first start with configuring Active Directory. Then we will install the first GIS server and then configure the Server site. After that, we will install the second GIS server and join the existing Server site, and we will finish by installing and configuring the dedicated web-server using the Web Adaptor.
Note
Web Adaptor
A Web Adaptor is a bridge that integrates your dedicated Web server with the built-in Web server of ArcGIS for Server. It allows packets to be forwarded between the two web servers.
Active Directory controls the security and policies of all Windows users, and it is very effective for ArcGIS for Server. Using Active Directory, create YOURDOMAIN\arcgis.server on your domain—I will be using the GIS domain. To add the user to active directory, open Active Directory Users and Computers by navigating to Start | Control Panel | Administrative Tools | Active Directory Users and Computers. After that, perform the following steps:
In the console tree, right-click on the folder to which you want to add a user account.
Navigate to Active Directory Users and Computers | domain node | folder.
Click on New, and then click on User.
In the First name field, type the user's first name.
In the Initials field, type the user's initials.
In the Last name field, type the user's last name.
Modify the Full name field to add initials or reverse order of first and last names.
In User logon name, type the user's logon name, click on the UPN suffix in the drop-down list, and then click on Next.
In the Password and Confirm password fields, type the user's password. You will use this password for GIS server installation later.
Now, we need to add GIS\arcgis.server to the administrators group on the three servers WEB SERVER01, GIS-SERVER01, and GIS-SERVER02.
Log in to the server with an administrator user.
From the Start menu, click on Run and type
compmgmt.mscto run Computer Management.Go to Local Users and Groups.
Click on Groups.
Double-click on Administrators.
Click on Add and then type in your domain user
GIS\arcgis.server.
Perform these steps on all three of your servers.
There are two installation steps. Master server installation is where we will create our Server site. The secondary installation is to join the rest of the servers to this master installation site.
Log in to the master GIS server GIS-SERVER01 with the user ID GIS\arcgis.server; this is a very important step for your site to be added to Active Directory.
Note
If you used another local user profile to perform the installation, you will end up with an inconsistent setup.
Run the ESRI.exe file and select the ArcGIS for Server setup. If this is a new installation, you will be prompted to install one component (GIS Server) as explained in the Testing Installation Track section. Installing this component will turn your server into a GIS server. This server is bundled with a built-in Web server running on port 6080; make sure that the subfeature .NET Extension Support is selected for installation and then click on Next.
The hosted services on your server require a Windows account so that they can run silently on your GIS server. We will use our domain user GIS\arcgis.server. In the ArcGIS Server Account field, type GIS\arcgis.server, and in the Password and Confirm Password fields, enter the user's password, then click on Next.
Note
You have already created the user GIS\arcgis.server in Active Directory. Therefore, you should specify the password you used while creating the user.
Since we are going to set up another GIS server in exactly the same way, we will export this configuration, which includes the ArcGIS for Server Windows account information. Select Export configuration file and choose where you want to save it. Give it a name that corresponds with YOURDOMAIN.arcgis.server.xml, just so you know that this configuration file is associated with the Windows domain user arcgis.server. I named mine GIS.arcgis.server.xml.
Now that all files are copied, authorization is required to fully complete your GIS server setup. Follow the steps to authorize the product if you have the license file. You are now ready to start configuring ArcGIS for Server.
This account is running five processes. These processes will increase as you start authoring services.
Now that the software is up and running, we will create our Server site to hold the configurations. Since we still haven't installed our Web server, we will temporarily connect to the built-in Web server to set up our Server site. Open Chrome and type this in this address: http://GIS-SERVER01:6080/arcgis/manager.
Tip
Best practice
Using the IP address increases network performance by slightly more than 10 percent because it saves your network the trouble of resolving the machine name to the IP address. However, for demonstration purposes in this book, I will be using the machine name instead.
This is ArcGIS for Server Manager, a website hosted on the built-in Web server running on port 6080 used to manage the Server site. It is recommended that you bookmark this page because you will be visiting it frequently. If this is the first time you visit this page after a fresh installation, you will be prompted with a message:
This machine does not currently participate in an ArcGIS Server site. You can either create a new site or join an existing site.
Since we do not have an existing Server site anywhere in our network, we will create a new one. Click on Create New Site.
Any Server site needs to have an administrator, the Primary Site Administrator, who has the privileges to manage the site configuration, and whose credentials must be entered to log in to the site. This is not a Windows account like the one we configured earlier. Type siteadmin as the name of the administrator account in the Username field. Then type a new password in the Password and the Confirm password fields, and then click on Next. This will create the Primary Site Administrator with the specified credentials.
The directories and the configuration store of the site are a crucial part in the ArcGIS for Server setup. As explained earlier, those directories are accessed by the GIS servers, so they have to be available at all times. The best way to ensure that is to have Network Attached Storage (NAS) set up on your network and create all your directories on. If you don't have a NAS server, you can use any other server for storage. In this case, we will use the Web server as it is a highly available server and it is less likely to go down, unlike the GIS servers.
Note
NAS
NAS is a data storage computer that provides file-level access to a network by a group of nodes.
One of the problems I faced with a client was that the load balancing between GIS servers was not working. The reason was that they were using one of the GIS servers as the configuration store. When they took that particular server out of the network for maintenance, the other GIS servers didn't take over because the configuration store and all the directories are no longer accessible by the other GIS servers.
Tip
Best practice
Do not use any of your GIS servers as a configuration store since they are highly likely to go down, thus bringing all of your architecture down as well. You will also not be able to take down that server from your site for maintenance.
In this exercise, we will use the Web server as our configuration store. Log in to your Web server WEB SERVER01 using the GIS\arcgis.server Windows account. Go to the C drive and create a folder named arcgisserver. Share this folder and give it read/write to the GIS\arcgis.server domain user.
Go back to the installation, In the Root Server Directory field, type the path \\WEB SERVER01\arcgisserver\directories, and in the Configuration Store field, type \\WEB SERVER01\arcgisserver\config-store. Click on Next.
Note
Since the user GIS\arcgis.server has read/write access to the folder \\WEB SERVER01\arcgisserver\directories, the GIS server will be able to access it as well.
Now, you are ready to create the master Server site. A summary of your configuration will be displayed; click on Finish. This takes a few minutes to get done.
Now that the master Server site is created, it is ready to be joined by other GIS servers. It is important to understand that the master site is not located on GIS-SERVER01; rather, it is located in the configuration store which in turn is located in the arcgiserver directory on the WEB SERVER01 machine.
Note
The Server site is mistaken to be located on the master GIS server; in fact, it is saved in the configuration store.
Log in to the secondary GIS-SERVER02 machine using the GIS\arcgis.server Windows account and follow the same steps you performed in the master installation. Install GIS server and make sure .NET Extension is selected. This will install the GIS server component along with the Web server running on port 6080.
When you reach the Specify ArcGIS for Server Account form, copy the configuration file GIS.arcgis.server.xml we created previously into this machine, and select it so you don't need to re-enter the GIS\arcgis.server account. Continue the installation and authorize your server; click on Next to start configuring the site.
Remember, we do not need to create another Server site since we have an existing one. All we need to do is to configure the built-in Web server of GIS-SERVER02 to point to our existing master site. Open Chrome, type http://GIS-SERVER02:6080/arcgis/manager in the address bar and press Enter.
This is your Server site Manager; you will be prompted with this message: This machine does not currently participate in an ArcGIS Server site. You can either create a new site or join an existing site. We do have an existing site, so click on Join an Existing Site.
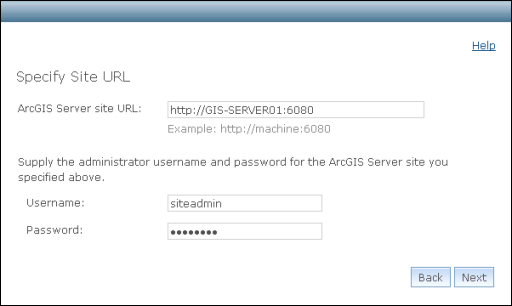
In the Specify Site URL form, enter the master site address http://GIS-SERVER01:6080 in the ArcGIS Server Site URL field; in the Username field, enter siteadmin, the primary administrator name, and in the Password field, enter the password for siteadmin; then click on Next.
After you complete this successfully, you will have one site with two GIS servers ready to crunch services. You can manage this site by accessing any of the GIS server built-in web servers using any one of the following URLs:
http://GIS-SERVER01:6080/arcgis/managerhttp://GIS-SERVER02:6080/arcgis/manager
What if you want to join a third machine? Which URL should you use, GIS-SERVER01 or GIS-SERVER02? The answer is that any will work, because both are joined to the same site.
Now that you have finished your GIS server installation, you need to reinforce some access-management policies and control who can access what. To do that, the built-in web servers on your GIS servers are not enough; you need a dedicated Web server. It is not recommended that you install the Web server on the same machine as the GIS servers. GIS servers have high affinity, they consume a large portion of memory and CPU, and they are highly likely to go down. GIS servers are subject to regular maintenance, which means they have to be restarted from time to time, especially to install software updates or patches. If the machine hosting both the GIS server and Web server goes down for any of those reasons, your entire architecture will collapse. The rest of the GIS servers will be rendered useless since your users can no longer access the Web server that directs the traffic. While it is on a dedicated server, in-case one GIS server fails, it will re-route user traffic to the next available GIS server.
Tip
Best practice
Never install your Web server on a machine running as a GIS server, always use a dedicated machine as your Web server.
Even on a dedicated machine, a Web server might still go down. To prevent this, you may install an NLB node with two web servers instead of one.
You have your own Web server software (IIS), and ArcGIS for Server has its own 6080 Web server; we need a way to make these two understand and forward information to each other. For that, we will install a Web Adaptor. You can install as many Web Adaptors as you want, thus creating different websites to be managed independently.
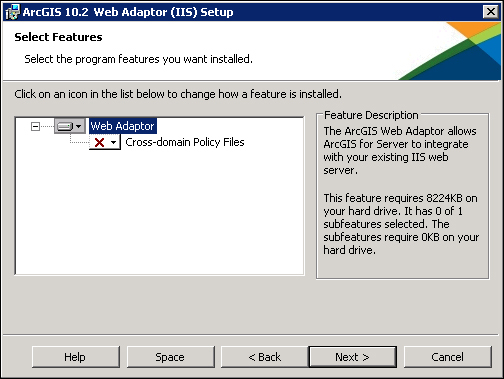
You can now log in to WEB SERVER01 using the GIS\arcgis.server Windows account. From your ArcGIS for Server media disk, run ESRI.EXE and select ArcGIS Web Adaptor (IIS). If you do not have IIS installed on your machine, the software will do it for you. This is valid when you have ArcGIS for Server 10.1 SP1 or higher; otherwise, you have to install IIS manually. In the Select Features options, make sure Cross-Domain Policy Files is unchecked.
Note
Cross domain
Cross-domain policy is the behavior by which a web application running on machine "A" requests information from another machine "B". This can introduce various security vulnerabilities. Esri doesn't mention this, but enabling cross-domain policy files opens a security flaw on your server; if you do not have a good reason to enable it, keep it disabled.
Esri recommends enabling cross-domain policy because Silverlight and Flex viewers need it in order to function. Since we will use neither in our exercises, you will not need this option as shown in the following screenshot:
Click on Next to view the next form, where you will configure the virtual directory for your Web Adaptor.
Tip
Best practice
Enabling Cross Domain Policy Files on the Web server allows attackers to inject harmful code using Cross Side Scripting (XSS) on websites hosted on the Web server, which might allow them to send and receive sensitive information from a remote server.
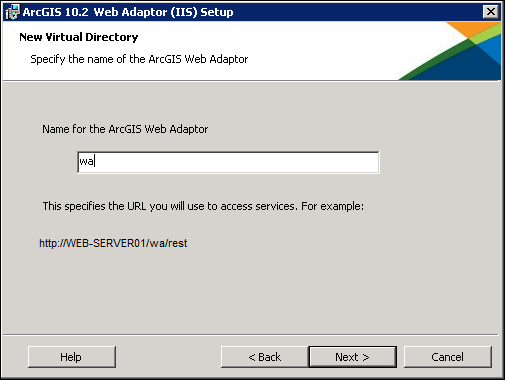
The Web Adapter will create a new virtual directory on your Web server, and all your services will go under this directory. In the New Virtual Directory form, type wa—short for Web Adaptor—in the Name of the ArcGIS Web Adaptor field, and then click on Next.
Now that the Web Adaptor is installed, we need to join it to the Server site. Launch Chrome and type this address in the address bar: http://WEB SERVER01:6080/wa/webadaptor.
Starting with 10.2, the Web Adaptor is used to configure
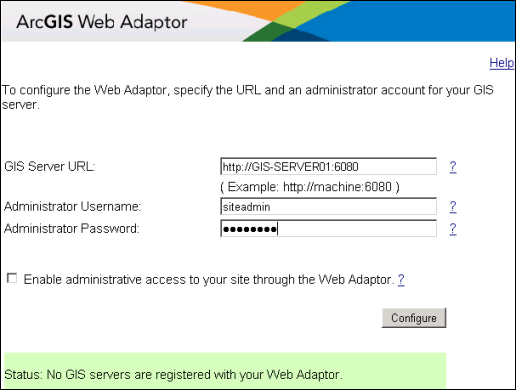
Portal for ArcGIS, another product Esri is currently focusing on along with ArcGIS for Server. This is why you will be prompted to select which product you want to configure; select ArcGIS for Server and click on Next. You will be prompted to join the web adaptor to the Server site. Here, we need to specify a URL that will point to our master Server site. In our case, both http://GIS-SERVER01:6080 and http://GIS-SERVER02:6080 point to the same site; therefore, using any of them will work. In the GIS Server URL field, type http://GIS-SERVER01:6080; in the Administrator Username field, type siteadmin, which is the site primary administrator; and in the Administrator Password field, type the password. Click on Configure.
Make sure the Enable administrative access to your site through the Web Adaptor checkbox is unchecked. It is recommended that you disable end users to have access to the site manager and change site configurations. We will separately create another adaptor especially for administrators.
Once you click on Configure, and you will get the following message:
The following GIS Servers are registered to your Web Adaptor
GIS-SERVER01
GIS-SERVER02
Your end users can now access the GIS servers through the Web server with the URL http://WEB SERVER01/wa/rest/services. They do not need to worry about port 6080, and they need not know your GIS servers. Note that when you try to access the manager with the URL http://WEB SERVER01/wa/manager, you will get this error message:
Administrator access is disabled.
Please contact your system administrator to enable it.
You can optionally configure a dedicated web adaptor with administrative access.
Follow the same steps as in the Configuring the end user Web Adaptor section and give the adaptor the name waadmin. In the last step, just enable the administrator for this site. Try to access the manager via http://WEB SERVER01/waadmin/manager.
You just completed a full-fledged robust installation of ArcGIS for Server.