Book Image

Raspberry Pi 2 Server Essentials

By : Piotr J Kula
Book Image

Raspberry Pi 2 Server Essentials

By: Piotr J Kula

Overview of this book

There’s no end to what you can do with a Raspberry Pi – it makes a huge range of tech projects possible. This book shows you how to transform it into a multipurpose web server, able to store and manage resources that lets you build some truly innovative and impressive computing creations. You’ll learn how to use your Raspberry Pi 2 to host a website using a range of different languages, host a game server, store files, and run everything from a media center to a cloud network. If you want to take control of your technological world, start building your own server and find out what’s possible with the Raspberry Pi microcomputer. Begin by getting your Pi set up – follow each step as the book shows you how to prepare a network and configure the additional features that you’ll need to build your projects. Once you’ve done this you’ll dig a little deeper and set up your pi as a file server, making sure it’s built for speed using a range of different tools, including Python, Node.js and ASP.NET. Following this the book shows you how to extend your server to allow you to host games, and stream live HD video before customizing it even further to create a fully-fledged media center. It doesn’t stop there however – the book then dives into the exciting world of the Internet of Things (IoT). You’ll learn how to install Windows IoT onto your Raspberry Pi, the operating system that’s driving embedded software projects all around the world. Once you’ve done this you’ll be ready to explore IoT further, as the book shows you how to use your device to host a cloud network that can form the basis of a wider IoT project.
Table of Contents (19 chapters)
Raspberry Pi 2 Server Essentials
Credits
About the Author
About the Reviewers
www.PacktPub.com
Preface
Index

Local Area Network (LAN)


Using the standard Raspbian package, both essential and non-essential drivers are included. All essential drivers are loaded and some non-essential ones are as well.

We will start by plugging in a network cable between the Raspberry Pi and the router provided by your ISP. By default, your router has a DHCP server that automatically assigns an IP address to your Raspberry Pi.

You may also use network switches to make a more complex network but because the Raspberry Pi has a 100 megabit network port, it may downgrade your entire network to 100 megabits. Some switches can negotiate separate connections to lower speed interfaces without downgrading the entire network, but you need to consult the specifications of the device in order to do this.

To check whether your LAN is up and running, just type ifconfig, and you will get text containing your current settings:

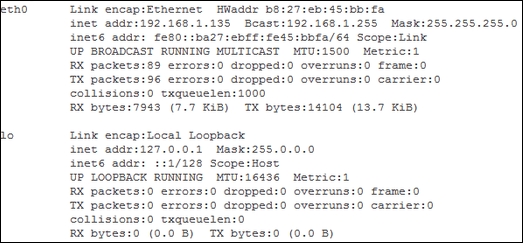
Let's try to understand the different keywords from the preceding output:

  • HWaddr: This is your Pi's MAC address...