Book Image

Learning Continuous Integration with Jenkins

By : Nikhil Pathania
Book Image

Learning Continuous Integration with Jenkins

By: Nikhil Pathania

Overview of this book

In past few years, Agile software development has seen tremendous growth across the world. There is huge demand for software delivery solutions that are fast yet flexible to frequent amendments. As a result, CI and continuous delivery methodologies are gaining popularity. Jenkins’ core functionality and flexibility allows it to fit in a variety of environments and can help streamline the development process for all stakeholders. This book starts off by explaining the concepts of CI and its significance in the Agile world with a whole chapter dedicated to it. Next, you’ll learn to configure and set up Jenkins. You’ll gain a foothold in implementing CI and continuous delivery methods. We dive into the various features offered by Jenkins one by one exploiting them for CI. After that, you’ll find out how to use the built-in pipeline feature of Jenkins. You’ll see how to integrate Jenkins with code analysis tools and test automation tools in order to achieve continuous delivery. Next, you’ll be introduced to continuous deployment and learn to achieve it using Jenkins. Through this book’s wealth of best practices and real-world tips, you'll discover how easy it is to implement a CI service with Jenkins.
Table of Contents (15 chapters)
Learning Continuous Integration with Jenkins
Credits
About the Author
About the Reviewer
www.PacktPub.com
Preface
Index

Continuous Delivery in action


Now, we are ready to test our Continuous Delivery pipeline. Let's assume the role of a developer who intends to work on the feature1 branch. Our developer is working on a Windows 10 machine with the following software installed on it:

  • The latest version of Eclipse (Eclipse Mars)

  • Apache Tomcat server 8

  • Git 2.6.3

  • SourceTree

  • Java JDK 1.8.0_60

  • Maven 3.3.9

We won't modify any code in order to trigger our Continuous Delivery pipeline, as in the previous section we made considerable changes to our code base. I guess checking in those changes would be more than sufficient. Nevertheless, you are free to make changes to your code.

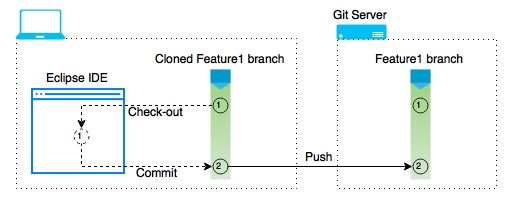
Committing and pushing changes on the feature1 branch

The following figure gives an overview of the operation that we will perform:

Perform the following instructions to commit and push changes:

  1. Open Eclipse IDE.

  2. Right-click on the project payslip and go to Team | Commit…:

  3. In the window that opens, add some comments (as shown in the screenshot) and select...