
Before we look at the various plugins and ways to extend Docker, we should look at what a typical life cycle of a container looks like.
Using the example from the previous section, let's launch the official PHP 5.6 container and then replace it with the official PHP 7.0 one.
Before we can launch our containers, we need to get Docker up and running; luckily, this is a simple process.
In the following chapter, we will be getting into bootstrapping our Docker environments using Docker Machine; however, for now, let's perform a quick installation of Docker on a cloud server.
The following instructions will work on Ubuntu 14.04 LTS or CentOS 7 instances hosted on any of the public clouds, such as the following:
Digital Ocean: https://www.digitalocean.com/
Amazon Web Services: https://aws.amazon.com/
Microsoft Azure: https://azure.microsoft.com/
VMware vCloud Air: http://vcloud.vmware.com/
You can also try a local virtual machine running locally using the follow
Vagrant: https://www.vagrantup.com/
Virtualbox: https://www.virtualbox.org/
VMware Fusion: http://www.vmware.com/uk/products/fusion/
VMware Workstation: http://www.vmware.com/uk/products/workstation/
I am going to be using a CentOS 7 server hosted in Digital Ocean as it is convenient to quickly launch a machine and then terminate it.
Once you have your server up and running, you can install Docker from the official Yum or APT repositories by running the following command:
curl -sSL https://get.docker.com/ | sh
If, like me, you are running a CentOS 7 server, you will need to ensure that the service is running. To do this, type the following command:
systemctl start docker
Once installed, you should be able to check whether everything worked as expected by running the Docker hello-world container by entering the following command:
docker run hello-world
Once you have Docker installed and confirmed that it runs as expected, you can download the latest builds of the official PHP 5.6 and PHP 7.0 images by running the following command:
docker pull php:5.6-apache && docker pull php:7.0-apache
For more information on the official PHP images, refer to the Docker Hub page at https://hub.docker.com/_/php/.
Now that we have the images downloaded, it's time to deploy our application as we are keeping it really simple; all we going to be deploying is a phpinfo page, this will confirm the version of PHP we are running along with details on the rest of the containers environment:
mkdir app1 && cd app1
echo "<?php phpinfo(); ?>" > index.php
Now the index.php file is in place. Let's start the PHP 5.6 container by running the following command:
docker run --name app1 -d -p 80:80 -it -v "$PWD":/var/www/html php:5.6-apache
This will have launch an app1 container. If you enter the IP address of your server instance or a domain which resolves to, you should see a page that shows that you are running PHP 5.6:
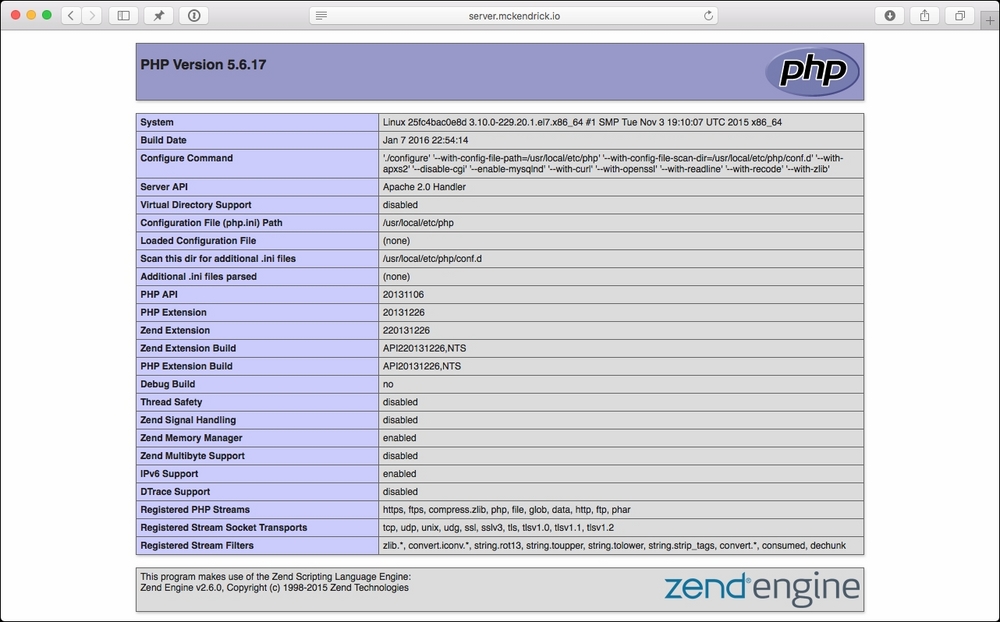
Now that you have PHP 5.6 up and running, let's upgrade it to PHP 7. Traditionally, this would mean installing a new set of packages using either third-party YUM or APT repositories; speaking from experience, this process can be a little hit and miss, depending on the compatibility with the packages for the previous versions of PHP that you have installed.
Luckily in our case, we are using Docker, so all we have to do is terminate our PHP 5.6 container and replace with one running PHP 7. At any time during this process, you can check the containers that are running using the following command:
docker ps
This will print a list of the running containers to the screen (as seen in the screenshot at the end of this section). To stop and remove the PHP 5.6 container, run the following command:
docker rm -f app1
Once the container has terminated, run the following command to launch a PHP 7 container:
docker run --name app1 -d -p 80:80 -it -v "$PWD":/var/www/html php:7.0-apache
If you return to the phpinfo page in your browser, you will see that it is now running PHP 7:

To terminate the PHP 7 container, run the docker rm command again:
docker rm -f app1
A full copy of the preceding terminal session can be found in the following screenshot:

This example probably shows the biggest advantage of Docker, being able to quickly and consistently launch containers on top of code bases that are stored on your local storage. There are, however, some limits.