
So far, all the input to commands has been in the form of parameters, and the output has been either to the console (with write-host), or to the output stream. In this chapter, we will look at some of the ways that PowerShell gives us to work with files. The topics that will be covered include the following:
- Reading and writing text files
- Working with CSV files
- Output redirection
- Reading and writing objects using CLIXML
One method of reading a text file in PowerShell is to use the Get-Content cmdlet. Get-Content outputs the contents of the file as a collection of strings. If we have a text file called Servers.txt that contains the names of the SQL Servers in our environment, we would use the following code to read the file and get the status of the MSSQLSERVER service on the servers. Note that with this code, the file will not contain anything but the server names, each on a separate line with no blank lines:

If you don't want the file to be split into lines, there is a –Raw switch parameter that causes the cmdlet to output the entire file as a single string. As an example, if we have a text file with three lines, we can see the difference between when we use the default operation and when we use –Raw by counting the number of strings returned:

If you want only the beginning or the end of the file, you could use Select-Object with the –First or –Last parameters, but it turns out that Get-Content has this covered as well. To get the beginning of the file, you can use the –TotalCount parameter to specify how many lines to get. To get the end of the file, use the –Tail parameter, instead of the –TotalCount parameter, which lets you specify how many of the end lines to output.
Tip
Reminder!
Always filter the pipeline as early as possible. Although, you could achieve the same thing with Select-Object as you can with the –TotalCount and –Tail parameters, filtering at the source (Get-Content) will be faster because less objects will have to be created and passed on to the pipeline.
There are several ways to write to a text file. First, if you have the entire contents of the file in a variable or as the result of a pipeline, you can use the Set-Content cmdlet to write the file as a single unit. For instance, you could read a file with Get-Content, use the .Replace() method to change something, and then write the file back using Set-Content:

Another useful feature of Set-Content is that you can set the encoding of the file using the –Encoding parameter. The possible values for the encoding are:
- ASCII (the default)
- BigEndianUnicode (UTF-16 big-endian)
- Byte
- String
- Unicode (UTF-16 little-endian)
- UTF7
- UTF8
- Unknown
With all these options, you should have no trouble writing in any format that you need.
Comma-separated value files, or CSV files, are a mainstay of the PowerShell world. In the next two sections, we will see how they are very useful, both as input and as output.
If your workplace is anything like mine, you probably work with people who want reports about what is going on. Writing "real" reports in SQL Server reporting services is an option if your data is accessible to SQL server, but they take a while to write and deploy. Obviously, there are reporting packages that you can use as well, such as Crystal Reports, but they can be expensive and take time to write and deploy a report. Most people in IT, though, are fine with Excel as a document format and can work with the data in Excel to create a report.
Outputting objects to CSV files in PowerShell is very simple. The Export-CSV cmdlet looks at the properties of the first object in the pipeline and creates a CSV file with a header row containing the names of these properties. It writes the values of these properties in successive lines of the file. Since it uses all the properties of the (first) object, you will probably want to "narrow" down the object using Select-Object and the –Property parameter to limit the properties that show up in your CSV file.
For example, if you wanted to create a file with the names and lengths of the files in a folder, you could use the following code:

You can see from the output of the Get-Content cmdlet that there is a line at the top that indicates the type of objects that were output. You can suppress this line by including the –NoTypeInformation switch. You can also see that the column headings and the values are enclosed in quotes and separated by commas. It's possible to change the delimiter to something other than a comma using the –Delimiter parameter, but you don't have the option to suppress the quotes.
You can easily open a CSV file in Excel (or whatever application is associated with CSV files on your system) using the Invoke-Item cmdlet. Invoke-Item performs the default action associated with a particular file. You can think of it as double-clicking on an item in the File Explorer. If you have Excel, the default action for CSV files is to open them in Excel. To easily open the output file we created in the last section, we would use Invoke-Item c:\temp\filelist.csv, and it would pop up looking like a spreadsheet as follows:
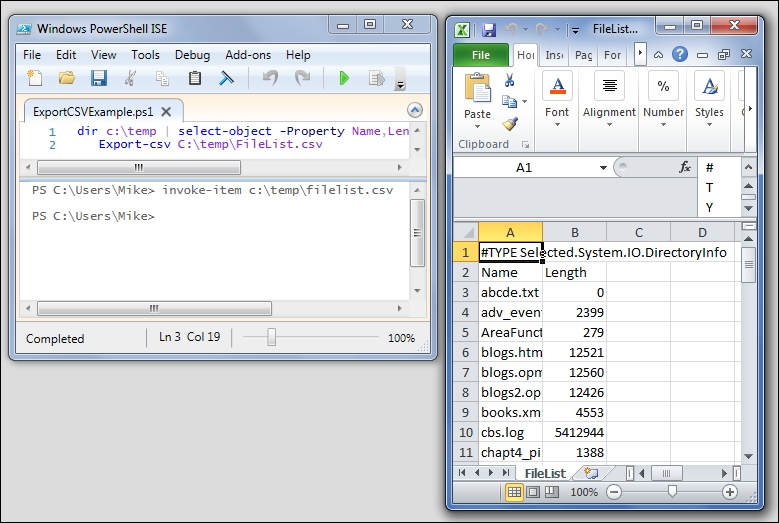
At this point, it can be manipulated just like a normal spreadsheet, so it's easy for people who haven't learned PowerShell yet to work with it.
Since PowerShell cmdlets work on objects, it's convenient to be able to read a file as a sequence of objects rather than as strings, like you would from Get-Content. Just as Export-CSV takes objects and writes them to a file, Import-CSV reads a CSV file and outputs objects with the properties that are named in the header.
An easy example to understand would be a CSV file that contains a server list with the name of each server, as well as the type of the server (Web, Database, or File), and whom to contact, if there are problems with each server:

With this CSV file, we can easily read this into a variable using Import-CSV. As Import-CSV creates objects, we can refer to the rows of this CSV file using properties. Getting a summary of our servers using the Group-Object cmdlet is a simple matter:

Output to CSV for quick reports
If your workplace is anything like mine, you probably work with people who want reports about what is going on. Writing "real" reports in SQL Server reporting services is an option if your data is accessible to SQL server, but they take a while to write and deploy. Obviously, there are reporting packages that you can use as well, such as Crystal Reports, but they can be expensive and take time to write and deploy a report. Most people in IT, though, are fine with Excel as a document format and can work with the data in Excel to create a report.
Outputting objects to CSV files in PowerShell is very simple. The Export-CSV cmdlet looks at the properties of the first object in the pipeline and creates a CSV file with a header row containing the names of these properties. It writes the values of these properties in successive lines of the file. Since it uses all the properties of the (first) object, you will probably want to "narrow" down the object using Select-Object and the –Property parameter to limit the properties that show up in your CSV file.
For example, if you wanted to create a file with the names and lengths of the files in a folder, you could use the following code:
You can see from the output of the Get-Content cmdlet that there is a line at the top that indicates the type of objects that were output. You can suppress this line by including the –NoTypeInformation switch. You can also see that the column headings and the values are enclosed in quotes and separated by commas. It's possible to change the delimiter to something other than a comma using the –Delimiter parameter, but you don't have the option to suppress the quotes.
You can easily open a CSV file in Excel (or whatever application is associated with CSV files on your system) using the Invoke-Item cmdlet. Invoke-Item performs the default action associated with a particular file. You can think of it as double-clicking on an item in the File Explorer. If you have Excel, the default action for CSV files is to open them in Excel. To easily open the output file we created in the last section, we would use Invoke-Item c:\temp\filelist.csv, and it would pop up looking like a spreadsheet as follows:
At this point, it can be manipulated just like a normal spreadsheet, so it's easy for people who haven't learned PowerShell yet to work with it.
Since PowerShell cmdlets work on objects, it's convenient to be able to read a file as a sequence of objects rather than as strings, like you would from Get-Content. Just as Export-CSV takes objects and writes them to a file, Import-CSV reads a CSV file and outputs objects with the properties that are named in the header.
An easy example to understand would be a CSV file that contains a server list with the name of each server, as well as the type of the server (Web, Database, or File), and whom to contact, if there are problems with each server:
With this CSV file, we can easily read this into a variable using Import-CSV. As Import-CSV creates objects, we can refer to the rows of this CSV file using properties. Getting a summary of our servers using the Group-Object cmdlet is a simple matter:
The Invoke-Item cmdlet
You can easily open a CSV file in Excel (or whatever application is associated with CSV files on your system) using the Invoke-Item cmdlet. Invoke-Item performs the default action associated with a particular file. You can think of it as double-clicking on an item in the File Explorer. If you have Excel, the default action for CSV files is to open them in Excel. To easily open the output file we created in the last section, we would use Invoke-Item c:\temp\filelist.csv, and it would pop up looking like a spreadsheet as follows:
At this point, it can be manipulated just like a normal spreadsheet, so it's easy for people who haven't learned PowerShell yet to work with it.
Since PowerShell cmdlets work on objects, it's convenient to be able to read a file as a sequence of objects rather than as strings, like you would from Get-Content. Just as Export-CSV takes objects and writes them to a file, Import-CSV reads a CSV file and outputs objects with the properties that are named in the header.
An easy example to understand would be a CSV file that contains a server list with the name of each server, as well as the type of the server (Web, Database, or File), and whom to contact, if there are problems with each server:
With this CSV file, we can easily read this into a variable using Import-CSV. As Import-CSV creates objects, we can refer to the rows of this CSV file using properties. Getting a summary of our servers using the Group-Object cmdlet is a simple matter:
Import from CSV for quick objects
Since PowerShell cmdlets work on objects, it's convenient to be able to read a file as a sequence of objects rather than as strings, like you would from Get-Content. Just as Export-CSV takes objects and writes them to a file, Import-CSV reads a CSV file and outputs objects with the properties that are named in the header.
An easy example to understand would be a CSV file that contains a server list with the name of each server, as well as the type of the server (Web, Database, or File), and whom to contact, if there are problems with each server:
With this CSV file, we can easily read this into a variable using Import-CSV. As Import-CSV creates objects, we can refer to the rows of this CSV file using properties. Getting a summary of our servers using the Group-Object cmdlet is a simple matter:
We've talked about the output stream, but it turns out that PowerShell has quite a few streams besides this. Here's the list, including one that was introduced in PowerShell 5:
|
Stream |
Number |
Contents |
|---|---|---|
|
Output |
1 |
Output from commands |
|
Error |
2 |
Error messages |
|
Warning |
3 |
Warning messages |
|
Debug |
4 |
Debug messages |
|
Verbose |
5 |
Verbose output |
|
Information |
6 |
General information (PowerShell 5) |
Similar to DOS, you can redirect streams to a file using the greater-than symbol (>). For example, you can send a directory listing to a file as follows:
Dir c:\temp >c:\temp\files.txt
The output is formatted according to standard PowerShell formatting, but since it's just a text file, you can't recreate the objects that you started with. Also, unlike with Set-Content, you can't control the output encoding, which is always Unicode if you use the redirection operator.
In addition to the single greater-than symbol, there are a number of other redirection operators that append (using two greater-than symbols) and combine streams (such as 2>&1, which merges the error stream to the output stream using the numbers found in the table). As there a number of streams and a variety of operators, you should refer to the about_redirection help topic for a complete description.
A final way to redirect output is to use the out-file cmdlet. Unlike the redirect operator, out-file includes an –Encoding parameter that lets you change the encoding. The values for this parameter are the same as the Set-Content cmdlet. The main difference between Set-Content and Out-File is that Out-File accepts pipeline input. So, you will use Out-File as the last command in a pipeline to send the output to a file.
For instance, the redirection we performed with the redirection operator would be expressed using Out-File as follows:
Dir c:\temp | out-file C:\temp\files.txt
I don't know about you, but this is a lot easier for me to read. If you want to append to an existing file, the –Append switch is what you're looking for. You don't get to combine streams as you can with the redirection operators, but for general purpose output redirection, Out-File is a good candidate.
Other types of redirection operators
In addition to the single greater-than symbol, there are a number of other redirection operators that append (using two greater-than symbols) and combine streams (such as 2>&1, which merges the error stream to the output stream using the numbers found in the table). As there a number of streams and a variety of operators, you should refer to the about_redirection help topic for a complete description.
A final way to redirect output is to use the out-file cmdlet. Unlike the redirect operator, out-file includes an –Encoding parameter that lets you change the encoding. The values for this parameter are the same as the Set-Content cmdlet. The main difference between Set-Content and Out-File is that Out-File accepts pipeline input. So, you will use Out-File as the last command in a pipeline to send the output to a file.
For instance, the redirection we performed with the redirection operator would be expressed using Out-File as follows:
Dir c:\temp | out-file C:\temp\files.txt
I don't know about you, but this is a lot easier for me to read. If you want to append to an existing file, the –Append switch is what you're looking for. You don't get to combine streams as you can with the redirection operators, but for general purpose output redirection, Out-File is a good candidate.
The out-file cmdlet
A final way to redirect output is to use the out-file cmdlet. Unlike the redirect operator, out-file includes an –Encoding parameter that lets you change the encoding. The values for this parameter are the same as the Set-Content cmdlet. The main difference between Set-Content and Out-File is that Out-File accepts pipeline input. So, you will use Out-File as the last command in a pipeline to send the output to a file.
For instance, the redirection we performed with the redirection operator would be expressed using Out-File as follows:
Dir c:\temp | out-file C:\temp\files.txt
I don't know about you, but this is a lot easier for me to read. If you want to append to an existing file, the –Append switch is what you're looking for. You don't get to combine streams as you can with the redirection operators, but for general purpose output redirection, Out-File is a good candidate.
You've seen how we can use Export-CSV to write objects to a file and that we can read these objects back using Import-CSV. One limitation of using the CSV format is that it is a flat format, meaning that you get a list of properties that have simple values. If you need to output arbitrary objects to a file and need to store more interesting values than strings, you should probably look at the CLIXML cmdlets, Export-CLIXML and Import-CLIXML. CLIXML is an XML-based format to serialize objects.
When you export objects using Export-CLIXML, it looks at the list of properties that may be value properties (such as string or int values) or they may be objects themselves. If they are objects, Export-CLIXML will look at the properties of the properties. It will continue this process until it reaches a predetermined depth. The default value of depth is "2", but you can override this using the –Depth parameter.
To see how this works, let's get a particular service and export it to a file using this command:
get-service MSSQLSERVER | Export-CLIXML –path C:\temp\SQL.clixml
Looking at the following output, you can see that it's XML, but it's still fairly readable. The file includes the list of type names (the type of the object as well as any ancestor types), followed by a list of properties. Some of them start with an S or a B, denoting String or Boolean, and others start with OBJ or NIL meaning objects that are either populated or empty:

Reading a CLIXML file with Import-CLIXML builds a complex object, but it's not quite the same object that you started with for three reasons, as follows:
- The object was only written to a limited depth, so we could have lost some details
- The methods are not included in the recreated object, only the properties
- Since we didn't use the constructor for the type of object we need, the type of the object is now slightly different
We can see the differences using get-member on the imported object:

Note that the type of the object now starts with Deserialized. This is because the process of writing an object is called serialization, and the process of recreating an object from a serialized format is called deserialization. You might, also, hear such objects being referred to as "rehydrated" or "unwired". The point is that this object, for instance, is no longer connected to the MSSQLSERVER service on my laptop like the original object was.
PowerShell has a very rich set of cmdlets that deal with file input and output. We've seen how to read and write text files, CSV files, and CLIXML files. We, also, looked at how to use redirection to cause PowerShell to write streams to files or combine streams together.
In the next chapter, we will look at one way by which PowerShell can communicate with different kinds of software and components on a computer, using WMI and CIM. These capabilities greatly expand PowerShell's power, and causes it to be an almost universal tool in the Microsoft environment.