

In this chapter, we will cover the following recipes:
- Installing Ejabberd
- Creating users and connecting with the XMPP client
- Configuring the Ejabberd installation
- Creating web client with Strophe.js
- Enabling group chat
- Chat server with Node.js
Extensible Messaging and Presence Protocol (XMPP) is a communication protocol that provides near-real-time message passing between two or more entities. XMPP is based on XML and transfers data in predefined formats that are known to server as well as client systems. Being an XML-based protocol, you can easily extend XMPP to suit your requirements. It also provides various standard extensions to extend the base functionality of the XMPP server.
In this chapter, we will learn how to set up our own XMPP server. The main focus will be on implementing a simple chat application. In later recipes, we will also look at a Node.js and socket-based alternative to implementing the messaging server.
We will be working with a popular XMPP server Ejabberd. It is a well-known XMPP implementation supported by ProcessOne. Ejabberd is based on Erlang, a functional programming language specifically designed for soft real-time communication.
In this recipe, we will learn how to install the Ejabberd XMPP server. We will be using an integrated installation package that is available from the Ejabberd download site. You can also install Ejabberd from the Ubuntu package repository, but that will give you an older, and probably outdated, version.
The following are the steps to install Ejabberd:
- Download the Ejabberd installer with the following command. We will be downloading the 64-bit package for Debian-based systems.
- Make sure you get the updated link to download the latest available version:
$ wget https://www.process-one.net/downloads/downloads-action.php?file=/ejabberd/15.11/ejabberd_15.11-0_amd64.deb -O ejabberd.deb - Once the download completes, you will have an installer package with the
.debextension. Use thedpkgcommand to install Ejabberd from this package:$ sudo dpkg -i ejabberd.deb - When installation completes, check the location of the Ejabberd executable:
$ whereis ejabberd
- Now you can start the Ejabberd server, as follows:
$ sudo /opt/ejabberd-15.11/bin/ejabberdctl start - The
startcommand does not create any output. You can check the server status with theejabberdctl statuscommand:$ sudo /opt/ejabberd-15.11/bin/ejabberdctl status
- Now your XMPP server is ready to use. Ejabberd includes a web-based admin panel. Once the server has started, you can access it at
http://server_ip:5280/admin. It should ask you to log in, as shown in the following screenshot:
- The admin panel is protected with a username and password. Ejabberd installation creates a default administrative user account with the username and password both set to
admin. - To log in, you need a JID (XMPP ID) as a username, which is a username and hostname combination. The hostname of my server is
ubuntuand the admin JID isadmin@ubuntu. Once you have entered the correct username and password, an admin console will be rendered as follows:
Ejabberd binaries are available as a Debian package. It includes a minimum Erlang runtime and all other dependencies. You can download the latest package from the Ejabberd download page.
The installer unpacks all the contents at the /opt/ejabberd-version directory. You can get an exact location of the installation with the whereis command. All executable files are generally located under the bin directory. We will mostly be working with ejabberdctl, which is a command line administrative tool. It provides various options to manage and monitor Ejabberd installation. You can see the full list of supported options by entering ejabberdctl without any options.
The following screenshot shows the partial output of executing ejabberdctl without any options:
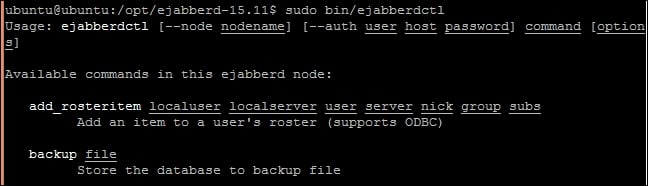
If you have noticed, I am using sudo with each ejabberdctl command. You can avoid the use of the sudo command by switching to the ejabberd user, which is created at the time of Ejabberd installation. The installer creates a system user account, ejabberd, and sets its home directory to the Ejabberd installation directory, /opt/ejabberd-version. You will still need to use sudo to switch user accounts as the ejabberd user has no password set. Use the following command to log in as the ejabberd user:
$ sudo su ejabberd
In addition to creating the system user to run the Ejabberd process, the installer also creates an ejabberd admin account. The username and password for the administrator account is set to admin/admin. Make sure that you change this password before using your server in production. The installation process also creates a default XMPP host. The hostname is set to match your server hostname. It can be modified from the configuration file.
Once the server has started, you can access the handy web administrative console to manage most of the Ejabberd settings. You can add new users, create access control lists and set access rules, check the participating servers (node), and all hosted XMPP domains (host). Additionally, you can enable or disable Ejabberd modules separately for each domain. That means if you are using the same server to host xmpp1.example1.com and xmpp2.example2.com, you can enable a multi-user chat for xmpp1.example1.com and disable the same module for xmpp2.example2.com.
- Ejabberd download page at https://www.process-one.net/en/ejabberd/downloads/
Getting ready
You will need an Ubuntu server with root access or an account with sudo privileges.
The following are the steps to install Ejabberd:
- Download the Ejabberd installer with the following command. We will be downloading the 64-bit package for Debian-based systems.
- Make sure you get the updated link to download the latest available version:
$ wget https://www.process-one.net/downloads/downloads-action.php?file=/ejabberd/15.11/ejabberd_15.11-0_amd64.deb -O ejabberd.deb - Once the download completes, you will have an installer package with the
.debextension. Use thedpkgcommand to install Ejabberd from this package:$ sudo dpkg -i ejabberd.deb - When installation completes, check the location of the Ejabberd executable:
$ whereis ejabberd - Now you can start the Ejabberd server, as follows:
$ sudo /opt/ejabberd-15.11/bin/ejabberdctl start - The
startcommand does not create any output. You can check the server status with theejabberdctl statuscommand:$ sudo /opt/ejabberd-15.11/bin/ejabberdctl status - Now your XMPP server is ready to use. Ejabberd includes a web-based admin panel. Once the server has started, you can access it at
http://server_ip:5280/admin. It should ask you to log in, as shown in the following screenshot: - The admin panel is protected with a username and password. Ejabberd installation creates a default administrative user account with the username and password both set to
admin. - To log in, you need a JID (XMPP ID) as a username, which is a username and hostname combination. The hostname of my server is
ubuntuand the admin JID isadmin@ubuntu. Once you have entered the correct username and password, an admin console will be rendered as follows:
Ejabberd binaries are available as a Debian package. It includes a minimum Erlang runtime and all other dependencies. You can download the latest package from the Ejabberd download page.
The installer unpacks all the contents at the /opt/ejabberd-version directory. You can get an exact location of the installation with the whereis command. All executable files are generally located under the bin directory. We will mostly be working with ejabberdctl, which is a command line administrative tool. It provides various options to manage and monitor Ejabberd installation. You can see the full list of supported options by entering ejabberdctl without any options.
The following screenshot shows the partial output of executing ejabberdctl without any options:
If you have noticed, I am using sudo with each ejabberdctl command. You can avoid the use of the sudo command by switching to the ejabberd user, which is created at the time of Ejabberd installation. The installer creates a system user account, ejabberd, and sets its home directory to the Ejabberd installation directory, /opt/ejabberd-version. You will still need to use sudo to switch user accounts as the ejabberd user has no password set. Use the following command to log in as the ejabberd user:
$ sudo su ejabberd
In addition to creating the system user to run the Ejabberd process, the installer also creates an ejabberd admin account. The username and password for the administrator account is set to admin/admin. Make sure that you change this password before using your server in production. The installation process also creates a default XMPP host. The hostname is set to match your server hostname. It can be modified from the configuration file.
Once the server has started, you can access the handy web administrative console to manage most of the Ejabberd settings. You can add new users, create access control lists and set access rules, check the participating servers (node), and all hosted XMPP domains (host). Additionally, you can enable or disable Ejabberd modules separately for each domain. That means if you are using the same server to host xmpp1.example1.com and xmpp2.example2.com, you can enable a multi-user chat for xmpp1.example1.com and disable the same module for xmpp2.example2.com.
- Ejabberd download page at https://www.process-one.net/en/ejabberd/downloads/
How to do it…
The following are the steps to install Ejabberd:
- Download the Ejabberd installer with the following command. We will be downloading the 64-bit package for Debian-based systems.
- Make sure you get the updated link to download the latest available version:
$ wget https://www.process-one.net/downloads/downloads-action.php?file=/ejabberd/15.11/ejabberd_15.11-0_amd64.deb -O ejabberd.deb - Once the download completes, you will have an installer package with the
.debextension. Use thedpkgcommand to install Ejabberd from this package:$ sudo dpkg -i ejabberd.deb - When installation completes, check the location of the Ejabberd executable:
$ whereis ejabberd - Now you can start the Ejabberd server, as follows:
$ sudo /opt/ejabberd-15.11/bin/ejabberdctl start - The
startcommand does not create any output. You can check the server status with theejabberdctl statuscommand:$ sudo /opt/ejabberd-15.11/bin/ejabberdctl status - Now your XMPP server is ready to use. Ejabberd includes a web-based admin panel. Once the server has started, you can access it at
http://server_ip:5280/admin. It should ask you to log in, as shown in the following screenshot: - The admin panel is protected with a username and password. Ejabberd installation creates a default administrative user account with the username and password both set to
admin. - To log in, you need a JID (XMPP ID) as a username, which is a username and hostname combination. The hostname of my server is
ubuntuand the admin JID isadmin@ubuntu. Once you have entered the correct username and password, an admin console will be rendered as follows:
Ejabberd binaries are available as a Debian package. It includes a minimum Erlang runtime and all other dependencies. You can download the latest package from the Ejabberd download page.
The installer unpacks all the contents at the /opt/ejabberd-version directory. You can get an exact location of the installation with the whereis command. All executable files are generally located under the bin directory. We will mostly be working with ejabberdctl, which is a command line administrative tool. It provides various options to manage and monitor Ejabberd installation. You can see the full list of supported options by entering ejabberdctl without any options.
The following screenshot shows the partial output of executing ejabberdctl without any options:
If you have noticed, I am using sudo with each ejabberdctl command. You can avoid the use of the sudo command by switching to the ejabberd user, which is created at the time of Ejabberd installation. The installer creates a system user account, ejabberd, and sets its home directory to the Ejabberd installation directory, /opt/ejabberd-version. You will still need to use sudo to switch user accounts as the ejabberd user has no password set. Use the following command to log in as the ejabberd user:
$ sudo su ejabberd
In addition to creating the system user to run the Ejabberd process, the installer also creates an ejabberd admin account. The username and password for the administrator account is set to admin/admin. Make sure that you change this password before using your server in production. The installation process also creates a default XMPP host. The hostname is set to match your server hostname. It can be modified from the configuration file.
Once the server has started, you can access the handy web administrative console to manage most of the Ejabberd settings. You can add new users, create access control lists and set access rules, check the participating servers (node), and all hosted XMPP domains (host). Additionally, you can enable or disable Ejabberd modules separately for each domain. That means if you are using the same server to host xmpp1.example1.com and xmpp2.example2.com, you can enable a multi-user chat for xmpp1.example1.com and disable the same module for xmpp2.example2.com.
- Ejabberd download page at https://www.process-one.net/en/ejabberd/downloads/
How it works…
Ejabberd binaries are available as a Debian package. It includes a minimum Erlang runtime and all other dependencies. You can download the latest package from the Ejabberd download page.
The installer unpacks all the contents at the /opt/ejabberd-version directory. You can get an exact location of the installation with the whereis command. All executable files are generally located under the bin directory. We will mostly be working with ejabberdctl, which is a command line administrative tool. It provides various options to manage and monitor Ejabberd installation. You can see the full list of supported options by entering ejabberdctl without any options.
The following screenshot shows the partial output of executing ejabberdctl without any options:
If you have noticed, I am using sudo with each ejabberdctl command. You can avoid the use of the sudo command by switching to the ejabberd user, which is created at the time of Ejabberd installation. The installer creates a system user account, ejabberd, and sets its home directory to the Ejabberd installation directory, /opt/ejabberd-version. You will still need to use sudo to switch user accounts as the ejabberd user has no password set. Use the following command to log in as the ejabberd user:
$ sudo su ejabberd
In addition to creating the system user to run the Ejabberd process, the installer also creates an ejabberd admin account. The username and password for the administrator account is set to admin/admin. Make sure that you change this password before using your server in production. The installation process also creates a default XMPP host. The hostname is set to match your server hostname. It can be modified from the configuration file.
Once the server has started, you can access the handy web administrative console to manage most of the Ejabberd settings. You can add new users, create access control lists and set access rules, check the participating servers (node), and all hosted XMPP domains (host). Additionally, you can enable or disable Ejabberd modules separately for each domain. That means if you are using the same server to host xmpp1.example1.com and xmpp2.example2.com, you can enable a multi-user chat for xmpp1.example1.com and disable the same module for xmpp2.example2.com.
- Ejabberd download page at https://www.process-one.net/en/ejabberd/downloads/
See also
- Ejabberd download page at https://www.process-one.net/en/ejabberd/downloads/
We have installed the XMPP server, Ejabberd. In this recipe, we will learn how to add new user accounts to the Ejabberd server. We will also learn how to configure the XMPP client and connect to our server.
Make sure that you have installed the Ejabberd server and it is running properly.
Additionally, you will need XMPP client software. You can choose from multiple free and open source clients such as pidgin, PSI, Adium, Gajim, and many more. I will be using PSI as it provides various low-level administrative features.
Ejabberd supports multiple methods for registering a new user account. These include adding a new user from the command line, creating a new user from the admin panel, and allowing clients to register with the server using in-band registration. Here, we will create a new user from a command line admin tool. Later in this recipe, I will briefly explain another two methods.
Follow these steps to create a user account and connect it with a XMPP client:
- Use the following command to register a new user using the
ejabberdctlcommand:$ # ejabberdctl register username host password $ sudo ejabberdctl register user1 ubuntu password

- You can get a list of registered users with the
registered_usersoption toejabberdctl:$ # ejabberdctl registered_users host $ sudo ejabberdctl registered_users ubuntu

- Now you can create a connection to the server with the XMPP client and your new account. Download and install the XMPP client tool, PSI.
- Open PSI, click the General tab, and then select Account Setup. This will open the XMPP Accounts window, which looks something like this:

- Click the Add button in the XMPP Accounts window. This will open another window named Add Accounts:

- Now, in the Add Account window, enter the name for this connection, or you can choose to keep the name as Default. Click the Add button to open one more window.
- In the newly opened window, enter the account details that we created with the
ejabberdctlcommand:
- On the Account tab, enter the full XMPP address (JID) and password for your account.
- Click on the Connection tab, then click to check the Manually Specify Server Host/Port: checkbox, and then enter the server IP or FQDN and change the port to match your configuration:

- Next, click the Save button to complete the account setup and then click Close to close the account setup window. Your account will be listed in the main window of Psi, as follows:

- Now you are ready to connect to your XMPP server. Select the listed account and change the drop-down box at the bottom to Online. This will start the connection process and set the user status as Online.
- The PSI client will show a prompt regarding self-signed certificates if you are using the default certificate provided by Ejabberd. Click Trust this certificate to proceed.
It will take a few seconds to complete the connection process. Once connected, your PSI status will change to Online:

- Now click General menu to add XMPP contacts or to join a group chat or to send a message to existing contact. To change your Instant Messaging account status, click on the Status menu and select your desired option.
The preceding example demonstrates the account creation and client setup process for connecting with the XMPP server. We have used an administrative command to create an XMPP account and then configured client software to use the existing account.
You can also create a new account from the Ejabberd web console. The web console lists all the configured hostnames under the Virtual Hosts section, and each host lists options for user and access management, and other administration tools. Both these options need the server administrator to create an account.
Additionally, XMPP supports an extension that enables a user to self-register with the server. This is called in-band registration (xep-0077), where a user can send his registration request with his desired username, password, and other details, such as email, and the server creates a new user account. This is useful with public XMPP servers where administrators cannot handle all registration requests. The Ejabberd server supports in-band registration with the mod_register plugin, which is enabled by default. From the client side, you can use any XMPP client that supports in-band registration. If you have noticed, PSI also supports in-band registration and provides an option to register a new account in the Add Account process:

When it is an XMPP administration task, PSI is a handy tool. It provides a debug console where you can monitor all XML data transfers between the client and server, as well as send arbitrary XML stanzas to the server. You can access the XML console from right-clicking the menu of your PSI account. Once opened, check Enable checkbox to enable traffic monitoring. The XML Console looks similar to the following screenshot:

XML Console also allows the filtering of traffic based on packet type. Button Dump Ringbuf can be used to dump any traffic before opening the XML Console.
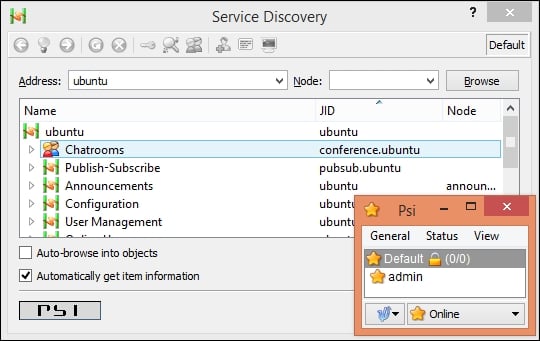
Another option is service discovery from the right-click menu. You need to log in as an administrator to see all the options under service discovery. From here, you can monitor user accounts and various services that are available on the server. The Service Discovery window looks something like this:
- A list of XMPP client tools at https://xmpp.org/xmpp-software/clients/
Getting ready
Make sure that you have installed the Ejabberd server and it is running properly.
Additionally, you will need XMPP client software. You can choose from multiple free and open source clients such as pidgin, PSI, Adium, Gajim, and many more. I will be using PSI as it provides various low-level administrative features.
Ejabberd supports multiple methods for registering a new user account. These include adding a new user from the command line, creating a new user from the admin panel, and allowing clients to register with the server using in-band registration. Here, we will create a new user from a command line admin tool. Later in this recipe, I will briefly explain another two methods.
Follow these steps to create a user account and connect it with a XMPP client:
- Use the following command to register a new user using the
ejabberdctlcommand:$ # ejabberdctl register username host password $ sudo ejabberdctl register user1 ubuntu password
- You can get a list of registered users with the
registered_usersoption toejabberdctl:$ # ejabberdctl registered_users host $ sudo ejabberdctl registered_users ubuntu
- Now you can create a connection to the server with the XMPP client and your new account. Download and install the XMPP client tool, PSI.
- Open PSI, click the General tab, and then select Account Setup. This will open the XMPP Accounts window, which looks something like this:
- Click the Add button in the XMPP Accounts window. This will open another window named Add Accounts:
- Now, in the Add Account window, enter the name for this connection, or you can choose to keep the name as Default. Click the Add button to open one more window.
- In the newly opened window, enter the account details that we created with the
ejabberdctlcommand: - On the Account tab, enter the full XMPP address (JID) and password for your account.
- Click on the Connection tab, then click to check the Manually Specify Server Host/Port: checkbox, and then enter the server IP or FQDN and change the port to match your configuration:
- Next, click the Save button to complete the account setup and then click Close to close the account setup window. Your account will be listed in the main window of Psi, as follows:
- Now you are ready to connect to your XMPP server. Select the listed account and change the drop-down box at the bottom to Online. This will start the connection process and set the user status as Online.
- The PSI client will show a prompt regarding self-signed certificates if you are using the default certificate provided by Ejabberd. Click Trust this certificate to proceed.
It will take a few seconds to complete the connection process. Once connected, your PSI status will change to Online:
- Now click General menu to add XMPP contacts or to join a group chat or to send a message to existing contact. To change your Instant Messaging account status, click on the Status menu and select your desired option.
The preceding example demonstrates the account creation and client setup process for connecting with the XMPP server. We have used an administrative command to create an XMPP account and then configured client software to use the existing account.
You can also create a new account from the Ejabberd web console. The web console lists all the configured hostnames under the Virtual Hosts section, and each host lists options for user and access management, and other administration tools. Both these options need the server administrator to create an account.
Additionally, XMPP supports an extension that enables a user to self-register with the server. This is called in-band registration (xep-0077), where a user can send his registration request with his desired username, password, and other details, such as email, and the server creates a new user account. This is useful with public XMPP servers where administrators cannot handle all registration requests. The Ejabberd server supports in-band registration with the mod_register plugin, which is enabled by default. From the client side, you can use any XMPP client that supports in-band registration. If you have noticed, PSI also supports in-band registration and provides an option to register a new account in the Add Account process:
When it is an XMPP administration task, PSI is a handy tool. It provides a debug console where you can monitor all XML data transfers between the client and server, as well as send arbitrary XML stanzas to the server. You can access the XML console from right-clicking the menu of your PSI account. Once opened, check Enable checkbox to enable traffic monitoring. The XML Console looks similar to the following screenshot:
XML Console also allows the filtering of traffic based on packet type. Button Dump Ringbuf can be used to dump any traffic before opening the XML Console.
Another option is service discovery from the right-click menu. You need to log in as an administrator to see all the options under service discovery. From here, you can monitor user accounts and various services that are available on the server. The Service Discovery window looks something like this:
- A list of XMPP client tools at https://xmpp.org/xmpp-software/clients/
How to do it…
Ejabberd supports multiple methods for registering a new user account. These include adding a new user from the command line, creating a new user from the admin panel, and allowing clients to register with the server using in-band registration. Here, we will create a new user from a command line admin tool. Later in this recipe, I will briefly explain another two methods.
Follow these steps to create a user account and connect it with a XMPP client:
- Use the following command to register a new user using the
ejabberdctlcommand:$ # ejabberdctl register username host password $ sudo ejabberdctl register user1 ubuntu password
- You can get a list of registered users with the
registered_usersoption toejabberdctl:$ # ejabberdctl registered_users host $ sudo ejabberdctl registered_users ubuntu
- Now you can create a connection to the server with the XMPP client and your new account. Download and install the XMPP client tool, PSI.
- Open PSI, click the General tab, and then select Account Setup. This will open the XMPP Accounts window, which looks something like this:
- Click the Add button in the XMPP Accounts window. This will open another window named Add Accounts:
- Now, in the Add Account window, enter the name for this connection, or you can choose to keep the name as Default. Click the Add button to open one more window.
- In the newly opened window, enter the account details that we created with the
ejabberdctlcommand: - On the Account tab, enter the full XMPP address (JID) and password for your account.
- Click on the Connection tab, then click to check the Manually Specify Server Host/Port: checkbox, and then enter the server IP or FQDN and change the port to match your configuration:
- Next, click the Save button to complete the account setup and then click Close to close the account setup window. Your account will be listed in the main window of Psi, as follows:
- Now you are ready to connect to your XMPP server. Select the listed account and change the drop-down box at the bottom to Online. This will start the connection process and set the user status as Online.
- The PSI client will show a prompt regarding self-signed certificates if you are using the default certificate provided by Ejabberd. Click Trust this certificate to proceed.
It will take a few seconds to complete the connection process. Once connected, your PSI status will change to Online:
- Now click General menu to add XMPP contacts or to join a group chat or to send a message to existing contact. To change your Instant Messaging account status, click on the Status menu and select your desired option.
The preceding example demonstrates the account creation and client setup process for connecting with the XMPP server. We have used an administrative command to create an XMPP account and then configured client software to use the existing account.
You can also create a new account from the Ejabberd web console. The web console lists all the configured hostnames under the Virtual Hosts section, and each host lists options for user and access management, and other administration tools. Both these options need the server administrator to create an account.
Additionally, XMPP supports an extension that enables a user to self-register with the server. This is called in-band registration (xep-0077), where a user can send his registration request with his desired username, password, and other details, such as email, and the server creates a new user account. This is useful with public XMPP servers where administrators cannot handle all registration requests. The Ejabberd server supports in-band registration with the mod_register plugin, which is enabled by default. From the client side, you can use any XMPP client that supports in-band registration. If you have noticed, PSI also supports in-band registration and provides an option to register a new account in the Add Account process:
When it is an XMPP administration task, PSI is a handy tool. It provides a debug console where you can monitor all XML data transfers between the client and server, as well as send arbitrary XML stanzas to the server. You can access the XML console from right-clicking the menu of your PSI account. Once opened, check Enable checkbox to enable traffic monitoring. The XML Console looks similar to the following screenshot:
XML Console also allows the filtering of traffic based on packet type. Button Dump Ringbuf can be used to dump any traffic before opening the XML Console.
Another option is service discovery from the right-click menu. You need to log in as an administrator to see all the options under service discovery. From here, you can monitor user accounts and various services that are available on the server. The Service Discovery window looks something like this:
- A list of XMPP client tools at https://xmpp.org/xmpp-software/clients/
How it works…
The preceding example demonstrates the account creation and client setup process for connecting with the XMPP server. We have used an administrative command to create an XMPP account and then configured client software to use the existing account.
You can also create a new account from the Ejabberd web console. The web console lists all the configured hostnames under the Virtual Hosts section, and each host lists options for user and access management, and other administration tools. Both these options need the server administrator to create an account.
Additionally, XMPP supports an extension that enables a user to self-register with the server. This is called in-band registration (xep-0077), where a user can send his registration request with his desired username, password, and other details, such as email, and the server creates a new user account. This is useful with public XMPP servers where administrators cannot handle all registration requests. The Ejabberd server supports in-band registration with the mod_register plugin, which is enabled by default. From the client side, you can use any XMPP client that supports in-band registration. If you have noticed, PSI also supports in-band registration and provides an option to register a new account in the Add Account process:
When it is an XMPP administration task, PSI is a handy tool. It provides a debug console where you can monitor all XML data transfers between the client and server, as well as send arbitrary XML stanzas to the server. You can access the XML console from right-clicking the menu of your PSI account. Once opened, check Enable checkbox to enable traffic monitoring. The XML Console looks similar to the following screenshot:
XML Console also allows the filtering of traffic based on packet type. Button Dump Ringbuf can be used to dump any traffic before opening the XML Console.
Another option is service discovery from the right-click menu. You need to log in as an administrator to see all the options under service discovery. From here, you can monitor user accounts and various services that are available on the server. The Service Discovery window looks something like this:
- A list of XMPP client tools at https://xmpp.org/xmpp-software/clients/
There's more…
When it is an XMPP administration task, PSI is a handy tool. It provides a debug console where you can monitor all XML data transfers between the client and server, as well as send arbitrary XML stanzas to the server. You can access the XML console from right-clicking the menu of your PSI account. Once opened, check Enable checkbox to enable traffic monitoring. The XML Console looks similar to the following screenshot:
XML Console also allows the filtering of traffic based on packet type. Button Dump Ringbuf can be used to dump any traffic before opening the XML Console.
Another option is service discovery from the right-click menu. You need to log in as an administrator to see all the options under service discovery. From here, you can monitor user accounts and various services that are available on the server. The Service Discovery window looks something like this:
- A list of XMPP client tools at https://xmpp.org/xmpp-software/clients/
See also
- A list of XMPP client tools at https://xmpp.org/xmpp-software/clients/
Ejabberd comes with various default settings that make it easy to get started. We can install Ejabberd and start using it as soon as installation completes. This works when we are testing our setup, but when we need a production server, we need to make a number of changes to the default installation. Ejabberd provides a central configuration file through which we can easily configure our XMPP installation.
This recipe covers the basic configuration of the Ejabberd server.
Make sure that you have installed the Ejabberd server.
You will need access to a root account or an account with sudo privileges.
Ejabberd configuration files are located under the conf directory in the Ejabberd installation. On the Ubuntu server, it should be /opt/ejabberd-version/conf.
Follow these steps to configure the Ejabberd installation:
- Open the
ejabberd.ymlfile. It contains configuration settings in the YML format. - Let us start by setting the domain for our XMPP service. This is located under the
SERVED HOSTNAMESsection in the configuration file. The default setting uses the server hostname as a host for the XMPP service. - Add a fully qualified domain name under the
hostssection. You can choose to keep the default host entry or remove it:
- Next, you may want to change the default ports for XMPP connections. Search for the
LISTENING PORTSsection inejabberd.ymland change the respective ports. I will use the default port configuration. The following is the configuration snippet listingport 5222:
- The
LISTENING PORTSsection contains different port configurations, each serving a separate service. Three of them are enabled by default and serve a client to server connection (5222), server to server connection (5269), and HTTP module for admin console andhttp_bindservice (5280). - The same section contains the parameter named
certfile, which specifies the SSL certificate file to be used while creating client connections. The default settings point to a certificate created by the Ejabberd installation process. You can change it to your own signed certificate. - Also note the shaper and access settings. These settings specify the connection throttling and access control settings used for the client to server connections respectively.
- At the end of the
LISTENING PORTSsection, there is a configuration forBOSH(port5280) connections, as well as the web admin panel. This section also enables web socket connections with theejabberd_http_wsmodule. - Under the
AUTHENTICATIONsection, you can configure the authentication mechanism to be used. By default, Ejabberd usesinternalauthentication but it can be set to useexternalscripts, system-level authentication, external databases, or even a centralized LDAP service. The following is the list of all supported options:
- Default
internalauthentication works well enough and we will proceed with it. If you are planning to use a different authentication mechanism, make sure that you comment outinternalauthentication. - You can also enable anonymous login support, where clients can open an XMPP connection without a username and password. Simply uncomment the respective settings from
Anonymous login support:
- Next, under the
DATABASE SETUPsection, you can set Ejabberd to use an external database system. Ejabberd supports all leading relational database systems, includingSQLite. The following is the list of all supported database systems:
- The default database settings use an inbuilt database server known as Mnesia. It provides in-memory and disk-based storage and can be easily replicated across Ejaberd nodes. Mnesia works well even for very busy XMPP operations.
- To define an admin user, search for the
ACCESS CONTROL LISTSsection and add your desired username and hostname under the admin users list:
This same section includes a list of blocked users.
You can also define your own access control lists, which can be used to restrict permissions to specific hostnames or users. The Access Rules section define the rules applicable to listed ACLs.
- Finally, under the
modulessection, you can configure the modules to be used by Ejabberd. Modules are plugins to extend the functionality of the Ejabberd server. Comment out the modules that you are not planning to use. You can also enable or disable any module in runtime from the web admin panel. The following is the partial list of modules:
Each module is named after respective XEPs (XMPP extensions). You can get details of the functionality of any module by looking for the related XEP. Also check the Ejabberd documentation to find out the dependencies between modules.
- Once you are done with all the configuration, you can restart the Ejabberd server with
ejabberdctl restartor reload configuration changes with theejabberdctl reload_configcommand:$ sudo bin/ejabberdctl reload_config
Most of the core settings of Ejabberd are controlled through the configuration file, ejabberd.yml. Alternatively, you can change settings with the ejabberdctl command, but those settings will not persist after restart. If you need the settings to be permanent, change them in the configuration file. You can always reload the configuration file changes without restarting the server.
While editing the configuration file, make sure that you follow the indentation and spacing as shown in examples. Ejabberd configuration follows the YML format and any change in spacing will leave that setting undefined. The good news is that the latest version of Ejabberd will prompt you about any mistakes in configuration.
There's another file named ejabberdctl.cfg that contains Erlang runtime settings. You may need to update those parameters while performance tuning the Ejabberd server.
The Ejabberd server is highly extensible and customizable thanks to its modular architecture. Most Ejabberd features are implemented as external modules. Modules are pluggable components that can be used to extend core functionality. These modules can be enabled or disabled as per requirements and do not affect the core functionality. Ejabberd modules are written in either Erlang or Elixir.
Ejabberd modules work with the hook mechanism implemented in the Ejabberd core. Hooks are nothing but simple events such as message received, user logged in, and connection time out. You can get a full list of supported hooks in the Ejabberd documentation, although it may not be a complete list. Each hook gets its own handler chain, with each handler assigned with a priority number. When you enable a module, it registers a given handler with a respective hook and a position or priority in the handler chain. When a hook is triggered by an event, it executes each handler in a chain, one after another. Additionally, a handler function may request to stop processing hooks and not to execute any further handlers.
The Ejabberd administrative command ejabberdctl provides an option to search for and install external modules. Ejabberd takes care of downloading the module, compiling, and installing it. You can even write your own module and add it to the local repository for installation. Check Ejabberd's developer documents for more details on module development.
- List of XMPP extensions at http://xmpp.org/xmpp-protocols/xmpp-extensions/
- Ejabberd document at link - https://www.process-one.net/docs/ejabberd/guide_en.html
- Ejabberd developer documentation at http://docs.ejabberd.im/developer/modules/
- Ejabberd hooks at http://docs.ejabberd.im/developer/hooks/
Getting ready
Make sure that you have installed the Ejabberd server.
You will need access to a root account or an account with sudo privileges.
Ejabberd configuration files are located under the conf directory in the Ejabberd installation. On the Ubuntu server, it should be /opt/ejabberd-version/conf.
Follow these steps to configure the Ejabberd installation:
- Open the
ejabberd.ymlfile. It contains configuration settings in the YML format. - Let us start by setting the domain for our XMPP service. This is located under the
SERVED HOSTNAMESsection in the configuration file. The default setting uses the server hostname as a host for the XMPP service. - Add a fully qualified domain name under the
hostssection. You can choose to keep the default host entry or remove it: - Next, you may want to change the default ports for XMPP connections. Search for the
LISTENING PORTSsection inejabberd.ymland change the respective ports. I will use the default port configuration. The following is the configuration snippet listingport 5222: - The
LISTENING PORTSsection contains different port configurations, each serving a separate service. Three of them are enabled by default and serve a client to server connection (5222), server to server connection (5269), and HTTP module for admin console andhttp_bindservice (5280). - The same section contains the parameter named
certfile, which specifies the SSL certificate file to be used while creating client connections. The default settings point to a certificate created by the Ejabberd installation process. You can change it to your own signed certificate. - Also note the shaper and access settings. These settings specify the connection throttling and access control settings used for the client to server connections respectively.
- At the end of the
LISTENING PORTSsection, there is a configuration forBOSH(port5280) connections, as well as the web admin panel. This section also enables web socket connections with theejabberd_http_wsmodule. - Under the
AUTHENTICATIONsection, you can configure the authentication mechanism to be used. By default, Ejabberd usesinternalauthentication but it can be set to useexternalscripts, system-level authentication, external databases, or even a centralized LDAP service. The following is the list of all supported options: - Default
internalauthentication works well enough and we will proceed with it. If you are planning to use a different authentication mechanism, make sure that you comment outinternalauthentication. - You can also enable anonymous login support, where clients can open an XMPP connection without a username and password. Simply uncomment the respective settings from
Anonymous login support: - Next, under the
DATABASE SETUPsection, you can set Ejabberd to use an external database system. Ejabberd supports all leading relational database systems, includingSQLite. The following is the list of all supported database systems: - The default database settings use an inbuilt database server known as Mnesia. It provides in-memory and disk-based storage and can be easily replicated across Ejaberd nodes. Mnesia works well even for very busy XMPP operations.
- To define an admin user, search for the
ACCESS CONTROL LISTSsection and add your desired username and hostname under the admin users list:This same section includes a list of blocked users.
You can also define your own access control lists, which can be used to restrict permissions to specific hostnames or users. The Access Rules section define the rules applicable to listed ACLs.
- Finally, under the
modulessection, you can configure the modules to be used by Ejabberd. Modules are plugins to extend the functionality of the Ejabberd server. Comment out the modules that you are not planning to use. You can also enable or disable any module in runtime from the web admin panel. The following is the partial list of modules:Each module is named after respective XEPs (XMPP extensions). You can get details of the functionality of any module by looking for the related XEP. Also check the Ejabberd documentation to find out the dependencies between modules.
- Once you are done with all the configuration, you can restart the Ejabberd server with
ejabberdctl restartor reload configuration changes with theejabberdctl reload_configcommand:$ sudo bin/ejabberdctl reload_config
Most of the core settings of Ejabberd are controlled through the configuration file, ejabberd.yml. Alternatively, you can change settings with the ejabberdctl command, but those settings will not persist after restart. If you need the settings to be permanent, change them in the configuration file. You can always reload the configuration file changes without restarting the server.
While editing the configuration file, make sure that you follow the indentation and spacing as shown in examples. Ejabberd configuration follows the YML format and any change in spacing will leave that setting undefined. The good news is that the latest version of Ejabberd will prompt you about any mistakes in configuration.
There's another file named ejabberdctl.cfg that contains Erlang runtime settings. You may need to update those parameters while performance tuning the Ejabberd server.
The Ejabberd server is highly extensible and customizable thanks to its modular architecture. Most Ejabberd features are implemented as external modules. Modules are pluggable components that can be used to extend core functionality. These modules can be enabled or disabled as per requirements and do not affect the core functionality. Ejabberd modules are written in either Erlang or Elixir.
Ejabberd modules work with the hook mechanism implemented in the Ejabberd core. Hooks are nothing but simple events such as message received, user logged in, and connection time out. You can get a full list of supported hooks in the Ejabberd documentation, although it may not be a complete list. Each hook gets its own handler chain, with each handler assigned with a priority number. When you enable a module, it registers a given handler with a respective hook and a position or priority in the handler chain. When a hook is triggered by an event, it executes each handler in a chain, one after another. Additionally, a handler function may request to stop processing hooks and not to execute any further handlers.
The Ejabberd administrative command ejabberdctl provides an option to search for and install external modules. Ejabberd takes care of downloading the module, compiling, and installing it. You can even write your own module and add it to the local repository for installation. Check Ejabberd's developer documents for more details on module development.
- List of XMPP extensions at http://xmpp.org/xmpp-protocols/xmpp-extensions/
- Ejabberd document at link - https://www.process-one.net/docs/ejabberd/guide_en.html
- Ejabberd developer documentation at http://docs.ejabberd.im/developer/modules/
- Ejabberd hooks at http://docs.ejabberd.im/developer/hooks/
How to do it…
Ejabberd configuration files are located under the conf directory in the Ejabberd installation. On the Ubuntu server, it should be /opt/ejabberd-version/conf.
Follow these steps to configure the Ejabberd installation:
- Open the
ejabberd.ymlfile. It contains configuration settings in the YML format. - Let us start by setting the domain for our XMPP service. This is located under the
SERVED HOSTNAMESsection in the configuration file. The default setting uses the server hostname as a host for the XMPP service. - Add a fully qualified domain name under the
hostssection. You can choose to keep the default host entry or remove it: - Next, you may want to change the default ports for XMPP connections. Search for the
LISTENING PORTSsection inejabberd.ymland change the respective ports. I will use the default port configuration. The following is the configuration snippet listingport 5222: - The
LISTENING PORTSsection contains different port configurations, each serving a separate service. Three of them are enabled by default and serve a client to server connection (5222), server to server connection (5269), and HTTP module for admin console andhttp_bindservice (5280). - The same section contains the parameter named
certfile, which specifies the SSL certificate file to be used while creating client connections. The default settings point to a certificate created by the Ejabberd installation process. You can change it to your own signed certificate. - Also note the shaper and access settings. These settings specify the connection throttling and access control settings used for the client to server connections respectively.
- At the end of the
LISTENING PORTSsection, there is a configuration forBOSH(port5280) connections, as well as the web admin panel. This section also enables web socket connections with theejabberd_http_wsmodule. - Under the
AUTHENTICATIONsection, you can configure the authentication mechanism to be used. By default, Ejabberd usesinternalauthentication but it can be set to useexternalscripts, system-level authentication, external databases, or even a centralized LDAP service. The following is the list of all supported options: - Default
internalauthentication works well enough and we will proceed with it. If you are planning to use a different authentication mechanism, make sure that you comment outinternalauthentication. - You can also enable anonymous login support, where clients can open an XMPP connection without a username and password. Simply uncomment the respective settings from
Anonymous login support: - Next, under the
DATABASE SETUPsection, you can set Ejabberd to use an external database system. Ejabberd supports all leading relational database systems, includingSQLite. The following is the list of all supported database systems: - The default database settings use an inbuilt database server known as Mnesia. It provides in-memory and disk-based storage and can be easily replicated across Ejaberd nodes. Mnesia works well even for very busy XMPP operations.
- To define an admin user, search for the
ACCESS CONTROL LISTSsection and add your desired username and hostname under the admin users list:This same section includes a list of blocked users.
You can also define your own access control lists, which can be used to restrict permissions to specific hostnames or users. The Access Rules section define the rules applicable to listed ACLs.
- Finally, under the
modulessection, you can configure the modules to be used by Ejabberd. Modules are plugins to extend the functionality of the Ejabberd server. Comment out the modules that you are not planning to use. You can also enable or disable any module in runtime from the web admin panel. The following is the partial list of modules:Each module is named after respective XEPs (XMPP extensions). You can get details of the functionality of any module by looking for the related XEP. Also check the Ejabberd documentation to find out the dependencies between modules.
- Once you are done with all the configuration, you can restart the Ejabberd server with
ejabberdctl restartor reload configuration changes with theejabberdctl reload_configcommand:$ sudo bin/ejabberdctl reload_config
Most of the core settings of Ejabberd are controlled through the configuration file, ejabberd.yml. Alternatively, you can change settings with the ejabberdctl command, but those settings will not persist after restart. If you need the settings to be permanent, change them in the configuration file. You can always reload the configuration file changes without restarting the server.
While editing the configuration file, make sure that you follow the indentation and spacing as shown in examples. Ejabberd configuration follows the YML format and any change in spacing will leave that setting undefined. The good news is that the latest version of Ejabberd will prompt you about any mistakes in configuration.
There's another file named ejabberdctl.cfg that contains Erlang runtime settings. You may need to update those parameters while performance tuning the Ejabberd server.
The Ejabberd server is highly extensible and customizable thanks to its modular architecture. Most Ejabberd features are implemented as external modules. Modules are pluggable components that can be used to extend core functionality. These modules can be enabled or disabled as per requirements and do not affect the core functionality. Ejabberd modules are written in either Erlang or Elixir.
Ejabberd modules work with the hook mechanism implemented in the Ejabberd core. Hooks are nothing but simple events such as message received, user logged in, and connection time out. You can get a full list of supported hooks in the Ejabberd documentation, although it may not be a complete list. Each hook gets its own handler chain, with each handler assigned with a priority number. When you enable a module, it registers a given handler with a respective hook and a position or priority in the handler chain. When a hook is triggered by an event, it executes each handler in a chain, one after another. Additionally, a handler function may request to stop processing hooks and not to execute any further handlers.
The Ejabberd administrative command ejabberdctl provides an option to search for and install external modules. Ejabberd takes care of downloading the module, compiling, and installing it. You can even write your own module and add it to the local repository for installation. Check Ejabberd's developer documents for more details on module development.
- List of XMPP extensions at http://xmpp.org/xmpp-protocols/xmpp-extensions/
- Ejabberd document at link - https://www.process-one.net/docs/ejabberd/guide_en.html
- Ejabberd developer documentation at http://docs.ejabberd.im/developer/modules/
- Ejabberd hooks at http://docs.ejabberd.im/developer/hooks/
How it works…
Most of the core settings of Ejabberd are controlled through the configuration file, ejabberd.yml. Alternatively, you can change settings with the ejabberdctl command, but those settings will not persist after restart. If you need the settings to be permanent, change them in the configuration file. You can always reload the configuration file changes without restarting the server.
While editing the configuration file, make sure that you follow the indentation and spacing as shown in examples. Ejabberd configuration follows the YML format and any change in spacing will leave that setting undefined. The good news is that the latest version of Ejabberd will prompt you about any mistakes in configuration.
There's another file named ejabberdctl.cfg that contains Erlang runtime settings. You may need to update those parameters while performance tuning the Ejabberd server.
The Ejabberd server is highly extensible and customizable thanks to its modular architecture. Most Ejabberd features are implemented as external modules. Modules are pluggable components that can be used to extend core functionality. These modules can be enabled or disabled as per requirements and do not affect the core functionality. Ejabberd modules are written in either Erlang or Elixir.
Ejabberd modules work with the hook mechanism implemented in the Ejabberd core. Hooks are nothing but simple events such as message received, user logged in, and connection time out. You can get a full list of supported hooks in the Ejabberd documentation, although it may not be a complete list. Each hook gets its own handler chain, with each handler assigned with a priority number. When you enable a module, it registers a given handler with a respective hook and a position or priority in the handler chain. When a hook is triggered by an event, it executes each handler in a chain, one after another. Additionally, a handler function may request to stop processing hooks and not to execute any further handlers.
The Ejabberd administrative command ejabberdctl provides an option to search for and install external modules. Ejabberd takes care of downloading the module, compiling, and installing it. You can even write your own module and add it to the local repository for installation. Check Ejabberd's developer documents for more details on module development.
- List of XMPP extensions at http://xmpp.org/xmpp-protocols/xmpp-extensions/
- Ejabberd document at link - https://www.process-one.net/docs/ejabberd/guide_en.html
- Ejabberd developer documentation at http://docs.ejabberd.im/developer/modules/
- Ejabberd hooks at http://docs.ejabberd.im/developer/hooks/
There's more…
The Ejabberd server is highly extensible and customizable thanks to its modular architecture. Most Ejabberd features are implemented as external modules. Modules are pluggable components that can be used to extend core functionality. These modules can be enabled or disabled as per requirements and do not affect the core functionality. Ejabberd modules are written in either Erlang or Elixir.
Ejabberd modules work with the hook mechanism implemented in the Ejabberd core. Hooks are nothing but simple events such as message received, user logged in, and connection time out. You can get a full list of supported hooks in the Ejabberd documentation, although it may not be a complete list. Each hook gets its own handler chain, with each handler assigned with a priority number. When you enable a module, it registers a given handler with a respective hook and a position or priority in the handler chain. When a hook is triggered by an event, it executes each handler in a chain, one after another. Additionally, a handler function may request to stop processing hooks and not to execute any further handlers.
The Ejabberd administrative command ejabberdctl provides an option to search for and install external modules. Ejabberd takes care of downloading the module, compiling, and installing it. You can even write your own module and add it to the local repository for installation. Check Ejabberd's developer documents for more details on module development.
- List of XMPP extensions at http://xmpp.org/xmpp-protocols/xmpp-extensions/
- Ejabberd document at link - https://www.process-one.net/docs/ejabberd/guide_en.html
- Ejabberd developer documentation at http://docs.ejabberd.im/developer/modules/
- Ejabberd hooks at http://docs.ejabberd.im/developer/hooks/
See also
- List of XMPP extensions at http://xmpp.org/xmpp-protocols/xmpp-extensions/
- Ejabberd document at link - https://www.process-one.net/docs/ejabberd/guide_en.html
- Ejabberd developer documentation at http://docs.ejabberd.im/developer/modules/
- Ejabberd hooks at http://docs.ejabberd.im/developer/hooks/
In this recipe, we will learn how to use web technologies to create a web-based XMPP client. I will demonstrate the use of the popular JavaScript library StropheJS to create a basic web client and connect to the XMPP server.
Strophe is a collection of libraries that can be used to communicate with the XMPP server. It contains libstrophe, which is a C-based implementation of XMPP client functionalities, and Strophe.js, which is a JavaScript implementation. Strophe provides core XMPP client functionality and can be extended with custom modules. The community has contributed various extensions to support additional XMPP functions.
With a limit on page count, I will focus on a simple demo of Strophe.js where we download the code and modify an example to connect with our XMPP server.
You will need the XMPP server installed and running. You can also use public XMPP servers, but make sure that you register with them and obtain your username (JID) and password.
You will need at least two user accounts to communicate with each other.
As we are using a web-based connection, it needs a Bidirectional-streams Over Synchronous HTTP (BOSH) extension enabled on the XMPP server. Ejabberd supports this functionality with mod_http_bind and it should be enabled by default.
Download and extract the latest source achieve from the Strophe.js site: http://strophe.im/strophejs/.
Optionally, you will need a web server set up to access a web client.
I assume the source code is located in the StropheJS directory. We will use one of the examples shipped with the StropheJS source:
- Change the directory to
examplesunder the extracted StropheJS code. This directory contains multiple examples, demonstrating different features of StropheJS. We will useechobot.jsandechobot.htmlas our starting point. - Open
echobot.jsand change theBOSH_SERVICEURL on the first line, as follows:var BOSH_SERVICE = 'http://hostname:5280/http-bind';
- Replace the hostname with your XMPP domain or XMPP server IP address. For example, if your XMPP server is available at
xmpp.mysrv.com, then theBOSH_SERVICEURL will be as follows:var BOSH_SERVICE = 'http://xmpp.mysrv.com:5280/http-bind';
- Optionally, you can enable debug logging to watch actual data exchanged between client and server. Find the
$(document).ready()section and uncomment the following lines:// uncomment the following lines to spy on the wire traffic. connection.rawInput = function (data) { log('RECV: ' + data); }; connection.rawOutput = function (data) { log('SEND: ' + data); }; - Save the changes to
echobot.jsand openechobot.htmlin your browser. You should see a page with two text fields, one for JID and another for Password:
- Enter your JID (XMPP username) and respective password and click connect.
- Now, Strophe.js will try to open an XMPP connection and log in with the given details. If the connection is successful, you should see the following screen:

- The last line includes your JID, with a unique identifier for the current session appended at the end. This form of JID is also called full JID.
- Open a separate client connection with, say, PSI, log in with some other user, and send a message on your given JID. This should print your message on the web page and the same message will be echoed back to the sender. Your web page should look similar to the following screenshot:

Strophe.js is a JavaScript-based XMPP client library that makes it easy to write your own web-based XMPP clients. Strophe handles all actual communication parts, such as the encoding and decoding of XML stanzas, the connection procedure, and so on. You can use simple APIs provided by Strophe to create your client. Strophe.js uses jQuery to work with the HTML DOM, so if you are familiar with jQuery you will feel at home when working with Strophe.
If you browse through the code in echobot.js, you will see two main event handlers: onConnect and onMessage. These event handlers are attached to specific events and are executed when that event occurs. The onConnect handler is attached to a connection object to capture any change in connection state, and onMessage is attached as a handler for message events. It will be triggered when our client receives any message from the server.
If you are interested in the syntax for the addHandler function, it is as follows:
addHandler: function (handler,ns,name,type,id,from,options)
The handler parameter is the actual function to manipulate an incoming message object; ns is the XMPP namespace and can be used to receive packets only from a certain namespace. It defaults to jabber:client, the name parameter, which is the name of an element to act upon—in our case, it is message. You can use iq or presence to receive respective data types. Other parameters add more filtering options, where you can specify a specific ID for the message, type of the message packet (chat or normal or group, defaults to chat) and other options.
The handler function onMessage gets triggered whenever a connection object receives a new message from the server. Then, it parses the received data and extracts all required information. As it is an echo bot, it simply reads the message and echoes it back to the sender. The new message packet is generated with the following lines:
var reply = $msg({to: from, from: to, type: 'chat'})
.cnode(Strophe.copyElement(body));The message is passed to a connection object with the following lines, which in turn sends it to the server:
connection.send(reply.tree());
The last section initiates the Strophe client on page load (ready). When we click on the connect button, a click handler in this section gets triggered and opens a new connection with the XMPP server. The same button is changed to disconnect so that we can send a proper disconnect request to the server.
Strophe.js supports WebSocket-based XMPP connections, and the latest version of Ejabberd has also added support for WebSockets. WebSockets provides noticeable performance improvements and reduces connection time over BOSH connections. In the preceding example, we have used the BOSH protocol, which can be replaced with WebSocket simply by changing the BOSH_SERVICE URL as follows:
var BOSH_SERVICE = 'ws:// hostname:5280/websocket';
If you need a secure WebSocket connection, use the wss protocol instead of:
wsvar BOSH_SERVICE = 'wss:// hostname:5280/websocket';
You should check other examples, mainly prebind and restore. Both demonstrate connection features that can help in reducing connection delay.
- StropheJS official page at http://strophe.im/strophejs/
- StropheJS GitHub repo at https://github.com/strophe/strophejs
- StropheJS API documentation at http://strophe.im/strophejs/doc/1.1.3/files/strophe-js.html
- StropheJS plugins at https://github.com/metajack/strophejs-plugins
Getting ready
You will need the XMPP server installed and running. You can also use public XMPP servers, but make sure that you register with them and obtain your username (JID) and password.
You will need at least two user accounts to communicate with each other.
As we are using a web-based connection, it needs a Bidirectional-streams Over Synchronous HTTP (BOSH) extension enabled on the XMPP server. Ejabberd supports this functionality with mod_http_bind and it should be enabled by default.
Download and extract the latest source achieve from the Strophe.js site: http://strophe.im/strophejs/.
Optionally, you will need a web server set up to access a web client.
I assume the source code is located in the StropheJS directory. We will use one of the examples shipped with the StropheJS source:
- Change the directory to
examplesunder the extracted StropheJS code. This directory contains multiple examples, demonstrating different features of StropheJS. We will useechobot.jsandechobot.htmlas our starting point. - Open
echobot.jsand change theBOSH_SERVICEURL on the first line, as follows:var BOSH_SERVICE = 'http://hostname:5280/http-bind';
- Replace the hostname with your XMPP domain or XMPP server IP address. For example, if your XMPP server is available at
xmpp.mysrv.com, then theBOSH_SERVICEURL will be as follows:var BOSH_SERVICE = 'http://xmpp.mysrv.com:5280/http-bind';
- Optionally, you can enable debug logging to watch actual data exchanged between client and server. Find the
$(document).ready()section and uncomment the following lines:// uncomment the following lines to spy on the wire traffic. connection.rawInput = function (data) { log('RECV: ' + data); }; connection.rawOutput = function (data) { log('SEND: ' + data); }; - Save the changes to
echobot.jsand openechobot.htmlin your browser. You should see a page with two text fields, one for JID and another for Password: - Enter your JID (XMPP username) and respective password and click connect.
- Now, Strophe.js will try to open an XMPP connection and log in with the given details. If the connection is successful, you should see the following screen:
- The last line includes your JID, with a unique identifier for the current session appended at the end. This form of JID is also called full JID.
- Open a separate client connection with, say, PSI, log in with some other user, and send a message on your given JID. This should print your message on the web page and the same message will be echoed back to the sender. Your web page should look similar to the following screenshot:
Strophe.js is a JavaScript-based XMPP client library that makes it easy to write your own web-based XMPP clients. Strophe handles all actual communication parts, such as the encoding and decoding of XML stanzas, the connection procedure, and so on. You can use simple APIs provided by Strophe to create your client. Strophe.js uses jQuery to work with the HTML DOM, so if you are familiar with jQuery you will feel at home when working with Strophe.
If you browse through the code in echobot.js, you will see two main event handlers: onConnect and onMessage. These event handlers are attached to specific events and are executed when that event occurs. The onConnect handler is attached to a connection object to capture any change in connection state, and onMessage is attached as a handler for message events. It will be triggered when our client receives any message from the server.
If you are interested in the syntax for the addHandler function, it is as follows:
addHandler: function (handler,ns,name,type,id,from,options)
The handler parameter is the actual function to manipulate an incoming message object; ns is the XMPP namespace and can be used to receive packets only from a certain namespace. It defaults to jabber:client, the name parameter, which is the name of an element to act upon—in our case, it is message. You can use iq or presence to receive respective data types. Other parameters add more filtering options, where you can specify a specific ID for the message, type of the message packet (chat or normal or group, defaults to chat) and other options.
The handler function onMessage gets triggered whenever a connection object receives a new message from the server. Then, it parses the received data and extracts all required information. As it is an echo bot, it simply reads the message and echoes it back to the sender. The new message packet is generated with the following lines:
var reply = $msg({to: from, from: to, type: 'chat'})
.cnode(Strophe.copyElement(body));The message is passed to a connection object with the following lines, which in turn sends it to the server:
connection.send(reply.tree());
The last section initiates the Strophe client on page load (ready). When we click on the connect button, a click handler in this section gets triggered and opens a new connection with the XMPP server. The same button is changed to disconnect so that we can send a proper disconnect request to the server.
Strophe.js supports WebSocket-based XMPP connections, and the latest version of Ejabberd has also added support for WebSockets. WebSockets provides noticeable performance improvements and reduces connection time over BOSH connections. In the preceding example, we have used the BOSH protocol, which can be replaced with WebSocket simply by changing the BOSH_SERVICE URL as follows:
var BOSH_SERVICE = 'ws:// hostname:5280/websocket';
If you need a secure WebSocket connection, use the wss protocol instead of:
wsvar BOSH_SERVICE = 'wss:// hostname:5280/websocket';
You should check other examples, mainly prebind and restore. Both demonstrate connection features that can help in reducing connection delay.
- StropheJS official page at http://strophe.im/strophejs/
- StropheJS GitHub repo at https://github.com/strophe/strophejs
- StropheJS API documentation at http://strophe.im/strophejs/doc/1.1.3/files/strophe-js.html
- StropheJS plugins at https://github.com/metajack/strophejs-plugins
How to do it…
I assume the source code is located in the StropheJS directory. We will use one of the examples shipped with the StropheJS source:
- Change the directory to
examplesunder the extracted StropheJS code. This directory contains multiple examples, demonstrating different features of StropheJS. We will useechobot.jsandechobot.htmlas our starting point. - Open
echobot.jsand change theBOSH_SERVICEURL on the first line, as follows:var BOSH_SERVICE = 'http://hostname:5280/http-bind';
- Replace the hostname with your XMPP domain or XMPP server IP address. For example, if your XMPP server is available at
xmpp.mysrv.com, then theBOSH_SERVICEURL will be as follows:var BOSH_SERVICE = 'http://xmpp.mysrv.com:5280/http-bind';
- Optionally, you can enable debug logging to watch actual data exchanged between client and server. Find the
$(document).ready()section and uncomment the following lines:// uncomment the following lines to spy on the wire traffic. connection.rawInput = function (data) { log('RECV: ' + data); }; connection.rawOutput = function (data) { log('SEND: ' + data); }; - Save the changes to
echobot.jsand openechobot.htmlin your browser. You should see a page with two text fields, one for JID and another for Password: - Enter your JID (XMPP username) and respective password and click connect.
- Now, Strophe.js will try to open an XMPP connection and log in with the given details. If the connection is successful, you should see the following screen:
- The last line includes your JID, with a unique identifier for the current session appended at the end. This form of JID is also called full JID.
- Open a separate client connection with, say, PSI, log in with some other user, and send a message on your given JID. This should print your message on the web page and the same message will be echoed back to the sender. Your web page should look similar to the following screenshot:
Strophe.js is a JavaScript-based XMPP client library that makes it easy to write your own web-based XMPP clients. Strophe handles all actual communication parts, such as the encoding and decoding of XML stanzas, the connection procedure, and so on. You can use simple APIs provided by Strophe to create your client. Strophe.js uses jQuery to work with the HTML DOM, so if you are familiar with jQuery you will feel at home when working with Strophe.
If you browse through the code in echobot.js, you will see two main event handlers: onConnect and onMessage. These event handlers are attached to specific events and are executed when that event occurs. The onConnect handler is attached to a connection object to capture any change in connection state, and onMessage is attached as a handler for message events. It will be triggered when our client receives any message from the server.
If you are interested in the syntax for the addHandler function, it is as follows:
addHandler: function (handler,ns,name,type,id,from,options)
The handler parameter is the actual function to manipulate an incoming message object; ns is the XMPP namespace and can be used to receive packets only from a certain namespace. It defaults to jabber:client, the name parameter, which is the name of an element to act upon—in our case, it is message. You can use iq or presence to receive respective data types. Other parameters add more filtering options, where you can specify a specific ID for the message, type of the message packet (chat or normal or group, defaults to chat) and other options.
The handler function onMessage gets triggered whenever a connection object receives a new message from the server. Then, it parses the received data and extracts all required information. As it is an echo bot, it simply reads the message and echoes it back to the sender. The new message packet is generated with the following lines:
var reply = $msg({to: from, from: to, type: 'chat'})
.cnode(Strophe.copyElement(body));The message is passed to a connection object with the following lines, which in turn sends it to the server:
connection.send(reply.tree());
The last section initiates the Strophe client on page load (ready). When we click on the connect button, a click handler in this section gets triggered and opens a new connection with the XMPP server. The same button is changed to disconnect so that we can send a proper disconnect request to the server.
Strophe.js supports WebSocket-based XMPP connections, and the latest version of Ejabberd has also added support for WebSockets. WebSockets provides noticeable performance improvements and reduces connection time over BOSH connections. In the preceding example, we have used the BOSH protocol, which can be replaced with WebSocket simply by changing the BOSH_SERVICE URL as follows:
var BOSH_SERVICE = 'ws:// hostname:5280/websocket';
If you need a secure WebSocket connection, use the wss protocol instead of:
wsvar BOSH_SERVICE = 'wss:// hostname:5280/websocket';
You should check other examples, mainly prebind and restore. Both demonstrate connection features that can help in reducing connection delay.
- StropheJS official page at http://strophe.im/strophejs/
- StropheJS GitHub repo at https://github.com/strophe/strophejs
- StropheJS API documentation at http://strophe.im/strophejs/doc/1.1.3/files/strophe-js.html
- StropheJS plugins at https://github.com/metajack/strophejs-plugins
How it works…
Strophe.js is a JavaScript-based XMPP client library that makes it easy to write your own web-based XMPP clients. Strophe handles all actual communication parts, such as the encoding and decoding of XML stanzas, the connection procedure, and so on. You can use simple APIs provided by Strophe to create your client. Strophe.js uses jQuery to work with the HTML DOM, so if you are familiar with jQuery you will feel at home when working with Strophe.
If you browse through the code in echobot.js, you will see two main event handlers: onConnect and onMessage. These event handlers are attached to specific events and are executed when that event occurs. The onConnect handler is attached to a connection object to capture any change in connection state, and onMessage is attached as a handler for message events. It will be triggered when our client receives any message from the server.
If you are interested in the syntax for the addHandler function, it is as follows:
addHandler: function (handler,ns,name,type,id,from,options)
The handler parameter is the actual function to manipulate an incoming message object; ns is the XMPP namespace and can be used to receive packets only from a certain namespace. It defaults to jabber:client, the name parameter, which is the name of an element to act upon—in our case, it is message. You can use iq or presence to receive respective data types. Other parameters add more filtering options, where you can specify a specific ID for the message, type of the message packet (chat or normal or group, defaults to chat) and other options.
The handler function onMessage gets triggered whenever a connection object receives a new message from the server. Then, it parses the received data and extracts all required information. As it is an echo bot, it simply reads the message and echoes it back to the sender. The new message packet is generated with the following lines:
var reply = $msg({to: from, from: to, type: 'chat'})
.cnode(Strophe.copyElement(body));The message is passed to a connection object with the following lines, which in turn sends it to the server:
connection.send(reply.tree());
The last section initiates the Strophe client on page load (ready). When we click on the connect button, a click handler in this section gets triggered and opens a new connection with the XMPP server. The same button is changed to disconnect so that we can send a proper disconnect request to the server.
Strophe.js supports WebSocket-based XMPP connections, and the latest version of Ejabberd has also added support for WebSockets. WebSockets provides noticeable performance improvements and reduces connection time over BOSH connections. In the preceding example, we have used the BOSH protocol, which can be replaced with WebSocket simply by changing the BOSH_SERVICE URL as follows:
var BOSH_SERVICE = 'ws:// hostname:5280/websocket';
If you need a secure WebSocket connection, use the wss protocol instead of:
wsvar BOSH_SERVICE = 'wss:// hostname:5280/websocket';
You should check other examples, mainly prebind and restore. Both demonstrate connection features that can help in reducing connection delay.
- StropheJS official page at http://strophe.im/strophejs/
- StropheJS GitHub repo at https://github.com/strophe/strophejs
- StropheJS API documentation at http://strophe.im/strophejs/doc/1.1.3/files/strophe-js.html
- StropheJS plugins at https://github.com/metajack/strophejs-plugins
There's more…
Strophe.js supports WebSocket-based XMPP connections, and the latest version of Ejabberd has also added support for WebSockets. WebSockets provides noticeable performance improvements and reduces connection time over BOSH connections. In the preceding example, we have used the BOSH protocol, which can be replaced with WebSocket simply by changing the BOSH_SERVICE URL as follows:
var BOSH_SERVICE = 'ws:// hostname:5280/websocket';
If you need a secure WebSocket connection, use the wss protocol instead of:
wsvar BOSH_SERVICE = 'wss:// hostname:5280/websocket';
You should check other examples, mainly prebind and restore. Both demonstrate connection features that can help in reducing connection delay.
- StropheJS official page at http://strophe.im/strophejs/
- StropheJS GitHub repo at https://github.com/strophe/strophejs
- StropheJS API documentation at http://strophe.im/strophejs/doc/1.1.3/files/strophe-js.html
- StropheJS plugins at https://github.com/metajack/strophejs-plugins
See also
- StropheJS official page at http://strophe.im/strophejs/
- StropheJS GitHub repo at https://github.com/strophe/strophejs
- StropheJS API documentation at http://strophe.im/strophejs/doc/1.1.3/files/strophe-js.html
- StropheJS plugins at https://github.com/metajack/strophejs-plugins
In this recipe, we will learn how to set up and use the group chat feature of XMPP. Group chat is also called Multi User Chat (MUC). Ejabberd supports MUC with the help of an extension and is enabled by default.
You will need the Ejabberd server set up and running. Make sure you have enabled MUC with the mod_muc and mod_muc_admin modules.
You will need two users for the group chat. One of them needs to have admin rights to set up MUC and create rooms.
Check your XMPP client for the support of MUC or conference protocol. I will be using PSI as a client for this recipe.
For multi-user chat, we need two or more users logged in on the server at the same time, plus a chat room. Let's first set up our chat client with user accounts and create a chat room.
Follow these steps to enable group chat:
- Open PSI and set up two different accounts. Log in to the XMPP server and set the Status to Online. Your PSI window should look something like this:

- You can access the MUC statistics on the Ejabberd web panel to check available rooms.
- Now we will create our first chat room. In PSI, click the General menu, select Service Discovery, and then select your admin account:

- This will open a Service Discovery window with a list of all administrative services on your Ejabberd XMPP server:

- Look for the Chatrooms node under the Name column and double-click it to browse its options. A new window will pop up, which should look something like this:

- Now type the name of the chat room you want to create under the Room information section. Set your nickname as it should be displayed to other participants and click the Join button.
- This will open a new window for your chat room. You will notice the chat room name on the title bar of the window. As the user admin created this room, he is assigned as a moderator:

- For now, the admin is the only participant in this room. Repeat the same steps with other user accounts to get them to join this room. Make sure that you use the same room name again. Once a new user joins the room, the admin user will get notified. Both users can see each other in the participants section:

A group chat works in a similar way to a one on one chat. In a one-on-one chat, we send a message to the JID of a specific user, while in a multi-user chat we send a message to the JID of a chat room. As the message is received on room ID, XMPP takes care of forwarding it to all participants in that room.
By default, XMPP chat rooms are not persistent and will be deleted when all participants leave that room. PSI uses the default configuration to quickly create a new chat room. Once the chat room is created, you can configure it in the same chat room window. Click on the options button, the downward triangle in the upper-right corner of the chat room window, and then select Configure room:

On the first tab, you can set members, administrators, and ban user accounts. On the General tab, you can set other room configurations. You can mark a room as persistent and make it private password-protected. This tab contains a number of other options; check them at your leisure.
You may have noticed we have used an admin account to create a chat room. You can allow non-admin users to act as an MUC admin. Open the Ejabberd configuration and search for muc_admin configuration. Add your desired username below the admin entry and set it to allow.
- Candy - JavaScript-based multi-user chat client at https://candy-chat.github.io/candy/
- Strophe.js MUC plugin at https://github.com/metajack/strophejs-plugins/tree/master/muc
Getting ready
You will need the Ejabberd server set up and running. Make sure you have enabled MUC with the mod_muc and mod_muc_admin modules.
You will need two users for the group chat. One of them needs to have admin rights to set up MUC and create rooms.
Check your XMPP client for the support of MUC or conference protocol. I will be using PSI as a client for this recipe.
For multi-user chat, we need two or more users logged in on the server at the same time, plus a chat room. Let's first set up our chat client with user accounts and create a chat room.
Follow these steps to enable group chat:
- Open PSI and set up two different accounts. Log in to the XMPP server and set the Status to Online. Your PSI window should look something like this:
- You can access the MUC statistics on the Ejabberd web panel to check available rooms.
- Now we will create our first chat room. In PSI, click the General menu, select Service Discovery, and then select your admin account:
- This will open a Service Discovery window with a list of all administrative services on your Ejabberd XMPP server:
- Look for the Chatrooms node under the Name column and double-click it to browse its options. A new window will pop up, which should look something like this:
- Now type the name of the chat room you want to create under the Room information section. Set your nickname as it should be displayed to other participants and click the Join button.
- This will open a new window for your chat room. You will notice the chat room name on the title bar of the window. As the user admin created this room, he is assigned as a moderator:
- For now, the admin is the only participant in this room. Repeat the same steps with other user accounts to get them to join this room. Make sure that you use the same room name again. Once a new user joins the room, the admin user will get notified. Both users can see each other in the participants section:
A group chat works in a similar way to a one on one chat. In a one-on-one chat, we send a message to the JID of a specific user, while in a multi-user chat we send a message to the JID of a chat room. As the message is received on room ID, XMPP takes care of forwarding it to all participants in that room.
By default, XMPP chat rooms are not persistent and will be deleted when all participants leave that room. PSI uses the default configuration to quickly create a new chat room. Once the chat room is created, you can configure it in the same chat room window. Click on the options button, the downward triangle in the upper-right corner of the chat room window, and then select Configure room:
On the first tab, you can set members, administrators, and ban user accounts. On the General tab, you can set other room configurations. You can mark a room as persistent and make it private password-protected. This tab contains a number of other options; check them at your leisure.
You may have noticed we have used an admin account to create a chat room. You can allow non-admin users to act as an MUC admin. Open the Ejabberd configuration and search for muc_admin configuration. Add your desired username below the admin entry and set it to allow.
- Candy - JavaScript-based multi-user chat client at https://candy-chat.github.io/candy/
- Strophe.js MUC plugin at https://github.com/metajack/strophejs-plugins/tree/master/muc
How to do it…
For multi-user chat, we need two or more users logged in on the server at the same time, plus a chat room. Let's first set up our chat client with user accounts and create a chat room.
Follow these steps to enable group chat:
- Open PSI and set up two different accounts. Log in to the XMPP server and set the Status to Online. Your PSI window should look something like this:
- You can access the MUC statistics on the Ejabberd web panel to check available rooms.
- Now we will create our first chat room. In PSI, click the General menu, select Service Discovery, and then select your admin account:
- This will open a Service Discovery window with a list of all administrative services on your Ejabberd XMPP server:
- Look for the Chatrooms node under the Name column and double-click it to browse its options. A new window will pop up, which should look something like this:
- Now type the name of the chat room you want to create under the Room information section. Set your nickname as it should be displayed to other participants and click the Join button.
- This will open a new window for your chat room. You will notice the chat room name on the title bar of the window. As the user admin created this room, he is assigned as a moderator:
- For now, the admin is the only participant in this room. Repeat the same steps with other user accounts to get them to join this room. Make sure that you use the same room name again. Once a new user joins the room, the admin user will get notified. Both users can see each other in the participants section:
A group chat works in a similar way to a one on one chat. In a one-on-one chat, we send a message to the JID of a specific user, while in a multi-user chat we send a message to the JID of a chat room. As the message is received on room ID, XMPP takes care of forwarding it to all participants in that room.
By default, XMPP chat rooms are not persistent and will be deleted when all participants leave that room. PSI uses the default configuration to quickly create a new chat room. Once the chat room is created, you can configure it in the same chat room window. Click on the options button, the downward triangle in the upper-right corner of the chat room window, and then select Configure room:
On the first tab, you can set members, administrators, and ban user accounts. On the General tab, you can set other room configurations. You can mark a room as persistent and make it private password-protected. This tab contains a number of other options; check them at your leisure.
You may have noticed we have used an admin account to create a chat room. You can allow non-admin users to act as an MUC admin. Open the Ejabberd configuration and search for muc_admin configuration. Add your desired username below the admin entry and set it to allow.
- Candy - JavaScript-based multi-user chat client at https://candy-chat.github.io/candy/
- Strophe.js MUC plugin at https://github.com/metajack/strophejs-plugins/tree/master/muc
How it works…
A group chat works in a similar way to a one on one chat. In a one-on-one chat, we send a message to the JID of a specific user, while in a multi-user chat we send a message to the JID of a chat room. As the message is received on room ID, XMPP takes care of forwarding it to all participants in that room.
By default, XMPP chat rooms are not persistent and will be deleted when all participants leave that room. PSI uses the default configuration to quickly create a new chat room. Once the chat room is created, you can configure it in the same chat room window. Click on the options button, the downward triangle in the upper-right corner of the chat room window, and then select Configure room:
On the first tab, you can set members, administrators, and ban user accounts. On the General tab, you can set other room configurations. You can mark a room as persistent and make it private password-protected. This tab contains a number of other options; check them at your leisure.
You may have noticed we have used an admin account to create a chat room. You can allow non-admin users to act as an MUC admin. Open the Ejabberd configuration and search for muc_admin configuration. Add your desired username below the admin entry and set it to allow.
- Candy - JavaScript-based multi-user chat client at https://candy-chat.github.io/candy/
- Strophe.js MUC plugin at https://github.com/metajack/strophejs-plugins/tree/master/muc
There's more…
By default, XMPP chat rooms are not persistent and will be deleted when all participants leave that room. PSI uses the default configuration to quickly create a new chat room. Once the chat room is created, you can configure it in the same chat room window. Click on the options button, the downward triangle in the upper-right corner of the chat room window, and then select Configure room:
On the first tab, you can set members, administrators, and ban user accounts. On the General tab, you can set other room configurations. You can mark a room as persistent and make it private password-protected. This tab contains a number of other options; check them at your leisure.
You may have noticed we have used an admin account to create a chat room. You can allow non-admin users to act as an MUC admin. Open the Ejabberd configuration and search for muc_admin configuration. Add your desired username below the admin entry and set it to allow.
- Candy - JavaScript-based multi-user chat client at https://candy-chat.github.io/candy/
- Strophe.js MUC plugin at https://github.com/metajack/strophejs-plugins/tree/master/muc
See also
- Candy - JavaScript-based multi-user chat client at https://candy-chat.github.io/candy/
- Strophe.js MUC plugin at https://github.com/metajack/strophejs-plugins/tree/master/muc
Up to now, this chapter has covered XMPP and its usages. It is a good, mature protocol with multiple servers developed around it. Sometimes, however, you may need to set up a quick application that uses a simple message transfer, or develop a small chat application for your team. For such projects, XMPP servers may turn out to be overkill. You may not use all the features of XMPP and waste resources, even for a basic setup. Plus, developing an XMPP application is a time consuming process.
In this case, you can quickly start using Node.js-based socket communication. Node.js has gained popularity in the developer community. It is a framework developed in a commonly known language, JavaScript. In this recipe, we will learn how to develop a message passing application using Node.js sockets. We will use Socket.io, a popular Node.js library, to work with sockets and a demo app provided by Socket.io.
We are going to set up a Node.js-based application, so we need to install Node.js on our Ubuntu server.
Follow these steps to install Node.js:
- Install Node.js with the following command:
$ sudo apt-get update $ sudo apt-get install nodejs
- Optionally, check your Node.js version:
$ node -v - Next, download the sample application from the Socket.io GitHub repo:
$ wget https://github.com/rauchg/chat-example/archive/master.zip - Unzip the downloaded contents. This will create a new directory named
chat-sample-master:$ unzip master.zip - Change the path to the newly created directory:
$ cd chat-sample-master - Next, we will need to install the dependencies for this sample application. Use the following Node.js command to install all dependencies.
$ npm install - This will fetch all dependencies and install them in the
node_modulesdirectory underchat-sample-master. Once theinstallcommand completes, you can start your application with the following command:$ node index.js ubuntu: ~/chat-example-master $ node index.js listening on *:3000
- This will start an inbuilt HTTP server and set it to listen on default port
3000. Now you can access the app athttp://server-ip:3000. The screen will look similar to the following image:
- Open another instance in a separate browser window and start sending your messages.
We have set up a very simple application that listens on a given Node.js socket. To send a message, we have used the socket.emit() function, which writes the data from text box to socket:
$('form').submit(function(){
socket.emit('chat message', $('#m').val());
...
});When this message is received on the server side, the server writes it to all connected sockets, resulting in a group chat scenario:
io.on('connection', function(socket){
socket.on('chat message', function(msg){
io.emit('chat message', msg);
});
}); Similarly, to receive a message, we keep listening on the socket, and when an event chat message happens, we write the received data to an HTML page as a message:
socket.on('chat message', function(msg){
$('#messages').append($('<li>').text(msg));
});This is very basic application and can be extended easily to implement one-on-one chat. All we need is a unique ID for all clients and a little modification to the interface to separate messages. Right now, the message is sent as it is; you can collect the message and create a JSON object to contain sender and receiver IDs, plus any additional information.
The advantage of using NodeJS is quick and easy development. JavaScript is a commonly used language and you can easily get support from the large community. You can always develop the application as per your requirements. The disadvantage is regarding scaling; you will need to code the clustering mechanism on your own, whereas for XMPP, clustering is implemented by nearly all leading servers.
The Node.js setup available with the Ubuntu repository is not the latest one. You can download the latest version from the node official download page.
Download NodeJS binaries for Linux. Choose your desired version by visiting the NodeJS download page. As of writing this, the latest stable version is 5.1:
$ wget https://nodejs.org/download/release/v5.1.0/node-v5.1.0-linux-x64.tar.xz
Extract binaries and move it to /use/local so that it is accessible globally:
$ tar Jxv --strip=1 -C /usr/local/
Check the node version with the following command:
$ node -v
- Node.js download page: https://nodejs.org/en/download
- Node: how to install: https://github.com/nodejs/help/issues/41
- Sample chat application on GitHub: https://github.com/rauchg/chat-example
Getting ready
You will need access to a root account or an account with sudo privileges.
We are going to set up a Node.js-based application, so we need to install Node.js on our Ubuntu server.
Follow these steps to install Node.js:
- Install Node.js with the following command:
$ sudo apt-get update $ sudo apt-get install nodejs
- Optionally, check your Node.js version:
$ node -v - Next, download the sample application from the Socket.io GitHub repo:
$ wget https://github.com/rauchg/chat-example/archive/master.zip - Unzip the downloaded contents. This will create a new directory named
chat-sample-master:$ unzip master.zip - Change the path to the newly created directory:
$ cd chat-sample-master - Next, we will need to install the dependencies for this sample application. Use the following Node.js command to install all dependencies.
$ npm install - This will fetch all dependencies and install them in the
node_modulesdirectory underchat-sample-master. Once theinstallcommand completes, you can start your application with the following command:$ node index.js ubuntu: ~/chat-example-master $ node index.js listening on *:3000
- This will start an inbuilt HTTP server and set it to listen on default port
3000. Now you can access the app athttp://server-ip:3000. The screen will look similar to the following image: - Open another instance in a separate browser window and start sending your messages.
We have set up a very simple application that listens on a given Node.js socket. To send a message, we have used the socket.emit() function, which writes the data from text box to socket:
$('form').submit(function(){
socket.emit('chat message', $('#m').val());
...
});When this message is received on the server side, the server writes it to all connected sockets, resulting in a group chat scenario:
io.on('connection', function(socket){
socket.on('chat message', function(msg){
io.emit('chat message', msg);
});
}); Similarly, to receive a message, we keep listening on the socket, and when an event chat message happens, we write the received data to an HTML page as a message:
socket.on('chat message', function(msg){
$('#messages').append($('<li>').text(msg));
});This is very basic application and can be extended easily to implement one-on-one chat. All we need is a unique ID for all clients and a little modification to the interface to separate messages. Right now, the message is sent as it is; you can collect the message and create a JSON object to contain sender and receiver IDs, plus any additional information.
The advantage of using NodeJS is quick and easy development. JavaScript is a commonly used language and you can easily get support from the large community. You can always develop the application as per your requirements. The disadvantage is regarding scaling; you will need to code the clustering mechanism on your own, whereas for XMPP, clustering is implemented by nearly all leading servers.
The Node.js setup available with the Ubuntu repository is not the latest one. You can download the latest version from the node official download page.
Download NodeJS binaries for Linux. Choose your desired version by visiting the NodeJS download page. As of writing this, the latest stable version is 5.1:
$ wget https://nodejs.org/download/release/v5.1.0/node-v5.1.0-linux-x64.tar.xz
Extract binaries and move it to /use/local so that it is accessible globally:
$ tar Jxv --strip=1 -C /usr/local/
Check the node version with the following command:
$ node -v
- Node.js download page: https://nodejs.org/en/download
- Node: how to install: https://github.com/nodejs/help/issues/41
- Sample chat application on GitHub: https://github.com/rauchg/chat-example
How to do it…
We are going to set up a Node.js-based application, so we need to install Node.js on our Ubuntu server.
Follow these steps to install Node.js:
- Install Node.js with the following command:
$ sudo apt-get update $ sudo apt-get install nodejs
- Optionally, check your Node.js version:
$ node -v - Next, download the sample application from the Socket.io GitHub repo:
$ wget https://github.com/rauchg/chat-example/archive/master.zip - Unzip the downloaded contents. This will create a new directory named
chat-sample-master:$ unzip master.zip - Change the path to the newly created directory:
$ cd chat-sample-master - Next, we will need to install the dependencies for this sample application. Use the following Node.js command to install all dependencies.
$ npm install - This will fetch all dependencies and install them in the
node_modulesdirectory underchat-sample-master. Once theinstallcommand completes, you can start your application with the following command:$ node index.js ubuntu: ~/chat-example-master $ node index.js listening on *:3000
- This will start an inbuilt HTTP server and set it to listen on default port
3000. Now you can access the app athttp://server-ip:3000. The screen will look similar to the following image: - Open another instance in a separate browser window and start sending your messages.
We have set up a very simple application that listens on a given Node.js socket. To send a message, we have used the socket.emit() function, which writes the data from text box to socket:
$('form').submit(function(){
socket.emit('chat message', $('#m').val());
...
});When this message is received on the server side, the server writes it to all connected sockets, resulting in a group chat scenario:
io.on('connection', function(socket){
socket.on('chat message', function(msg){
io.emit('chat message', msg);
});
}); Similarly, to receive a message, we keep listening on the socket, and when an event chat message happens, we write the received data to an HTML page as a message:
socket.on('chat message', function(msg){
$('#messages').append($('<li>').text(msg));
});This is very basic application and can be extended easily to implement one-on-one chat. All we need is a unique ID for all clients and a little modification to the interface to separate messages. Right now, the message is sent as it is; you can collect the message and create a JSON object to contain sender and receiver IDs, plus any additional information.
The advantage of using NodeJS is quick and easy development. JavaScript is a commonly used language and you can easily get support from the large community. You can always develop the application as per your requirements. The disadvantage is regarding scaling; you will need to code the clustering mechanism on your own, whereas for XMPP, clustering is implemented by nearly all leading servers.
The Node.js setup available with the Ubuntu repository is not the latest one. You can download the latest version from the node official download page.
Download NodeJS binaries for Linux. Choose your desired version by visiting the NodeJS download page. As of writing this, the latest stable version is 5.1:
$ wget https://nodejs.org/download/release/v5.1.0/node-v5.1.0-linux-x64.tar.xz
Extract binaries and move it to /use/local so that it is accessible globally:
$ tar Jxv --strip=1 -C /usr/local/
Check the node version with the following command:
$ node -v
- Node.js download page: https://nodejs.org/en/download
- Node: how to install: https://github.com/nodejs/help/issues/41
- Sample chat application on GitHub: https://github.com/rauchg/chat-example
How it works…
We have set up a very simple application that listens on a given Node.js socket. To send a message, we have used the socket.emit() function, which writes the data from text box to socket:
$('form').submit(function(){
socket.emit('chat message', $('#m').val());
...
});When this message is received on the server side, the server writes it to all connected sockets, resulting in a group chat scenario:
io.on('connection', function(socket){
socket.on('chat message', function(msg){
io.emit('chat message', msg);
});
}); Similarly, to receive a message, we keep listening on the socket, and when an event chat message happens, we write the received data to an HTML page as a message:
socket.on('chat message', function(msg){
$('#messages').append($('<li>').text(msg));
});This is very basic application and can be extended easily to implement one-on-one chat. All we need is a unique ID for all clients and a little modification to the interface to separate messages. Right now, the message is sent as it is; you can collect the message and create a JSON object to contain sender and receiver IDs, plus any additional information.
The advantage of using NodeJS is quick and easy development. JavaScript is a commonly used language and you can easily get support from the large community. You can always develop the application as per your requirements. The disadvantage is regarding scaling; you will need to code the clustering mechanism on your own, whereas for XMPP, clustering is implemented by nearly all leading servers.
The Node.js setup available with the Ubuntu repository is not the latest one. You can download the latest version from the node official download page.
Download NodeJS binaries for Linux. Choose your desired version by visiting the NodeJS download page. As of writing this, the latest stable version is 5.1:
$ wget https://nodejs.org/download/release/v5.1.0/node-v5.1.0-linux-x64.tar.xz
Extract binaries and move it to /use/local so that it is accessible globally:
$ tar Jxv --strip=1 -C /usr/local/
Check the node version with the following command:
$ node -v
- Node.js download page: https://nodejs.org/en/download
- Node: how to install: https://github.com/nodejs/help/issues/41
- Sample chat application on GitHub: https://github.com/rauchg/chat-example
There's more…
The Node.js setup available with the Ubuntu repository is not the latest one. You can download the latest version from the node official download page.
Download NodeJS binaries for Linux. Choose your desired version by visiting the NodeJS download page. As of writing this, the latest stable version is 5.1:
$ wget https://nodejs.org/download/release/v5.1.0/node-v5.1.0-linux-x64.tar.xz
Extract binaries and move it to /use/local so that it is accessible globally:
$ tar Jxv --strip=1 -C /usr/local/
Check the node version with the following command:
$ node -v
- Node.js download page: https://nodejs.org/en/download
- Node: how to install: https://github.com/nodejs/help/issues/41
- Sample chat application on GitHub: https://github.com/rauchg/chat-example
See also
- Node.js download page: https://nodejs.org/en/download
- Node: how to install: https://github.com/nodejs/help/issues/41
- Sample chat application on GitHub: https://github.com/rauchg/chat-example