
In this chapter, we will cover the following recipes:
- Installing Git
- Creating a local repository with Git CLI
- Storing file revisions with Git commit
- Synchronizing the repository with a remote server
- Receiving updates with Git pull
- Creating repository clones
- Installing GitLab, your own Git hosting
- Adding users to the GitLab server
- Creating a repository with GitLab
- Automating common tasks with Git hooks
In this chapter, we will learn how to set up a popular version control system: Git. A version control system, also known as revision control system, can be thought of as a repository of files that record every single change in a file. Every update to a file or set of files is recorded as a new version, with some metadata about that specific modification. Metadata contains details of who made the change, a small comment explaining why the change was made, details on exactly what changed in each file, and a timestamp. You can easily switch back to an older version when needed.
Version control systems are generally used to track software source code, but they can be used with virtually any type of file. It is necessary for collaborative work where two or more people are working on the same file. Everyone maintains their own local copy of each file and works on them. When a person satisfactorily completes his work, he sends the updated file to the central repo. Others can synchronize their local copies with this central repo and receive any updates. If two people happen to modify the same file at the same time, they can choose what to keep and what to remove before sending updates to the central repository. If any issue happens with the latest updates, source code can be replaced with previous known-to-work versions. This allows you to track the changes over time and find the cause of the problem.
Over time, multiple version control systems have been developed; some are centralized version control systems (CVCS) and others are distributed version control systems. Centralized systems consist of a single central server that hosts all the versions and updates. Everyone sends new changes to the central server and gets updates from it. This makes it easy to administer the repository and enable fine-grained control, but it also becomes a candidate for a single point of failure. If a central server goes down, no one can push changes or get updates. CVS and Subversion are well known centralized version control systems.
Distributed version control systems, on the other hand, overcome this problem by distributing a full copy of the repository on each participating system. If a central server goes down, a copy from any client can be sent to the server to restore it. One can even choose to promote a client as a new server. Git, Mercurial, and Bazaar are examples of distributed version control systems. Bazaar is sponsored and developed by Canonical, the developer of Ubuntu. It is primarily focused on community-supported open source software development.
In this chapter, we will focus on Git, a popular version control system. It was primarily developed by Linus Torvalds to support the development of the Linux kernel. Git is influenced by the lessons learned from other version control systems. It was developed with the aim to support large projects, such as the Linux kernel, and the need for a fully distributed system and high speed. Later, GitHub, a social network for code and developers, ensured the widespread adoption of Git.
In this chapter, we will learn how to work with Git. Starting with the basics, such as installing Git and using it locally, we will also cover some advanced features of Git. We will also set up our own Git hosting with GitLab, an open source tool.
This recipe covers the installation of Git binaries on the Ubuntu server. As always, we will install the latest available Git package.
Git maintains a separate repository of the latest binaries on Launchpad. We will use PPA for this repository,to install the latest Git version:
- Add PPA to the Ubuntu installation source:
$ sudo add-apt-repository ppa:git-core/ppa - Update the
aptrepository cache:$ sudo apt-get update - Now, install Git with a simple
apt-get install gitcommand:$ sudo apt-get install git -y - Once installation completes, you can check the Git version with the following command. You can cross check the version with the official Git download page:
$ git version - Now introduce yourself to Git by providing your name and email address. Git will add this information to every commit message made by you:
$ git config --global user.name "Your Name" $ git config --global user.email "[email protected]"
- You can cross-check the configuration by using the
--listparameter togit config:$ git config --list - Use
git helpto get a list of the basic daily use commands:$ git help
Here, we have the installed the latest Git version from the repository maintained by Git developers. The Ubuntu default package repository contains the Git package, but often it is not updated. Ubuntu 14.04 still provides Git version 1.9.1.
Once the Git packages are installed, you need to identify yourself to Git. This information is used to tag the commits created by you. We have globally set the username and email with the git config command. Now, whenever you create a new commit in any repository on this system, the commit will get tagged with your username and email. This helps in tracking who did what, especially when you are working in a large group. You can get a list of configuration settings with the command git config --list, and the output should look something like the following:
$ git config --list user.name=yourname [email protected]
If you execute the same command from within a repository directory, the list will show some extra settings specific to that repository:
~/sample-repo$ git config --list user.name=yourname [email protected] core.repositoryformatversion=0 core.filemode=true core.bare=false core.logallrefupdates=true
Now, if you are not already familiar with Git, you can make use of the git help command to get documentation and manual pages. The default help menu lists commonly used commands with a short description. You can get a list of all available commands with the same git help command and a flag, -a.
$ git help -a
Additionally, the installation contains some guides or manual pages to help you get started with Git. To get a list of the available guides, use:
$ git help -g
The common Git guides are as follows:
attributes: Defines attributes per pathglossary: A Git glossaryignore: Specifies intentionally untracked files to ignore
To open a particular guide, use the git help guidename or the man git[guidename] command:
$ git help everyday # or man giteveryday
Git has become a mainstream version control system, especially after the rise of the social coding site GitHub. There are other well-known version control systems available, such as Subversion and Mercurial. Facebook uses a modified version of Mercurial for their internal code hosting. Bazaar is another distributed version control system sponsored and developed by Canonical, the force behind Ubuntu. Bazaar provides tight integration with Launchpad, a collaborative development platform by Canonical.
You can get more details about Bazaar on their official page at http://bazaar.canonical.com/en/.
You can read more by following these links:
- Git basics: https://git-scm.com/book/en/v2/Getting-Started-Git-Basics
- Git book: https://git-scm.com/book/en/v2
- Check out the Git interactive tutorial at: https://try.github.io and http://git.rocks/
- Launchpad: https://launchpad.net/
Getting ready
You will need access to a root account or an account with sudo privileges.
Git maintains a separate repository of the latest binaries on Launchpad. We will use PPA for this repository,to install the latest Git version:
- Add PPA to the Ubuntu installation source:
$ sudo add-apt-repository ppa:git-core/ppa - Update the
aptrepository cache:$ sudo apt-get update - Now, install Git with a simple
apt-get install gitcommand:$ sudo apt-get install git -y - Once installation completes, you can check the Git version with the following command. You can cross check the version with the official Git download page:
$ git version - Now introduce yourself to Git by providing your name and email address. Git will add this information to every commit message made by you:
$ git config --global user.name "Your Name" $ git config --global user.email "[email protected]"
- You can cross-check the configuration by using the
--listparameter togit config:$ git config --list - Use
git helpto get a list of the basic daily use commands:$ git help
Here, we have the installed the latest Git version from the repository maintained by Git developers. The Ubuntu default package repository contains the Git package, but often it is not updated. Ubuntu 14.04 still provides Git version 1.9.1.
Once the Git packages are installed, you need to identify yourself to Git. This information is used to tag the commits created by you. We have globally set the username and email with the git config command. Now, whenever you create a new commit in any repository on this system, the commit will get tagged with your username and email. This helps in tracking who did what, especially when you are working in a large group. You can get a list of configuration settings with the command git config --list, and the output should look something like the following:
$ git config --list user.name=yourname [email protected]
If you execute the same command from within a repository directory, the list will show some extra settings specific to that repository:
~/sample-repo$ git config --list user.name=yourname [email protected] core.repositoryformatversion=0 core.filemode=true core.bare=false core.logallrefupdates=true
Now, if you are not already familiar with Git, you can make use of the git help command to get documentation and manual pages. The default help menu lists commonly used commands with a short description. You can get a list of all available commands with the same git help command and a flag, -a.
$ git help -a
Additionally, the installation contains some guides or manual pages to help you get started with Git. To get a list of the available guides, use:
$ git help -g
The common Git guides are as follows:
attributes: Defines attributes per pathglossary: A Git glossaryignore: Specifies intentionally untracked files to ignore
To open a particular guide, use the git help guidename or the man git[guidename] command:
$ git help everyday # or man giteveryday
Git has become a mainstream version control system, especially after the rise of the social coding site GitHub. There are other well-known version control systems available, such as Subversion and Mercurial. Facebook uses a modified version of Mercurial for their internal code hosting. Bazaar is another distributed version control system sponsored and developed by Canonical, the force behind Ubuntu. Bazaar provides tight integration with Launchpad, a collaborative development platform by Canonical.
You can get more details about Bazaar on their official page at http://bazaar.canonical.com/en/.
You can read more by following these links:
- Git basics: https://git-scm.com/book/en/v2/Getting-Started-Git-Basics
- Git book: https://git-scm.com/book/en/v2
- Check out the Git interactive tutorial at: https://try.github.io and http://git.rocks/
- Launchpad: https://launchpad.net/
How to do it…
Git maintains a separate repository of the latest binaries on Launchpad. We will use PPA for this repository,to install the latest Git version:
- Add PPA to the Ubuntu installation source:
$ sudo add-apt-repository ppa:git-core/ppa - Update the
aptrepository cache:$ sudo apt-get update - Now, install Git with a simple
apt-get install gitcommand:$ sudo apt-get install git -y - Once installation completes, you can check the Git version with the following command. You can cross check the version with the official Git download page:
$ git version - Now introduce yourself to Git by providing your name and email address. Git will add this information to every commit message made by you:
$ git config --global user.name "Your Name" $ git config --global user.email "[email protected]"
- You can cross-check the configuration by using the
--listparameter togit config:$ git config --list - Use
git helpto get a list of the basic daily use commands:$ git help
Here, we have the installed the latest Git version from the repository maintained by Git developers. The Ubuntu default package repository contains the Git package, but often it is not updated. Ubuntu 14.04 still provides Git version 1.9.1.
Once the Git packages are installed, you need to identify yourself to Git. This information is used to tag the commits created by you. We have globally set the username and email with the git config command. Now, whenever you create a new commit in any repository on this system, the commit will get tagged with your username and email. This helps in tracking who did what, especially when you are working in a large group. You can get a list of configuration settings with the command git config --list, and the output should look something like the following:
$ git config --list user.name=yourname [email protected]
If you execute the same command from within a repository directory, the list will show some extra settings specific to that repository:
~/sample-repo$ git config --list user.name=yourname [email protected] core.repositoryformatversion=0 core.filemode=true core.bare=false core.logallrefupdates=true
Now, if you are not already familiar with Git, you can make use of the git help command to get documentation and manual pages. The default help menu lists commonly used commands with a short description. You can get a list of all available commands with the same git help command and a flag, -a.
$ git help -a
Additionally, the installation contains some guides or manual pages to help you get started with Git. To get a list of the available guides, use:
$ git help -g
The common Git guides are as follows:
attributes: Defines attributes per pathglossary: A Git glossaryignore: Specifies intentionally untracked files to ignore
To open a particular guide, use the git help guidename or the man git[guidename] command:
$ git help everyday # or man giteveryday
Git has become a mainstream version control system, especially after the rise of the social coding site GitHub. There are other well-known version control systems available, such as Subversion and Mercurial. Facebook uses a modified version of Mercurial for their internal code hosting. Bazaar is another distributed version control system sponsored and developed by Canonical, the force behind Ubuntu. Bazaar provides tight integration with Launchpad, a collaborative development platform by Canonical.
You can get more details about Bazaar on their official page at http://bazaar.canonical.com/en/.
You can read more by following these links:
- Git basics: https://git-scm.com/book/en/v2/Getting-Started-Git-Basics
- Git book: https://git-scm.com/book/en/v2
- Check out the Git interactive tutorial at: https://try.github.io and http://git.rocks/
- Launchpad: https://launchpad.net/
How it works…
Here, we have the installed the latest Git version from the repository maintained by Git developers. The Ubuntu default package repository contains the Git package, but often it is not updated. Ubuntu 14.04 still provides Git version 1.9.1.
Once the Git packages are installed, you need to identify yourself to Git. This information is used to tag the commits created by you. We have globally set the username and email with the git config command. Now, whenever you create a new commit in any repository on this system, the commit will get tagged with your username and email. This helps in tracking who did what, especially when you are working in a large group. You can get a list of configuration settings with the command git config --list, and the output should look something like the following:
$ git config --list user.name=yourname [email protected]
If you execute the same command from within a repository directory, the list will show some extra settings specific to that repository:
~/sample-repo$ git config --list user.name=yourname [email protected] core.repositoryformatversion=0 core.filemode=true core.bare=false core.logallrefupdates=true
Now, if you are not already familiar with Git, you can make use of the git help command to get documentation and manual pages. The default help menu lists commonly used commands with a short description. You can get a list of all available commands with the same git help command and a flag, -a.
$ git help -a
Additionally, the installation contains some guides or manual pages to help you get started with Git. To get a list of the available guides, use:
$ git help -g
The common Git guides are as follows:
attributes: Defines attributes per pathglossary: A Git glossaryignore: Specifies intentionally untracked files to ignore
To open a particular guide, use the git help guidename or the man git[guidename] command:
$ git help everyday # or man giteveryday
Git has become a mainstream version control system, especially after the rise of the social coding site GitHub. There are other well-known version control systems available, such as Subversion and Mercurial. Facebook uses a modified version of Mercurial for their internal code hosting. Bazaar is another distributed version control system sponsored and developed by Canonical, the force behind Ubuntu. Bazaar provides tight integration with Launchpad, a collaborative development platform by Canonical.
You can get more details about Bazaar on their official page at http://bazaar.canonical.com/en/.
You can read more by following these links:
- Git basics: https://git-scm.com/book/en/v2/Getting-Started-Git-Basics
- Git book: https://git-scm.com/book/en/v2
- Check out the Git interactive tutorial at: https://try.github.io and http://git.rocks/
- Launchpad: https://launchpad.net/
There's more…
Git has become a mainstream version control system, especially after the rise of the social coding site GitHub. There are other well-known version control systems available, such as Subversion and Mercurial. Facebook uses a modified version of Mercurial for their internal code hosting. Bazaar is another distributed version control system sponsored and developed by Canonical, the force behind Ubuntu. Bazaar provides tight integration with Launchpad, a collaborative development platform by Canonical.
You can get more details about Bazaar on their official page at http://bazaar.canonical.com/en/.
You can read more by following these links:
- Git basics: https://git-scm.com/book/en/v2/Getting-Started-Git-Basics
- Git book: https://git-scm.com/book/en/v2
- Check out the Git interactive tutorial at: https://try.github.io and http://git.rocks/
- Launchpad: https://launchpad.net/
See also
You can read more by following these links:
- Git basics: https://git-scm.com/book/en/v2/Getting-Started-Git-Basics
- Git book: https://git-scm.com/book/en/v2
- Check out the Git interactive tutorial at: https://try.github.io and http://git.rocks/
- Launchpad: https://launchpad.net/
Now that we have the Git binaries installed, let's take a step forward and create our first local Git repository.
We will take a common path by starting a new pet project, where we will simply create a new local directory, add some files to it, and then realize, Ohh I am gonna need a version control system:
- So, yes, quickly create your new project:
$ mkdir mynewproject $ touch mynewproject /index.html $ touch mynewproject /main.js $ touch mynewproject/main.css
- Add some sample content to these files by editing them:
Now you need to create a Git repository for this project. Sure, Git covered you with the
git initcommand. - Make sure you are in the project directory and then initialize a new repository, as follows:
$ cd mynewproject $ git init
This will initialize a new empty repository under the project directory. A new hidden directory gets created with the name .git. This directory will contain all the metadata of your Git repository and all revisions of every single file tracked by Git.
Here, we have used the git init command to initialize a new repository on our local system. The files created before initializing a repo are optional; you can always skip that step and directly use git init to create a new local repository. Later, when you need to push (synchronize) this repo with a remote hosted repository, you can simply use the git remote add command. We will see examples of git remote add in the next recipes.
With the git init command, you can also create a bare repository by using the --bare flag. The difference between a normal repository and a bare repository is that a bare repository does not have a working copy. You cannot use a bare repository directly to edit and commit files. Unlike a normal repository, where revision history, tags, and head information is stored in a separate .git directory, a bare repo stores all this data in the same directory. It is meant to be a central shared repository where multiple people can commit their changes. You need to clone these types of repositories to access and edit files. The changes can be pushed using the git push command from the cloned copy.
You can also use git clone to clone existing repositories. The repository can be local or remote. The clone command will replicate the contents of a parent repository, including revision history and other details. We will see more details of git clone in the next recipes.
You can read more by following these links:
- Git init: https://git-scm.com/docs/git-init
- Git clone: https://git-scm.com/docs/git-clone
Getting ready
Make sure that you have installed Git.
We will take a common path by starting a new pet project, where we will simply create a new local directory, add some files to it, and then realize, Ohh I am gonna need a version control system:
- So, yes, quickly create your new project:
$ mkdir mynewproject $ touch mynewproject /index.html $ touch mynewproject /main.js $ touch mynewproject/main.css
- Add some sample content to these files by editing them:
Now you need to create a Git repository for this project. Sure, Git covered you with the
git initcommand. - Make sure you are in the project directory and then initialize a new repository, as follows:
$ cd mynewproject $ git init
This will initialize a new empty repository under the project directory. A new hidden directory gets created with the name .git. This directory will contain all the metadata of your Git repository and all revisions of every single file tracked by Git.
Here, we have used the git init command to initialize a new repository on our local system. The files created before initializing a repo are optional; you can always skip that step and directly use git init to create a new local repository. Later, when you need to push (synchronize) this repo with a remote hosted repository, you can simply use the git remote add command. We will see examples of git remote add in the next recipes.
With the git init command, you can also create a bare repository by using the --bare flag. The difference between a normal repository and a bare repository is that a bare repository does not have a working copy. You cannot use a bare repository directly to edit and commit files. Unlike a normal repository, where revision history, tags, and head information is stored in a separate .git directory, a bare repo stores all this data in the same directory. It is meant to be a central shared repository where multiple people can commit their changes. You need to clone these types of repositories to access and edit files. The changes can be pushed using the git push command from the cloned copy.
You can also use git clone to clone existing repositories. The repository can be local or remote. The clone command will replicate the contents of a parent repository, including revision history and other details. We will see more details of git clone in the next recipes.
You can read more by following these links:
- Git init: https://git-scm.com/docs/git-init
- Git clone: https://git-scm.com/docs/git-clone
How to do it…
We will take a common path by starting a new pet project, where we will simply create a new local directory, add some files to it, and then realize, Ohh I am gonna need a version control system:
- So, yes, quickly create your new project:
$ mkdir mynewproject $ touch mynewproject /index.html $ touch mynewproject /main.js $ touch mynewproject/main.css
- Add some sample content to these files by editing them:
Now you need to create a Git repository for this project. Sure, Git covered you with the
git initcommand. - Make sure you are in the project directory and then initialize a new repository, as follows:
$ cd mynewproject $ git init
This will initialize a new empty repository under the project directory. A new hidden directory gets created with the name .git. This directory will contain all the metadata of your Git repository and all revisions of every single file tracked by Git.
Here, we have used the git init command to initialize a new repository on our local system. The files created before initializing a repo are optional; you can always skip that step and directly use git init to create a new local repository. Later, when you need to push (synchronize) this repo with a remote hosted repository, you can simply use the git remote add command. We will see examples of git remote add in the next recipes.
With the git init command, you can also create a bare repository by using the --bare flag. The difference between a normal repository and a bare repository is that a bare repository does not have a working copy. You cannot use a bare repository directly to edit and commit files. Unlike a normal repository, where revision history, tags, and head information is stored in a separate .git directory, a bare repo stores all this data in the same directory. It is meant to be a central shared repository where multiple people can commit their changes. You need to clone these types of repositories to access and edit files. The changes can be pushed using the git push command from the cloned copy.
You can also use git clone to clone existing repositories. The repository can be local or remote. The clone command will replicate the contents of a parent repository, including revision history and other details. We will see more details of git clone in the next recipes.
You can read more by following these links:
- Git init: https://git-scm.com/docs/git-init
- Git clone: https://git-scm.com/docs/git-clone
How it works…
Here, we have used the git init command to initialize a new repository on our local system. The files created before initializing a repo are optional; you can always skip that step and directly use git init to create a new local repository. Later, when you need to push (synchronize) this repo with a remote hosted repository, you can simply use the git remote add command. We will see examples of git remote add in the next recipes.
With the git init command, you can also create a bare repository by using the --bare flag. The difference between a normal repository and a bare repository is that a bare repository does not have a working copy. You cannot use a bare repository directly to edit and commit files. Unlike a normal repository, where revision history, tags, and head information is stored in a separate .git directory, a bare repo stores all this data in the same directory. It is meant to be a central shared repository where multiple people can commit their changes. You need to clone these types of repositories to access and edit files. The changes can be pushed using the git push command from the cloned copy.
You can also use git clone to clone existing repositories. The repository can be local or remote. The clone command will replicate the contents of a parent repository, including revision history and other details. We will see more details of git clone in the next recipes.
You can read more by following these links:
- Git init: https://git-scm.com/docs/git-init
- Git clone: https://git-scm.com/docs/git-clone
There's more…
You can also use git clone to clone existing repositories. The repository can be local or remote. The clone command will replicate the contents of a parent repository, including revision history and other details. We will see more details of git clone in the next recipes.
You can read more by following these links:
- Git init: https://git-scm.com/docs/git-init
- Git clone: https://git-scm.com/docs/git-clone
See also
You can read more by following these links:
- Git init: https://git-scm.com/docs/git-init
- Git clone: https://git-scm.com/docs/git-clone
We have initialized a new repository for our project. Now we will learn how to store file modifications using git add and git commit.
Make sure you have initialized a new git repository and created sample files under your project directory. Follow the previous recipes to get more details.
Now that we have a new repo initialized for our project, let's go ahead and check in our files.
- Before we add any files, simply check the current status of the repo with the
git statuscommand. This should list all the files under theUntracked fileslist, as follows:$ git status
As shown by
git status, none of our files are being tracked byGit. We need to add those files before Git tracks any changes to them. - Let's add all the files to the tracking list with
git add:$ git add .This command does not create any output, but stages all untracked files to be added to the repo. The symbol (
.) specifies the current directory and processes all files under the current directory. You can also specify file name(s) to add specific files. - Now check the git status again. This time, it will show newly added files marked by green text and a message saying
Changes to be committed:
- Next, commit the current state of the files with the
git commitcommand. Commit means asking Git to save the current state of staged files:$ git commit -m "First commit"
The
git commitcommand will display details of updates to the repository, along with the commit ID (4459fcc). In this case, we have added three new files without any new insertion or deletion of contents. - Now if you check the
git statusagain, it should show thenothing to commitmessage:$ git status On branch master nothing to commit, working directory clean
- Next, make some changes in any file and check the repo status again. This time, it should show the modified files as follows:

- You can check the exact differences to the previous version and current modifications with the
git diffcommand. Usegit diffwithout any file name to get all modifications in all files, or use it with a file name to check specific files:$ git diff
- Now you can repeat the add and commit process to store these changes. We have modified an existing file without creating new files. We can use the
-aflag with git commit to stage changes and commit them in a single command, as follows:$ git commit -a -m "index.html updated"
The -a flag will stage all modified files and commit will proceed with newly staged contents. Note that this only works with modified files. If you have created any new file, you need to use git add to stage them.
This recipe uses two primary commands: git add and git commit. The first one stages the content for the next commit, and the second actually stores the current state of the content. The git add command is used to add new files, stage updates to existing files, and remove any entries of deleted files. All these modifications to the current working tree are staged for the next commit. The command can be used multiple times to stage multiple modifications. Additionally, you can stage all files under the current directory at once by adding a single file, naming it explicitly, or even choosing a single line from a bunch of updates in the single file.
Once the modifications are staged, you can use git commit to store the updates. When the changes are committed, Git stores the updates in the revision history and changes Git Head to point to the latest revision. All updated files are stored in the form of a binary large object (blob) as a new snapshot. The commit process also triggers some hooks or events that can be used to execute external scripts to carry out some additional functions. Later in this chapter, we will discuss Git hooks in more detail.
Other than git add and git commit, we have used git status and git diff commands. As the name suggests, git status shows the current status of the repository in question. It lists all files that have been modified after the last commit, newly created or deleted files, and any updates that have already been staged. The git diff command can be used to list all modifications to a given file. It compares the current state of a file against its last committed or indexed state. Note that you can use git diff before indexing any file with git add.
Getting ready
Make sure you have initialized a new git repository and created sample files under your project directory. Follow the previous recipes to get more details.
Now that we have a new repo initialized for our project, let's go ahead and check in our files.
- Before we add any files, simply check the current status of the repo with the
git statuscommand. This should list all the files under theUntracked fileslist, as follows:$ git statusAs shown by
git status, none of our files are being tracked byGit. We need to add those files before Git tracks any changes to them. - Let's add all the files to the tracking list with
git add:$ git add .This command does not create any output, but stages all untracked files to be added to the repo. The symbol (
.) specifies the current directory and processes all files under the current directory. You can also specify file name(s) to add specific files. - Now check the git status again. This time, it will show newly added files marked by green text and a message saying
Changes to be committed: - Next, commit the current state of the files with the
git commitcommand. Commit means asking Git to save the current state of staged files:$ git commit -m "First commit"The
git commitcommand will display details of updates to the repository, along with the commit ID (4459fcc). In this case, we have added three new files without any new insertion or deletion of contents. - Now if you check the
git statusagain, it should show thenothing to commitmessage:$ git status On branch master nothing to commit, working directory clean
- Next, make some changes in any file and check the repo status again. This time, it should show the modified files as follows:
- You can check the exact differences to the previous version and current modifications with the
git diffcommand. Usegit diffwithout any file name to get all modifications in all files, or use it with a file name to check specific files:$ git diff - Now you can repeat the add and commit process to store these changes. We have modified an existing file without creating new files. We can use the
-aflag with git commit to stage changes and commit them in a single command, as follows:$ git commit -a -m "index.html updated"
The -a flag will stage all modified files and commit will proceed with newly staged contents. Note that this only works with modified files. If you have created any new file, you need to use git add to stage them.
This recipe uses two primary commands: git add and git commit. The first one stages the content for the next commit, and the second actually stores the current state of the content. The git add command is used to add new files, stage updates to existing files, and remove any entries of deleted files. All these modifications to the current working tree are staged for the next commit. The command can be used multiple times to stage multiple modifications. Additionally, you can stage all files under the current directory at once by adding a single file, naming it explicitly, or even choosing a single line from a bunch of updates in the single file.
Once the modifications are staged, you can use git commit to store the updates. When the changes are committed, Git stores the updates in the revision history and changes Git Head to point to the latest revision. All updated files are stored in the form of a binary large object (blob) as a new snapshot. The commit process also triggers some hooks or events that can be used to execute external scripts to carry out some additional functions. Later in this chapter, we will discuss Git hooks in more detail.
Other than git add and git commit, we have used git status and git diff commands. As the name suggests, git status shows the current status of the repository in question. It lists all files that have been modified after the last commit, newly created or deleted files, and any updates that have already been staged. The git diff command can be used to list all modifications to a given file. It compares the current state of a file against its last committed or indexed state. Note that you can use git diff before indexing any file with git add.
How to do it…
Now that we have a new repo initialized for our project, let's go ahead and check in our files.
- Before we add any files, simply check the current status of the repo with the
git statuscommand. This should list all the files under theUntracked fileslist, as follows:$ git statusAs shown by
git status, none of our files are being tracked byGit. We need to add those files before Git tracks any changes to them. - Let's add all the files to the tracking list with
git add:$ git add .This command does not create any output, but stages all untracked files to be added to the repo. The symbol (
.) specifies the current directory and processes all files under the current directory. You can also specify file name(s) to add specific files. - Now check the git status again. This time, it will show newly added files marked by green text and a message saying
Changes to be committed: - Next, commit the current state of the files with the
git commitcommand. Commit means asking Git to save the current state of staged files:$ git commit -m "First commit"The
git commitcommand will display details of updates to the repository, along with the commit ID (4459fcc). In this case, we have added three new files without any new insertion or deletion of contents. - Now if you check the
git statusagain, it should show thenothing to commitmessage:$ git status On branch master nothing to commit, working directory clean
- Next, make some changes in any file and check the repo status again. This time, it should show the modified files as follows:
- You can check the exact differences to the previous version and current modifications with the
git diffcommand. Usegit diffwithout any file name to get all modifications in all files, or use it with a file name to check specific files:$ git diff - Now you can repeat the add and commit process to store these changes. We have modified an existing file without creating new files. We can use the
-aflag with git commit to stage changes and commit them in a single command, as follows:$ git commit -a -m "index.html updated"
The -a flag will stage all modified files and commit will proceed with newly staged contents. Note that this only works with modified files. If you have created any new file, you need to use git add to stage them.
This recipe uses two primary commands: git add and git commit. The first one stages the content for the next commit, and the second actually stores the current state of the content. The git add command is used to add new files, stage updates to existing files, and remove any entries of deleted files. All these modifications to the current working tree are staged for the next commit. The command can be used multiple times to stage multiple modifications. Additionally, you can stage all files under the current directory at once by adding a single file, naming it explicitly, or even choosing a single line from a bunch of updates in the single file.
Once the modifications are staged, you can use git commit to store the updates. When the changes are committed, Git stores the updates in the revision history and changes Git Head to point to the latest revision. All updated files are stored in the form of a binary large object (blob) as a new snapshot. The commit process also triggers some hooks or events that can be used to execute external scripts to carry out some additional functions. Later in this chapter, we will discuss Git hooks in more detail.
Other than git add and git commit, we have used git status and git diff commands. As the name suggests, git status shows the current status of the repository in question. It lists all files that have been modified after the last commit, newly created or deleted files, and any updates that have already been staged. The git diff command can be used to list all modifications to a given file. It compares the current state of a file against its last committed or indexed state. Note that you can use git diff before indexing any file with git add.
How it works…
This recipe uses two primary commands: git add and git commit. The first one stages the content for the next commit, and the second actually stores the current state of the content. The git add command is used to add new files, stage updates to existing files, and remove any entries of deleted files. All these modifications to the current working tree are staged for the next commit. The command can be used multiple times to stage multiple modifications. Additionally, you can stage all files under the current directory at once by adding a single file, naming it explicitly, or even choosing a single line from a bunch of updates in the single file.
Once the modifications are staged, you can use git commit to store the updates. When the changes are committed, Git stores the updates in the revision history and changes Git Head to point to the latest revision. All updated files are stored in the form of a binary large object (blob) as a new snapshot. The commit process also triggers some hooks or events that can be used to execute external scripts to carry out some additional functions. Later in this chapter, we will discuss Git hooks in more detail.
Other than git add and git commit, we have used git status and git diff commands. As the name suggests, git status shows the current status of the repository in question. It lists all files that have been modified after the last commit, newly created or deleted files, and any updates that have already been staged. The git diff command can be used to list all modifications to a given file. It compares the current state of a file against its last committed or indexed state. Note that you can use git diff before indexing any file with git add.
There's more…
Another useful command is git checkout. It can be used to discard any modifications and restore a file to its previous state, or restore the deleted file to its known revision.
Up to now, we have learned how to create a local Git repository and add or update files to it. In this recipe, we will learn how to set up a remote repo and synchronize local code with it. We will be using GitHub to host our remote repository; feel free to choose any other code hosting service.
You will need a GitHub account. Sign up for a free account if you do not already have one.
To create a new repository on GitHub, log in to your GitHub account and create a new public repository:
- Click the Create repository button. Make sure that the checkbox Initialize this repository with a README is unchecked. The new repository form should look something like this:

- On the next page, you will be given an option to initialize this repository. We already have a local repository, so we will use the ... or push an existing repository from the command line option:

- Copy both commands and execute them on a local Git repository:
$ git remote add origin https://github.com/sawantuday/mynewproject.git $ git push -u origin master
The first command,
git remote, adds a reference to the remote repository on GitHub and sets it as its origin. The next command,git push, synchronizes all local content with the remote repository. Thegit pushcommand will show the details, as follows:
- You will be prompted to authenticate with your GitHub account from the command line. Enter your GitHub username and password. This ensures that you are allowed to push the changes to the repository. Alternatively, you can add your local SSH public key to your GitHub account to avoid manual authentication.
Now you can use your GitHub repository to share code with others or clone it to some other system. On the GitHub page, check the code tab to take a look at files in the repository.
Local repositories are good for personal work. A single person can work with them easily. A centrally hosted repository is required when you need to share the code base with a group of people. Everyone can make a local copy of the central code base and send their changes back to the central copy. GitHub solves this problem by hosting repositories that are accessible over the Internet. You can simply create a free public repository and share its URL with colleagues. Through access control, you can select who can check in their code. You can also set up your own centrally hosted repository. All you need is a system accessible over your network or Internet.
Here, we have created a central shared repository on GitHub. GitHub provides various options to initialize a repository and add code to it. As we already have our local repository ready, we just need to add a reference to the remote repo and synchronize our changes with git push. The git remote command is used to add a reference to the remote repository. We have set the remote repository as origin
, that is, the default remote repository. When using git push or git pull commands, if we do not specify any remote name it is assumed to be origin. Also, by default, Git marks the first remote as origin.
Next, we used Git push to push or synchronize our local contents to a remote copy. We have explicitly mentioned the remote name as origin and the remote branch as master. By default, Git always pushes to a remote named origin and branch master.
You can create your own remote copy on a local shared server. All you need is a normal user account on that server.
Log in to the shared server and create a bare repository with the following command:
$ git init --bare shared_repo
This will create an empty bare repository under the shared_repo directory. If you check its contents, you will find all Git-specific files and directories.
Now you can clone this repo from your workstation or use the git remote add command to add a remote to your already initialized repository. Use the following command to clone the repo. Replace the username with the user account on a shared server:
$ git clone ssh://user@ server_ip_or_name/full/path/to/repo
This command will ask for the password of the user account you have used in the username. Additionally, you can remove the password prompt by setting key-based SSH authentication with a shared server.
You can host your own simple static website with GitHub for free. All you need is a Git repository hosted on GitHub. Follow these steps to get your own GitHub page:
- Create a new repository with the name
username.github.io, whereusernameshould be your GitHub username. - Clone this repository to your local system. If you already have a project created on your local system, you can add this repository as a remote. Check this recipe for how to add a remote.
- Create
index.htmlif you do not have one. Add some content toindex.html. - Stage all content, commit to the local repository, and then push to GitHub.
- Next, point your browser to username.github.io. You should see the content of index.html.
GitHub pages works with websites generated using static website generators such as Jeykyll, Hugo, and Octopress. By default, you get a github.io sub-domain, but you can use your own domain name as well.
Check the manual pages for git remote and git push with man git-remote and man git-push respectively:
- Read more about generating SSH keys: https://help.github.com/articles/generating-ssh-keys/
- Get free hosting for your static website at GitHub pages: https://pages.github.com/
Getting ready
You will need a GitHub account. Sign up for a free account if you do not already have one.
To create a new repository on GitHub, log in to your GitHub account and create a new public repository:
- Click the Create repository button. Make sure that the checkbox Initialize this repository with a README is unchecked. The new repository form should look something like this:
- On the next page, you will be given an option to initialize this repository. We already have a local repository, so we will use the ... or push an existing repository from the command line option:
- Copy both commands and execute them on a local Git repository:
$ git remote add origin https://github.com/sawantuday/mynewproject.git $ git push -u origin master
The first command,
git remote, adds a reference to the remote repository on GitHub and sets it as its origin. The next command,git push, synchronizes all local content with the remote repository. Thegit pushcommand will show the details, as follows: - You will be prompted to authenticate with your GitHub account from the command line. Enter your GitHub username and password. This ensures that you are allowed to push the changes to the repository. Alternatively, you can add your local SSH public key to your GitHub account to avoid manual authentication.
Now you can use your GitHub repository to share code with others or clone it to some other system. On the GitHub page, check the code tab to take a look at files in the repository.
Local repositories are good for personal work. A single person can work with them easily. A centrally hosted repository is required when you need to share the code base with a group of people. Everyone can make a local copy of the central code base and send their changes back to the central copy. GitHub solves this problem by hosting repositories that are accessible over the Internet. You can simply create a free public repository and share its URL with colleagues. Through access control, you can select who can check in their code. You can also set up your own centrally hosted repository. All you need is a system accessible over your network or Internet.
Here, we have created a central shared repository on GitHub. GitHub provides various options to initialize a repository and add code to it. As we already have our local repository ready, we just need to add a reference to the remote repo and synchronize our changes with git push. The git remote command is used to add a reference to the remote repository. We have set the remote repository as origin
, that is, the default remote repository. When using git push or git pull commands, if we do not specify any remote name it is assumed to be origin. Also, by default, Git marks the first remote as origin.
Next, we used Git push to push or synchronize our local contents to a remote copy. We have explicitly mentioned the remote name as origin and the remote branch as master. By default, Git always pushes to a remote named origin and branch master.
You can create your own remote copy on a local shared server. All you need is a normal user account on that server.
Log in to the shared server and create a bare repository with the following command:
$ git init --bare shared_repo
This will create an empty bare repository under the shared_repo directory. If you check its contents, you will find all Git-specific files and directories.
Now you can clone this repo from your workstation or use the git remote add command to add a remote to your already initialized repository. Use the following command to clone the repo. Replace the username with the user account on a shared server:
$ git clone ssh://user@ server_ip_or_name/full/path/to/repo
This command will ask for the password of the user account you have used in the username. Additionally, you can remove the password prompt by setting key-based SSH authentication with a shared server.
You can host your own simple static website with GitHub for free. All you need is a Git repository hosted on GitHub. Follow these steps to get your own GitHub page:
- Create a new repository with the name
username.github.io, whereusernameshould be your GitHub username. - Clone this repository to your local system. If you already have a project created on your local system, you can add this repository as a remote. Check this recipe for how to add a remote.
- Create
index.htmlif you do not have one. Add some content toindex.html. - Stage all content, commit to the local repository, and then push to GitHub.
- Next, point your browser to username.github.io. You should see the content of index.html.
GitHub pages works with websites generated using static website generators such as Jeykyll, Hugo, and Octopress. By default, you get a github.io sub-domain, but you can use your own domain name as well.
Check the manual pages for git remote and git push with man git-remote and man git-push respectively:
- Read more about generating SSH keys: https://help.github.com/articles/generating-ssh-keys/
- Get free hosting for your static website at GitHub pages: https://pages.github.com/
How to do it…
To create a new repository on GitHub, log in to your GitHub account and create a new public repository:
- Click the Create repository button. Make sure that the checkbox Initialize this repository with a README is unchecked. The new repository form should look something like this:
- On the next page, you will be given an option to initialize this repository. We already have a local repository, so we will use the ... or push an existing repository from the command line option:
- Copy both commands and execute them on a local Git repository:
$ git remote add origin https://github.com/sawantuday/mynewproject.git $ git push -u origin master
The first command,
git remote, adds a reference to the remote repository on GitHub and sets it as its origin. The next command,git push, synchronizes all local content with the remote repository. Thegit pushcommand will show the details, as follows: - You will be prompted to authenticate with your GitHub account from the command line. Enter your GitHub username and password. This ensures that you are allowed to push the changes to the repository. Alternatively, you can add your local SSH public key to your GitHub account to avoid manual authentication.
Now you can use your GitHub repository to share code with others or clone it to some other system. On the GitHub page, check the code tab to take a look at files in the repository.
Local repositories are good for personal work. A single person can work with them easily. A centrally hosted repository is required when you need to share the code base with a group of people. Everyone can make a local copy of the central code base and send their changes back to the central copy. GitHub solves this problem by hosting repositories that are accessible over the Internet. You can simply create a free public repository and share its URL with colleagues. Through access control, you can select who can check in their code. You can also set up your own centrally hosted repository. All you need is a system accessible over your network or Internet.
Here, we have created a central shared repository on GitHub. GitHub provides various options to initialize a repository and add code to it. As we already have our local repository ready, we just need to add a reference to the remote repo and synchronize our changes with git push. The git remote command is used to add a reference to the remote repository. We have set the remote repository as origin
, that is, the default remote repository. When using git push or git pull commands, if we do not specify any remote name it is assumed to be origin. Also, by default, Git marks the first remote as origin.
Next, we used Git push to push or synchronize our local contents to a remote copy. We have explicitly mentioned the remote name as origin and the remote branch as master. By default, Git always pushes to a remote named origin and branch master.
You can create your own remote copy on a local shared server. All you need is a normal user account on that server.
Log in to the shared server and create a bare repository with the following command:
$ git init --bare shared_repo
This will create an empty bare repository under the shared_repo directory. If you check its contents, you will find all Git-specific files and directories.
Now you can clone this repo from your workstation or use the git remote add command to add a remote to your already initialized repository. Use the following command to clone the repo. Replace the username with the user account on a shared server:
$ git clone ssh://user@ server_ip_or_name/full/path/to/repo
This command will ask for the password of the user account you have used in the username. Additionally, you can remove the password prompt by setting key-based SSH authentication with a shared server.
You can host your own simple static website with GitHub for free. All you need is a Git repository hosted on GitHub. Follow these steps to get your own GitHub page:
- Create a new repository with the name
username.github.io, whereusernameshould be your GitHub username. - Clone this repository to your local system. If you already have a project created on your local system, you can add this repository as a remote. Check this recipe for how to add a remote.
- Create
index.htmlif you do not have one. Add some content toindex.html. - Stage all content, commit to the local repository, and then push to GitHub.
- Next, point your browser to username.github.io. You should see the content of index.html.
GitHub pages works with websites generated using static website generators such as Jeykyll, Hugo, and Octopress. By default, you get a github.io sub-domain, but you can use your own domain name as well.
Check the manual pages for git remote and git push with man git-remote and man git-push respectively:
- Read more about generating SSH keys: https://help.github.com/articles/generating-ssh-keys/
- Get free hosting for your static website at GitHub pages: https://pages.github.com/
How it works…
Local repositories are good for personal work. A single person can work with them easily. A centrally hosted repository is required when you need to share the code base with a group of people. Everyone can make a local copy of the central code base and send their changes back to the central copy. GitHub solves this problem by hosting repositories that are accessible over the Internet. You can simply create a free public repository and share its URL with colleagues. Through access control, you can select who can check in their code. You can also set up your own centrally hosted repository. All you need is a system accessible over your network or Internet.
Here, we have created a central shared repository on GitHub. GitHub provides various options to initialize a repository and add code to it. As we already have our local repository ready, we just need to add a reference to the remote repo and synchronize our changes with git push. The git remote command is used to add a reference to the remote repository. We have set the remote repository as origin
, that is, the default remote repository. When using git push or git pull commands, if we do not specify any remote name it is assumed to be origin. Also, by default, Git marks the first remote as origin.
Next, we used Git push to push or synchronize our local contents to a remote copy. We have explicitly mentioned the remote name as origin and the remote branch as master. By default, Git always pushes to a remote named origin and branch master.
You can create your own remote copy on a local shared server. All you need is a normal user account on that server.
Log in to the shared server and create a bare repository with the following command:
$ git init --bare shared_repo
This will create an empty bare repository under the shared_repo directory. If you check its contents, you will find all Git-specific files and directories.
Now you can clone this repo from your workstation or use the git remote add command to add a remote to your already initialized repository. Use the following command to clone the repo. Replace the username with the user account on a shared server:
$ git clone ssh://user@ server_ip_or_name/full/path/to/repo
This command will ask for the password of the user account you have used in the username. Additionally, you can remove the password prompt by setting key-based SSH authentication with a shared server.
You can host your own simple static website with GitHub for free. All you need is a Git repository hosted on GitHub. Follow these steps to get your own GitHub page:
- Create a new repository with the name
username.github.io, whereusernameshould be your GitHub username. - Clone this repository to your local system. If you already have a project created on your local system, you can add this repository as a remote. Check this recipe for how to add a remote.
- Create
index.htmlif you do not have one. Add some content toindex.html. - Stage all content, commit to the local repository, and then push to GitHub.
- Next, point your browser to username.github.io. You should see the content of index.html.
GitHub pages works with websites generated using static website generators such as Jeykyll, Hugo, and Octopress. By default, you get a github.io sub-domain, but you can use your own domain name as well.
Check the manual pages for git remote and git push with man git-remote and man git-push respectively:
- Read more about generating SSH keys: https://help.github.com/articles/generating-ssh-keys/
- Get free hosting for your static website at GitHub pages: https://pages.github.com/
There's more…
You can create your own remote copy on a local shared server. All you need is a normal user account on that server.
Log in to the shared server and create a bare repository with the following command:
$ git init --bare shared_repo
This will create an empty bare repository under the shared_repo directory. If you check its contents, you will find all Git-specific files and directories.
Now you can clone this repo from your workstation or use the git remote add command to add a remote to your already initialized repository. Use the following command to clone the repo. Replace the username with the user account on a shared server:
$ git clone ssh://user@ server_ip_or_name/full/path/to/repo
This command will ask for the password of the user account you have used in the username. Additionally, you can remove the password prompt by setting key-based SSH authentication with a shared server.
You can host your own simple static website with GitHub for free. All you need is a Git repository hosted on GitHub. Follow these steps to get your own GitHub page:
- Create a new repository with the name
username.github.io, whereusernameshould be your GitHub username. - Clone this repository to your local system. If you already have a project created on your local system, you can add this repository as a remote. Check this recipe for how to add a remote.
- Create
index.htmlif you do not have one. Add some content toindex.html. - Stage all content, commit to the local repository, and then push to GitHub.
- Next, point your browser to username.github.io. You should see the content of index.html.
GitHub pages works with websites generated using static website generators such as Jeykyll, Hugo, and Octopress. By default, you get a github.io sub-domain, but you can use your own domain name as well.
Check the manual pages for git remote and git push with man git-remote and man git-push respectively:
- Read more about generating SSH keys: https://help.github.com/articles/generating-ssh-keys/
- Get free hosting for your static website at GitHub pages: https://pages.github.com/
GitHub pages
You can host your own simple static website with GitHub for free. All you need is a Git repository hosted on GitHub. Follow these steps to get your own GitHub page:
- Create a new repository with the name
username.github.io, whereusernameshould be your GitHub username. - Clone this repository to your local system. If you already have a project created on your local system, you can add this repository as a remote. Check this recipe for how to add a remote.
- Create
index.htmlif you do not have one. Add some content toindex.html. - Stage all content, commit to the local repository, and then push to GitHub.
- Next, point your browser to username.github.io. You should see the content of index.html.
GitHub pages works with websites generated using static website generators such as Jeykyll, Hugo, and Octopress. By default, you get a github.io sub-domain, but you can use your own domain name as well.
Check the manual pages for git remote and git push with man git-remote and man git-push respectively:
- Read more about generating SSH keys: https://help.github.com/articles/generating-ssh-keys/
- Get free hosting for your static website at GitHub pages: https://pages.github.com/
See also
Check the manual pages for git remote and git push with man git-remote and man git-push respectively:
- Read more about generating SSH keys: https://help.github.com/articles/generating-ssh-keys/
- Get free hosting for your static website at GitHub pages: https://pages.github.com/
In the last recipe, we learned how to set up a remote repository and send local changes to a remote using the git push command. The story is not complete yet. When the repository is shared by multiple people, everyone will push their own changes. The central repository will keep on updating. When you want to synchronize or push your changes to the central repo, you need to download any updates made by other users and then push your modifications on top of that. A git pull command will be used to pull down any updates to the remote central repository to your local repository.
This recipe covers the git pull command. We will use this command to resolve a rejected push, but it is generally used simply to update your local copy.
You will need one central remote repository; it may be hosted on GitHub or anywhere else.
Secondly, you will need two local copies of the central repo. Use the git clone command to create a local replica of the remote repository. These two copies are used for demonstration purposes; in the real world, you will already have multiple copies with different users of your repository:
$ git clone https://github.com/sawantuday/mynewproject.git local_copy_1 $ git clone https://github.com/sawantuday/mynewproject.git local_copy_2
Now enter local_copy_1, create a new file with random content and then commit and push the changes back to the remote repository:
$ cd local_copy_1 $ echo "// Modifications by user 1" >> index.php $ git add . $ git commit -m "Index.php created with comments" $ git push origin master
Your push command should complete without any errors or warnings.
Next, enter local_copy_2 and create a new file with random contents:
$ cd local_copy_2 $ echo "\\ Modifications by user 2" >> main.php
Suppose you are user two working on a copy, local_copy_2. You cloned the repository and started working with the code base. In the meantime, user one completed his work and pushed his changes back to the central repo. Now, after you have completed your work, you are ready to send updates to the remote repo:
- Commit your modifications to the local repository:
$ git add . $ git commit -m "main.php created with comments"

- Try to push your commit to the central repo:
$ git push origin masterThis time, your push should fail, saying someone else had already updated the remote repository. Git will give you details of a rejected push, as follows:

- Now you need to pull remote changes; first, with git pull, merge any potential conflicts, and then try to push again:
$ git pull origin master
- You will be asked to enter a merge message in nano or a similar editor. Simply accept the pre-filled message and save the file by pressing Ctrl + O, then press Enter to save, and then Ctrl + X to exit.
- Now try to push again. This time it should complete successfully:
$ git push origin master
As we saw in the previous example, git pull is used to pull the remote modifications to the local repository. It is a good idea to use git pull before starting your work on the local copy. This way you can be sure that you have all remote updates in your local repository, thus reducing the chances of a rejected push.
The git pull command can be used any time, even to simply update your local codebase with the remote copy. I have used it in a commit and push flow just to demonstrate the rejected push and merge scenario.
The example demonstrates the simple automated merge. It may happen that both user one and user two are working on the same file and incidentally modify the same part of the code. Git will report a Merge conflict, as follows:
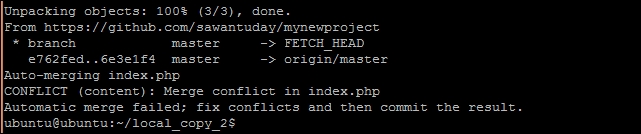
Now, in this case, Git may not be able to automatically merge both updates. It will combine both updates in single file and mark them in a special format, as follows:

In this case, you need to decide what to keep and what to remove. Once you are done with solving conflicts, remove the special tags added by Git and commit the conflicting file. After that, you can push your updates along with the new commit for merging.
You can read more by following these links:
- Git pull: https://git-scm.com/docs/git-pull
- Git merge: https://git-scm.com/docs/git-merge
- Git fetch: https://git-scm.com/docs/git-fetch
Getting ready
You will need one central remote repository; it may be hosted on GitHub or anywhere else.
Secondly, you will need two local copies of the central repo. Use the git clone command to create a local replica of the remote repository. These two copies are used for demonstration purposes; in the real world, you will already have multiple copies with different users of your repository:
$ git clone https://github.com/sawantuday/mynewproject.git local_copy_1 $ git clone https://github.com/sawantuday/mynewproject.git local_copy_2
Now enter local_copy_1, create a new file with random content and then commit and push the changes back to the remote repository:
$ cd local_copy_1 $ echo "// Modifications by user 1" >> index.php $ git add . $ git commit -m "Index.php created with comments" $ git push origin master
Your push command should complete without any errors or warnings.
Next, enter local_copy_2 and create a new file with random contents:
$ cd local_copy_2 $ echo "\\ Modifications by user 2" >> main.php
Suppose you are user two working on a copy, local_copy_2. You cloned the repository and started working with the code base. In the meantime, user one completed his work and pushed his changes back to the central repo. Now, after you have completed your work, you are ready to send updates to the remote repo:
- Commit your modifications to the local repository:
$ git add . $ git commit -m "main.php created with comments"
- Try to push your commit to the central repo:
$ git push origin masterThis time, your push should fail, saying someone else had already updated the remote repository. Git will give you details of a rejected push, as follows:
- Now you need to pull remote changes; first, with git pull, merge any potential conflicts, and then try to push again:
$ git pull origin master - You will be asked to enter a merge message in nano or a similar editor. Simply accept the pre-filled message and save the file by pressing Ctrl + O, then press Enter to save, and then Ctrl + X to exit.
- Now try to push again. This time it should complete successfully:
$ git push origin master
As we saw in the previous example, git pull is used to pull the remote modifications to the local repository. It is a good idea to use git pull before starting your work on the local copy. This way you can be sure that you have all remote updates in your local repository, thus reducing the chances of a rejected push.
The git pull command can be used any time, even to simply update your local codebase with the remote copy. I have used it in a commit and push flow just to demonstrate the rejected push and merge scenario.
The example demonstrates the simple automated merge. It may happen that both user one and user two are working on the same file and incidentally modify the same part of the code. Git will report a Merge conflict, as follows:
Now, in this case, Git may not be able to automatically merge both updates. It will combine both updates in single file and mark them in a special format, as follows:
In this case, you need to decide what to keep and what to remove. Once you are done with solving conflicts, remove the special tags added by Git and commit the conflicting file. After that, you can push your updates along with the new commit for merging.
You can read more by following these links:
- Git pull: https://git-scm.com/docs/git-pull
- Git merge: https://git-scm.com/docs/git-merge
- Git fetch: https://git-scm.com/docs/git-fetch
How to do it…
Suppose you are user two working on a copy, local_copy_2. You cloned the repository and started working with the code base. In the meantime, user one completed his work and pushed his changes back to the central repo. Now, after you have completed your work, you are ready to send updates to the remote repo:
- Commit your modifications to the local repository:
$ git add . $ git commit -m "main.php created with comments"
- Try to push your commit to the central repo:
$ git push origin masterThis time, your push should fail, saying someone else had already updated the remote repository. Git will give you details of a rejected push, as follows:
- Now you need to pull remote changes; first, with git pull, merge any potential conflicts, and then try to push again:
$ git pull origin master - You will be asked to enter a merge message in nano or a similar editor. Simply accept the pre-filled message and save the file by pressing Ctrl + O, then press Enter to save, and then Ctrl + X to exit.
- Now try to push again. This time it should complete successfully:
$ git push origin master
As we saw in the previous example, git pull is used to pull the remote modifications to the local repository. It is a good idea to use git pull before starting your work on the local copy. This way you can be sure that you have all remote updates in your local repository, thus reducing the chances of a rejected push.
The git pull command can be used any time, even to simply update your local codebase with the remote copy. I have used it in a commit and push flow just to demonstrate the rejected push and merge scenario.
The example demonstrates the simple automated merge. It may happen that both user one and user two are working on the same file and incidentally modify the same part of the code. Git will report a Merge conflict, as follows:
Now, in this case, Git may not be able to automatically merge both updates. It will combine both updates in single file and mark them in a special format, as follows:
In this case, you need to decide what to keep and what to remove. Once you are done with solving conflicts, remove the special tags added by Git and commit the conflicting file. After that, you can push your updates along with the new commit for merging.
You can read more by following these links:
- Git pull: https://git-scm.com/docs/git-pull
- Git merge: https://git-scm.com/docs/git-merge
- Git fetch: https://git-scm.com/docs/git-fetch
How it works…
As we saw in the previous example, git pull is used to pull the remote modifications to the local repository. It is a good idea to use git pull before starting your work on the local copy. This way you can be sure that you have all remote updates in your local repository, thus reducing the chances of a rejected push.
The git pull command can be used any time, even to simply update your local codebase with the remote copy. I have used it in a commit and push flow just to demonstrate the rejected push and merge scenario.
The example demonstrates the simple automated merge. It may happen that both user one and user two are working on the same file and incidentally modify the same part of the code. Git will report a Merge conflict, as follows:
Now, in this case, Git may not be able to automatically merge both updates. It will combine both updates in single file and mark them in a special format, as follows:
In this case, you need to decide what to keep and what to remove. Once you are done with solving conflicts, remove the special tags added by Git and commit the conflicting file. After that, you can push your updates along with the new commit for merging.
You can read more by following these links:
- Git pull: https://git-scm.com/docs/git-pull
- Git merge: https://git-scm.com/docs/git-merge
- Git fetch: https://git-scm.com/docs/git-fetch
See also
You can read more by following these links:
- Git pull: https://git-scm.com/docs/git-pull
- Git merge: https://git-scm.com/docs/git-merge
- Git fetch: https://git-scm.com/docs/git-fetch
Git clone allows you to create a copy of your repository in a new directory or location. It can be used to replicate a remote repository on your local system or create a local clone to be shared over an intranet. This recipe covers the git clone command. We will learn to create a clone of a remote repository and then take a look at various transport protocols supported by Git for cloning.
You will need Git binaries installed on your local system, plus a remote repository. Note down the full path (clone URL) of the remote repository.
Create a clone of the repository with the git clone command, as follows:
$ git clone ssh://[email protected]:22/home/ubuntu/cookbook.git \ ubuntu_cookbook
You will be asked to enter a password for the user account ubuntu.
This command will create a new directory named ubuntu_cookbook and clone the repository cookbook.git into this directory.
As seen in the previous example, the git clone command will create a new copy of an existing repository. The repository can be a local repository or one located on a remote server. Git supports various protocols to transfer the content between two systems. This includes well-known protocols such as SSH, HTTP/S, and rsync. In addition, Git provides a native transport protocol named Git. Note that the Git protocol does not require any authentication and should be used carefully. In the previous example, we have used the SSH protocol. When working with local repositories, you can use file///path/to/repo.git or even an absolute path /path/to/repo.git format.
Cloning requires a single argument, which is the path of the repository to be cloned. You can skip the destination directory and Git will create a clone in a new directory named after the repository name.
You can also create a new bare clone with the --bare option of the git clone command. This is useful for creating a shared central clone that is used by a group of people.
Another important option is the depth clone. When cloning a large repository that contains years of work, and you do not really need the entire history of the repository, the option --depth can be used to copy only a specified number of revisions. This will help you in quickly downloading just the tip of an entire repository, and will save you some bandwidth by avoiding unnecessary downloads. The syntax for the --depth option is as follows:
git clone --depth 1 https://github.com/torvalds/linux.git mylinux
Getting ready
You will need Git binaries installed on your local system, plus a remote repository. Note down the full path (clone URL) of the remote repository.
Create a clone of the repository with the git clone command, as follows:
$ git clone ssh://[email protected]:22/home/ubuntu/cookbook.git \ ubuntu_cookbook
You will be asked to enter a password for the user account ubuntu.
This command will create a new directory named ubuntu_cookbook and clone the repository cookbook.git into this directory.
As seen in the previous example, the git clone command will create a new copy of an existing repository. The repository can be a local repository or one located on a remote server. Git supports various protocols to transfer the content between two systems. This includes well-known protocols such as SSH, HTTP/S, and rsync. In addition, Git provides a native transport protocol named Git. Note that the Git protocol does not require any authentication and should be used carefully. In the previous example, we have used the SSH protocol. When working with local repositories, you can use file///path/to/repo.git or even an absolute path /path/to/repo.git format.
Cloning requires a single argument, which is the path of the repository to be cloned. You can skip the destination directory and Git will create a clone in a new directory named after the repository name.
You can also create a new bare clone with the --bare option of the git clone command. This is useful for creating a shared central clone that is used by a group of people.
Another important option is the depth clone. When cloning a large repository that contains years of work, and you do not really need the entire history of the repository, the option --depth can be used to copy only a specified number of revisions. This will help you in quickly downloading just the tip of an entire repository, and will save you some bandwidth by avoiding unnecessary downloads. The syntax for the --depth option is as follows:
git clone --depth 1 https://github.com/torvalds/linux.git mylinux
How to do it…
Create a clone of the repository with the git clone command, as follows:
$ git clone ssh://[email protected]:22/home/ubuntu/cookbook.git \ ubuntu_cookbook
You will be asked to enter a password for the user account ubuntu.
This command will create a new directory named ubuntu_cookbook and clone the repository cookbook.git into this directory.
As seen in the previous example, the git clone command will create a new copy of an existing repository. The repository can be a local repository or one located on a remote server. Git supports various protocols to transfer the content between two systems. This includes well-known protocols such as SSH, HTTP/S, and rsync. In addition, Git provides a native transport protocol named Git. Note that the Git protocol does not require any authentication and should be used carefully. In the previous example, we have used the SSH protocol. When working with local repositories, you can use file///path/to/repo.git or even an absolute path /path/to/repo.git format.
Cloning requires a single argument, which is the path of the repository to be cloned. You can skip the destination directory and Git will create a clone in a new directory named after the repository name.
You can also create a new bare clone with the --bare option of the git clone command. This is useful for creating a shared central clone that is used by a group of people.
Another important option is the depth clone. When cloning a large repository that contains years of work, and you do not really need the entire history of the repository, the option --depth can be used to copy only a specified number of revisions. This will help you in quickly downloading just the tip of an entire repository, and will save you some bandwidth by avoiding unnecessary downloads. The syntax for the --depth option is as follows:
git clone --depth 1 https://github.com/torvalds/linux.git mylinux
How it works…
As seen in the previous example, the git clone command will create a new copy of an existing repository. The repository can be a local repository or one located on a remote server. Git supports various protocols to transfer the content between two systems. This includes well-known protocols such as SSH, HTTP/S, and rsync. In addition, Git provides a native transport protocol named Git. Note that the Git protocol does not require any authentication and should be used carefully. In the previous example, we have used the SSH protocol. When working with local repositories, you can use file///path/to/repo.git or even an absolute path /path/to/repo.git format.
Cloning requires a single argument, which is the path of the repository to be cloned. You can skip the destination directory and Git will create a clone in a new directory named after the repository name.
You can also create a new bare clone with the --bare option of the git clone command. This is useful for creating a shared central clone that is used by a group of people.
Another important option is the depth clone. When cloning a large repository that contains years of work, and you do not really need the entire history of the repository, the option --depth can be used to copy only a specified number of revisions. This will help you in quickly downloading just the tip of an entire repository, and will save you some bandwidth by avoiding unnecessary downloads. The syntax for the --depth option is as follows:
git clone --depth 1 https://github.com/torvalds/linux.git mylinux
Up to now in this chapter, we have worked with the Git command line interface (CLI). It is a very flexible and powerful interface. This recipe covers the installation of a web interface for Git repositories. We will install GitLab, an open source self-hosted Git server. Through GitLab, you can do most administrative tasks, such as creating new repositories, managing access rights, and monitoring history. You can easily browse your files or code and quickly make small edits. GitLab is also adding support for collaboration tools.
You will need access to a root account or an account with sudo privileges
Make sure you check out the minimum requirements for installation. You can use a single core 1 GB server for an installation with less than 100 users. An server with 2 cores and 2 GB ram is recommended.
Also check the available disk space. The installer itself takes around 400 MB of disk space.
We will use the recommended Omnibus Package Installer. It provides a .deb package for Debian/Ubuntu systems. Additionally, the omnibus installation takes care of housekeeping tasks such as restarting the worker process to maintain memory use. If you choose to follow the manual installation process, you can get the detailed installation guide from the GitLab documentation:
- First, we will need to download the installer package. Download the latest installer package from the GitLab download page at https://packages.gitlab.com/gitlab/gitlab-ce:
$ wget https://packages.gitlab.com/gitlab/gitlab-ce/packages/ubuntu/xenial/gitlab-ce_8.7.1-ce.1_amd64.deb/download - Once download completes, install GitLab using the
dpkgcommand, as follows:$ sudo dpkg -i gitlab-ce_8.7.1-ce.1_amd64.deb - After installation, use the following command to configure GitLab:
$ sudo gitlab-ctl reconfigure - Optionally, check the system status with the
gitlab-ctl statuscommand. It should return a list of processes and their respective PIDs, as follows:ubuntu@ubuntu:~$ sudo gitlab-ctl status [sudo] password for ubuntu: run: gitlab-workhorse: (pid 806) 57803s; run: log: (pid 805) 57803s run: logrotate: (pid 31438) 202s; run: log: (pid 810) 57803s run: nginx: (pid 813) 57803s; run: log: (pid 812) 57803s run: postgresql: (pid 817) 57803s; run: log: (pid 811) 57803s
- Then, open your browser and point it to your server IP or hostname. You will be asked to set a new password for the administrator account. Once you set a new password, use
rootas the username and your password to login.
GitLab is a Ruby-based web application that provides centralized hosting for your Git repositories. We have installed an open source community edition of GitLab using their Omnibus installer. It is an integrated installer package that combines all dependencies and default settings. The installer combines Nginx, Redis, Sidekiq, Unicorn, and PostgreSQL. Unfortunately, the community edition with the Omnibus installer does not support switching to the MySQL database server. To use MySQL, you need to follow the manual installation process and compile GitLab from source, along with other various dependencies.
The configuration file is located at /etc/gitlab/gitlab.rb. It is quite a lengthy file and contains numerous parameters, separated by each component. Some important settings to look at include external_url, where you can set your domain name, database settings, if you are planning to use external PostgreSQL setup, and email server settings, to set up your outgoing email server. If you choose to modify any settings, you will need to reconfigure the installation using the gitlab-ctl reconfigure command. You can get a list of enabled configurations using the gitlab-ctl show-config command.
The GitLab Omnibus package ships with some extra components: GitLab CI, a continuous integration service, and GitLab mattermost, an integrated installation of mattermost that provides an internal communication functionality with a chat server and file sharing. GitLab CI is enabled by default and can be accessed at http://ci.your-gitlab-domain.com. You can enable mattermost from the configuration file and then access it at http://mattermost.your-gitlab-domain.com.
Git provides an inbuilt web interface to browse your repositories. All you need is a repository, web server, and the following command:
$ git instaweb --httpd apache2 # defaults to lighttpd You can access the page at http://server-ip:1234
Check the GitWeb documentation for more details at https://git-scm.com/docs/gitweb.
Check out the requirements for GitLab installation: https://github.com/gitlabhq/gitlabhq/blob/master/doc/install/requirements.md.
Getting ready
You will need access to a root account or an account with sudo privileges
Make sure you check out the minimum requirements for installation. You can use a single core 1 GB server for an installation with less than 100 users. An server with 2 cores and 2 GB ram is recommended.
Also check the available disk space. The installer itself takes around 400 MB of disk space.
We will use the recommended Omnibus Package Installer. It provides a .deb package for Debian/Ubuntu systems. Additionally, the omnibus installation takes care of housekeeping tasks such as restarting the worker process to maintain memory use. If you choose to follow the manual installation process, you can get the detailed installation guide from the GitLab documentation:
- First, we will need to download the installer package. Download the latest installer package from the GitLab download page at https://packages.gitlab.com/gitlab/gitlab-ce:
$ wget https://packages.gitlab.com/gitlab/gitlab-ce/packages/ubuntu/xenial/gitlab-ce_8.7.1-ce.1_amd64.deb/download - Once download completes, install GitLab using the
dpkgcommand, as follows:$ sudo dpkg -i gitlab-ce_8.7.1-ce.1_amd64.deb - After installation, use the following command to configure GitLab:
$ sudo gitlab-ctl reconfigure - Optionally, check the system status with the
gitlab-ctl statuscommand. It should return a list of processes and their respective PIDs, as follows:ubuntu@ubuntu:~$ sudo gitlab-ctl status [sudo] password for ubuntu: run: gitlab-workhorse: (pid 806) 57803s; run: log: (pid 805) 57803s run: logrotate: (pid 31438) 202s; run: log: (pid 810) 57803s run: nginx: (pid 813) 57803s; run: log: (pid 812) 57803s run: postgresql: (pid 817) 57803s; run: log: (pid 811) 57803s
- Then, open your browser and point it to your server IP or hostname. You will be asked to set a new password for the administrator account. Once you set a new password, use
rootas the username and your password to login.
GitLab is a Ruby-based web application that provides centralized hosting for your Git repositories. We have installed an open source community edition of GitLab using their Omnibus installer. It is an integrated installer package that combines all dependencies and default settings. The installer combines Nginx, Redis, Sidekiq, Unicorn, and PostgreSQL. Unfortunately, the community edition with the Omnibus installer does not support switching to the MySQL database server. To use MySQL, you need to follow the manual installation process and compile GitLab from source, along with other various dependencies.
The configuration file is located at /etc/gitlab/gitlab.rb. It is quite a lengthy file and contains numerous parameters, separated by each component. Some important settings to look at include external_url, where you can set your domain name, database settings, if you are planning to use external PostgreSQL setup, and email server settings, to set up your outgoing email server. If you choose to modify any settings, you will need to reconfigure the installation using the gitlab-ctl reconfigure command. You can get a list of enabled configurations using the gitlab-ctl show-config command.
The GitLab Omnibus package ships with some extra components: GitLab CI, a continuous integration service, and GitLab mattermost, an integrated installation of mattermost that provides an internal communication functionality with a chat server and file sharing. GitLab CI is enabled by default and can be accessed at http://ci.your-gitlab-domain.com. You can enable mattermost from the configuration file and then access it at http://mattermost.your-gitlab-domain.com.
Git provides an inbuilt web interface to browse your repositories. All you need is a repository, web server, and the following command:
$ git instaweb --httpd apache2 # defaults to lighttpd You can access the page at http://server-ip:1234
Check the GitWeb documentation for more details at https://git-scm.com/docs/gitweb.
Check out the requirements for GitLab installation: https://github.com/gitlabhq/gitlabhq/blob/master/doc/install/requirements.md.
How to do it…
We will use the recommended Omnibus Package Installer. It provides a .deb package for Debian/Ubuntu systems. Additionally, the omnibus installation takes care of housekeeping tasks such as restarting the worker process to maintain memory use. If you choose to follow the manual installation process, you can get the detailed installation guide from the GitLab documentation:
- First, we will need to download the installer package. Download the latest installer package from the GitLab download page at https://packages.gitlab.com/gitlab/gitlab-ce:
$ wget https://packages.gitlab.com/gitlab/gitlab-ce/packages/ubuntu/xenial/gitlab-ce_8.7.1-ce.1_amd64.deb/download - Once download completes, install GitLab using the
dpkgcommand, as follows:$ sudo dpkg -i gitlab-ce_8.7.1-ce.1_amd64.deb - After installation, use the following command to configure GitLab:
$ sudo gitlab-ctl reconfigure - Optionally, check the system status with the
gitlab-ctl statuscommand. It should return a list of processes and their respective PIDs, as follows:ubuntu@ubuntu:~$ sudo gitlab-ctl status [sudo] password for ubuntu: run: gitlab-workhorse: (pid 806) 57803s; run: log: (pid 805) 57803s run: logrotate: (pid 31438) 202s; run: log: (pid 810) 57803s run: nginx: (pid 813) 57803s; run: log: (pid 812) 57803s run: postgresql: (pid 817) 57803s; run: log: (pid 811) 57803s
- Then, open your browser and point it to your server IP or hostname. You will be asked to set a new password for the administrator account. Once you set a new password, use
rootas the username and your password to login.
GitLab is a Ruby-based web application that provides centralized hosting for your Git repositories. We have installed an open source community edition of GitLab using their Omnibus installer. It is an integrated installer package that combines all dependencies and default settings. The installer combines Nginx, Redis, Sidekiq, Unicorn, and PostgreSQL. Unfortunately, the community edition with the Omnibus installer does not support switching to the MySQL database server. To use MySQL, you need to follow the manual installation process and compile GitLab from source, along with other various dependencies.
The configuration file is located at /etc/gitlab/gitlab.rb. It is quite a lengthy file and contains numerous parameters, separated by each component. Some important settings to look at include external_url, where you can set your domain name, database settings, if you are planning to use external PostgreSQL setup, and email server settings, to set up your outgoing email server. If you choose to modify any settings, you will need to reconfigure the installation using the gitlab-ctl reconfigure command. You can get a list of enabled configurations using the gitlab-ctl show-config command.
The GitLab Omnibus package ships with some extra components: GitLab CI, a continuous integration service, and GitLab mattermost, an integrated installation of mattermost that provides an internal communication functionality with a chat server and file sharing. GitLab CI is enabled by default and can be accessed at http://ci.your-gitlab-domain.com. You can enable mattermost from the configuration file and then access it at http://mattermost.your-gitlab-domain.com.
Git provides an inbuilt web interface to browse your repositories. All you need is a repository, web server, and the following command:
$ git instaweb --httpd apache2 # defaults to lighttpd You can access the page at http://server-ip:1234
Check the GitWeb documentation for more details at https://git-scm.com/docs/gitweb.
Check out the requirements for GitLab installation: https://github.com/gitlabhq/gitlabhq/blob/master/doc/install/requirements.md.
How it works…
GitLab is a Ruby-based web application that provides centralized hosting for your Git repositories. We have installed an open source community edition of GitLab using their Omnibus installer. It is an integrated installer package that combines all dependencies and default settings. The installer combines Nginx, Redis, Sidekiq, Unicorn, and PostgreSQL. Unfortunately, the community edition with the Omnibus installer does not support switching to the MySQL database server. To use MySQL, you need to follow the manual installation process and compile GitLab from source, along with other various dependencies.
The configuration file is located at /etc/gitlab/gitlab.rb. It is quite a lengthy file and contains numerous parameters, separated by each component. Some important settings to look at include external_url, where you can set your domain name, database settings, if you are planning to use external PostgreSQL setup, and email server settings, to set up your outgoing email server. If you choose to modify any settings, you will need to reconfigure the installation using the gitlab-ctl reconfigure command. You can get a list of enabled configurations using the gitlab-ctl show-config command.
The GitLab Omnibus package ships with some extra components: GitLab CI, a continuous integration service, and GitLab mattermost, an integrated installation of mattermost that provides an internal communication functionality with a chat server and file sharing. GitLab CI is enabled by default and can be accessed at http://ci.your-gitlab-domain.com. You can enable mattermost from the configuration file and then access it at http://mattermost.your-gitlab-domain.com.
Git provides an inbuilt web interface to browse your repositories. All you need is a repository, web server, and the following command:
$ git instaweb --httpd apache2 # defaults to lighttpd You can access the page at http://server-ip:1234
Check the GitWeb documentation for more details at https://git-scm.com/docs/gitweb.
Check out the requirements for GitLab installation: https://github.com/gitlabhq/gitlabhq/blob/master/doc/install/requirements.md.
There's more…
Git provides an inbuilt web interface to browse your repositories. All you need is a repository, web server, and the following command:
$ git instaweb --httpd apache2 # defaults to lighttpd You can access the page at http://server-ip:1234
Check the GitWeb documentation for more details at https://git-scm.com/docs/gitweb.
Check out the requirements for GitLab installation: https://github.com/gitlabhq/gitlabhq/blob/master/doc/install/requirements.md.
See also
Check out the requirements for GitLab installation: https://github.com/gitlabhq/gitlabhq/blob/master/doc/install/requirements.md.
We have set up our own Git hosting server with GitLab, but it still contains a single admin user account. You can start using the setup and create a new repository with an admin account, but it is a good idea to set up a separate non-root account. In this recipe, we will cover the user management and access control features of the GitLab server.
Make sure you have followed the previous recipe and installed the GitLab server.
Login to GitLab with your root or admin account.
You will need to configure the email server before creating a user account. You can use an external email service, such as sendgrid or mailgun. Update your GitLab email server configuration and reconfigure the server for the changes to take effect.
The default landing page for GitLab is a projects page. The same page is listed even when you log in as root. To create a new user, we need to access the admin area:
- To open the admin console, click on the admin area icon located at the top-right corner of the screen. Alternatively, you can add
/adminto the base URL and access the admin area.The admin dashboard will greet you with details about your installation and the features and components list. The left-hand menu will list all available options.
- Click on the Users menu to get user account-related options.
- Next, click on the big green New User button to open a new user form.
Now fill in the required details such as name, username, and email. The form should looks something like this:
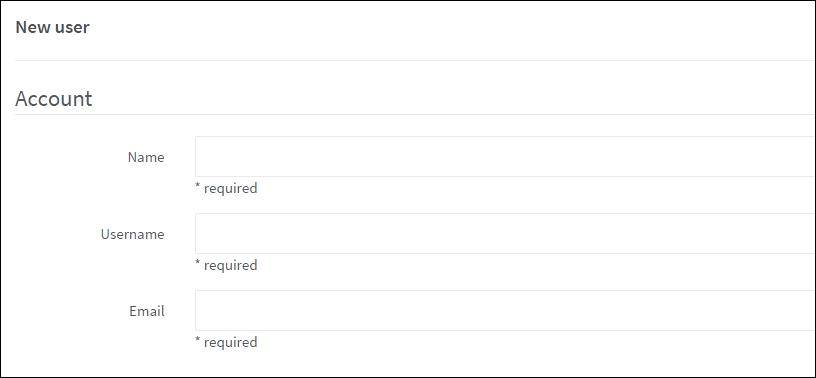
- You cannot set a password for a new user account on the create user form. The reset password link will be mailed to the user at a given email ID. A new user can set his password through that link:

- Under the Access section, you can mark this user as admin and set a limit on projects created by him:

- Next, under the profile section, you can add some more details for this user account.
- Now, click on the Create User button at the bottom-left of the form. This will save the given details and trigger a password reset email. A screen will change to the User Details page where you can see the account details, groups, and projects of a given user, as well as other details. From the same page, you can block or remove the user account.
Tip
A little workaround if you do not have email server set up is to click on the edit button on the user details page. This will open the same form as add new user, with the password fields enabled. Type in the new password, then confirm them, and click on the Save changes button. You have set the password for your new user without a reset email or the email server.
The new user account is ready to be used. Open the login page in a new window or private browser and use the email or username and newly set password to log in.
Getting ready
Make sure you have followed the previous recipe and installed the GitLab server.
Login to GitLab with your root or admin account.
You will need to configure the email server before creating a user account. You can use an external email service, such as sendgrid or mailgun. Update your GitLab email server configuration and reconfigure the server for the changes to take effect.
The default landing page for GitLab is a projects page. The same page is listed even when you log in as root. To create a new user, we need to access the admin area:
- To open the admin console, click on the admin area icon located at the top-right corner of the screen. Alternatively, you can add
/adminto the base URL and access the admin area.The admin dashboard will greet you with details about your installation and the features and components list. The left-hand menu will list all available options.
- Click on the Users menu to get user account-related options.
- Next, click on the big green New User button to open a new user form.
Now fill in the required details such as name, username, and email. The form should looks something like this:
- You cannot set a password for a new user account on the create user form. The reset password link will be mailed to the user at a given email ID. A new user can set his password through that link:
- Under the Access section, you can mark this user as admin and set a limit on projects created by him:
- Next, under the profile section, you can add some more details for this user account.
- Now, click on the Create User button at the bottom-left of the form. This will save the given details and trigger a password reset email. A screen will change to the User Details page where you can see the account details, groups, and projects of a given user, as well as other details. From the same page, you can block or remove the user account.
Tip
A little workaround if you do not have email server set up is to click on the edit button on the user details page. This will open the same form as add new user, with the password fields enabled. Type in the new password, then confirm them, and click on the Save changes button. You have set the password for your new user without a reset email or the email server.
The new user account is ready to be used. Open the login page in a new window or private browser and use the email or username and newly set password to log in.
How to do it…
The default landing page for GitLab is a projects page. The same page is listed even when you log in as root. To create a new user, we need to access the admin area:
- To open the admin console, click on the admin area icon located at the top-right corner of the screen. Alternatively, you can add
/adminto the base URL and access the admin area.The admin dashboard will greet you with details about your installation and the features and components list. The left-hand menu will list all available options.
- Click on the Users menu to get user account-related options.
- Next, click on the big green New User button to open a new user form.
Now fill in the required details such as name, username, and email. The form should looks something like this:
- You cannot set a password for a new user account on the create user form. The reset password link will be mailed to the user at a given email ID. A new user can set his password through that link:
- Under the Access section, you can mark this user as admin and set a limit on projects created by him:
- Next, under the profile section, you can add some more details for this user account.
- Now, click on the Create User button at the bottom-left of the form. This will save the given details and trigger a password reset email. A screen will change to the User Details page where you can see the account details, groups, and projects of a given user, as well as other details. From the same page, you can block or remove the user account.
Tip
A little workaround if you do not have email server set up is to click on the edit button on the user details page. This will open the same form as add new user, with the password fields enabled. Type in the new password, then confirm them, and click on the Save changes button. You have set the password for your new user without a reset email or the email server.
The new user account is ready to be used. Open the login page in a new window or private browser and use the email or username and newly set password to log in.
Now that we have set up our own Git hosting and created a new user account, we can start using our Git hosting by creating a new Git repository.
This recipe uses the GitLab setup. Make sure that you have followed the previous recipe and installed your GitLab server.
Log in with your user account on the GitLab server. You can choose the admin account, but a normal user account is recommended.
If you need to use SSH to clone and push to your repositories, you will need to set up your SSH key. From the dashboard, click on Profile Settings and then select SSH Keys to add a new SSH key. Check Chapter 2, Networking, for more details on how to create an SSH key.
In the previous recipe, we learned how to create a local repository and then push it to the remote. Here, we will first create a remote or hosted repository and then clone it to our local system:
- Log in to your GitLab account. You will be greeted with the Welcome screen detailing your projects.
- Click on the NEW PROJECT button to create a new repository:

- On a new screen, enter the project or repository name in the project path field. Add an optional descriptive message and select the proper checkbox to make your repository public or private:

- Next, click on the Create Project button to create a new repository. This will redirect you to the repository page.
A URL for your repository is listed, with some details on how to use your new repository. You can use HTTP URL if you have not set up SSH keys. Additionally, you may need to replace the hostname with the server IP from the repository URL:
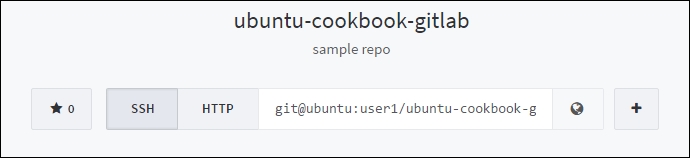
- Alternatively, you can create a readme file from the GitLab interface itself. Click on the README link to open a file editor in your browser.
When you clone the private repository using its HTTP URL, a local Git daemon will ask you for the username and password details for authentication.
Getting ready
This recipe uses the GitLab setup. Make sure that you have followed the previous recipe and installed your GitLab server.
Log in with your user account on the GitLab server. You can choose the admin account, but a normal user account is recommended.
If you need to use SSH to clone and push to your repositories, you will need to set up your SSH key. From the dashboard, click on Profile Settings and then select SSH Keys to add a new SSH key. Check Chapter 2, Networking, for more details on how to create an SSH key.
In the previous recipe, we learned how to create a local repository and then push it to the remote. Here, we will first create a remote or hosted repository and then clone it to our local system:
- Log in to your GitLab account. You will be greeted with the Welcome screen detailing your projects.
- Click on the NEW PROJECT button to create a new repository:
- On a new screen, enter the project or repository name in the project path field. Add an optional descriptive message and select the proper checkbox to make your repository public or private:
- Next, click on the Create Project button to create a new repository. This will redirect you to the repository page.
A URL for your repository is listed, with some details on how to use your new repository. You can use HTTP URL if you have not set up SSH keys. Additionally, you may need to replace the hostname with the server IP from the repository URL:
- Alternatively, you can create a readme file from the GitLab interface itself. Click on the README link to open a file editor in your browser.
When you clone the private repository using its HTTP URL, a local Git daemon will ask you for the username and password details for authentication.
How to do it…
In the previous recipe, we learned how to create a local repository and then push it to the remote. Here, we will first create a remote or hosted repository and then clone it to our local system:
- Log in to your GitLab account. You will be greeted with the Welcome screen detailing your projects.
- Click on the NEW PROJECT button to create a new repository:
- On a new screen, enter the project or repository name in the project path field. Add an optional descriptive message and select the proper checkbox to make your repository public or private:
- Next, click on the Create Project button to create a new repository. This will redirect you to the repository page.
A URL for your repository is listed, with some details on how to use your new repository. You can use HTTP URL if you have not set up SSH keys. Additionally, you may need to replace the hostname with the server IP from the repository URL:
- Alternatively, you can create a readme file from the GitLab interface itself. Click on the README link to open a file editor in your browser.
When you clone the private repository using its HTTP URL, a local Git daemon will ask you for the username and password details for authentication.
One of the more interesting features of Git is hooks. With hooks, you can tie an arbitrary script to various Git events. Whenever a particular event, such as a git commit or git push, occurs, the script attached to that event gets executed.
Typically, an event consists of several steps, and a script can be attached to each of these steps. The most common steps are pre-event and post-event, with pre hooks executed before the event and post hooks after the event. A pre hook, such as pre-commit, is generally used to cross-check the updates and can approve or reject an actual event. A post hook is used to execute additional activities after an event, such as start a built process when a new push is received or a notification sent.
Every Git repository consists of a .git/hooks directory with sample scripts. You can start using those hooks by removing the .sample extension from the script name. Additionally, the hook scripts belong to a single repository instance and do not get copied with the repository clone. So, if you add some hooks to your local repository and then push changes to the remote, the hooks will not get replicated on the remote. You will need to manually copy those scripts on the remote system. Built-in sample hooks generally use the shell scripts, but you can use any scripting language, such as Python or even PHP.
In this recipe, we will learn how to use Git hooks. We will create our own post-commit hook that deploys to a local web server.
We will need a local web server installed. I have used an Apache installation; feel free to use your favorite server:
- Set up a new virtual host under Apache and enable it:
$ cd /var/www/ $ sudo mkdir git-hooks-demo $ sudo chown ubuntu:ubuntu git-hooks-demo $ cd git-hooks-demo
- Create
index.htmland add the following contents to it:$ vi index.html<!DOCTYPE html> <html> <head><title>Git hooks demo</title></head> <body> <h2>Deployed Manually </h2> </body> </html> - Create the virtual host configuration:
$ cd /etc/apache2/sites-available $ sudo cp 000-default.conf git-hooks-demo.conf
- Open the virtual host configuration,
git-hooks-demo.conf,and replace its contents with following:<VirtualHost *:80> DocumentRoot /var/www/git-hooks-demo/html </VirtualHost>
- Check the initial version by visiting your IP address in your browser.
- Next, initialize a Git repository under the
homedirectory:$ cd ~/ $ mkdir git-hooks-repo $ cd git-hooks-repo $ git init
- Copy
index.htmlfrom the web root to the repository:$ cp /var/www/git-hooks-demo/index.html .
Now we are equipped with the basic requirements to create our Git hook.
Git hooks are located under the .git/hooks directory. We will create a new post commit hook that deploys the latest commit to our local web server. We will be using a shell script to write our hook:
- Create a new file under the
.git/hooksdirectory of your repository:$ touch .git/hooks/post-commit - Add the following contents to our
post-commithook:#!/bin/bash echo "Post commit hook started" WEBROOT=/var/www/git-hooks-demo TARBALL=/tmp/myapp.tar echo "Exporting repository contents" git archive master --format=tar --output $TARBALL mkdir $WEBROOT/html_new tar -xf $TARBALL -C $WEBROOT/html_new --strip-components 1 echo "Backup existing setup" mv $WEBROOT/html $WEBROOT/backups/html-'date +%Y-%m-%d-%T' echo "Deploying latest code" mv $WEBROOT/html_new $WEBROOT/html exit 0
- We need to set executable permissions to a
post-commitfile so that Git can execute it:$ chmod +x .git/hooks/post-commit - Now, update the
index.htmlcontent. Change the line<h2>Deployed Manually </h2>to<h2>Deployed using Git Hooks </h2>. - Commit the changes as usual. We have edited the existing file, so staging and committing can be done in a single command, as follows:
$ git commit -a -m "deployed using hooks"
This time, the git commit result should output all echo statements from our git hook. It should look as follows:

You can check the latest deployed index.html by visiting the IP address of your system:

We have created a simple post commit hook that exports all files from the Git repository, backs up the existing live site, and replaces it with new contents. This is a very simple shell script, set to execute after each commit event on the local repository. A script that starts with a hash bang signature defines that the script is expecting bash runtime. Later, we defined the WEBROOT and TARBALL variables, which contain the full path for the web-root directory and backup location respectively. Next, we created an archive of all the files with the git archive command. This command creates an archive of a named tree; a tree can be a specific commit ID or a branch. We have used a master branch for our export. The contents are exported in a tarball format with the export location set using the --output parameter. Once we have the tarball in place, we need to replace the live site with contents from the tarball. We have also taken a backup of the running site, just in case anything goes wrong.
This is a very primitive script and deploys only to the local server. To deploy on a remote server, you will need to use some synchronization tools such as rsync to update the content on a remote server. Make sure you are using an SSH connection for your deployments to live servers. Many blogs advise you to have a Git instance running on a live web server and setting it to deploy the live site using a post-receive hook. This can be an option for staging or a demo server, but on a live server I would try to avoid installing any tool other than a web server. Any additional packages will increase the effective attack surface and may compromise the security of your servers. Who knows whether Git contains some unknown shocks (remember shell shock?)
Note that we are creating a backup on each new commit. You may end up with an out of disk space error if your deployment is big or if you are doing frequent commits. That is not a big problem, though. The script can be easily modified to delete any directories created X days before. You can even choose to keep the last, say, 10 backups and delete others.
As we are deploying to a local web server, we have set the script to be a post-commit hook. If you choose to deploy it on a remote server, then make sure you set the script as a post receive or update script. We commit on a local repository and push updates to the remote server.
As we have seen, this is a plain shell script, and you can easily use any bash command in this script. Additionally, you can execute the script manually using the sh script.sh command or the short hand notation, ./script.sh. This will help in debugging the script and monitoring the output without the need to create any Git commits. Also make sure that the script file is set as executable and that all directories you are working with are writable by your user account.
If you are using remote repositories hosted with GitHub or GitLab, they provide a webhook feature which works similar to Git hooks. You will need to set a script accessible over the Web through a URL. When a particular event happens, GitLab will make a POST request to a given URL with the relevant event data.
- Read more about Git hooks at https://git-scm.com/docs/githooks
- Customizing Git hooks at https://git-scm.com/book/en/v2/Customizing-Git-Git-Hooks
Getting ready
We will need a local web server installed. I have used an Apache installation; feel free to use your favorite server:
- Set up a new virtual host under Apache and enable it:
$ cd /var/www/ $ sudo mkdir git-hooks-demo $ sudo chown ubuntu:ubuntu git-hooks-demo $ cd git-hooks-demo
- Create
index.htmland add the following contents to it:$ vi index.html<!DOCTYPE html> <html> <head><title>Git hooks demo</title></head> <body> <h2>Deployed Manually </h2> </body> </html> - Create the virtual host configuration:
$ cd /etc/apache2/sites-available $ sudo cp 000-default.conf git-hooks-demo.conf
- Open the virtual host configuration,
git-hooks-demo.conf,and replace its contents with following:<VirtualHost *:80> DocumentRoot /var/www/git-hooks-demo/html </VirtualHost>
- Check the initial version by visiting your IP address in your browser.
- Next, initialize a Git repository under the
homedirectory:$ cd ~/ $ mkdir git-hooks-repo $ cd git-hooks-repo $ git init
- Copy
index.htmlfrom the web root to the repository:$ cp /var/www/git-hooks-demo/index.html .
Now we are equipped with the basic requirements to create our Git hook.
Git hooks are located under the .git/hooks directory. We will create a new post commit hook that deploys the latest commit to our local web server. We will be using a shell script to write our hook:
- Create a new file under the
.git/hooksdirectory of your repository:$ touch .git/hooks/post-commit - Add the following contents to our
post-commithook:#!/bin/bash echo "Post commit hook started" WEBROOT=/var/www/git-hooks-demo TARBALL=/tmp/myapp.tar echo "Exporting repository contents" git archive master --format=tar --output $TARBALL mkdir $WEBROOT/html_new tar -xf $TARBALL -C $WEBROOT/html_new --strip-components 1 echo "Backup existing setup" mv $WEBROOT/html $WEBROOT/backups/html-'date +%Y-%m-%d-%T' echo "Deploying latest code" mv $WEBROOT/html_new $WEBROOT/html exit 0
- We need to set executable permissions to a
post-commitfile so that Git can execute it:$ chmod +x .git/hooks/post-commit - Now, update the
index.htmlcontent. Change the line<h2>Deployed Manually </h2>to<h2>Deployed using Git Hooks </h2>. - Commit the changes as usual. We have edited the existing file, so staging and committing can be done in a single command, as follows:
$ git commit -a -m "deployed using hooks"
This time, the git commit result should output all echo statements from our git hook. It should look as follows:
You can check the latest deployed index.html by visiting the IP address of your system:
We have created a simple post commit hook that exports all files from the Git repository, backs up the existing live site, and replaces it with new contents. This is a very simple shell script, set to execute after each commit event on the local repository. A script that starts with a hash bang signature defines that the script is expecting bash runtime. Later, we defined the WEBROOT and TARBALL variables, which contain the full path for the web-root directory and backup location respectively. Next, we created an archive of all the files with the git archive command. This command creates an archive of a named tree; a tree can be a specific commit ID or a branch. We have used a master branch for our export. The contents are exported in a tarball format with the export location set using the --output parameter. Once we have the tarball in place, we need to replace the live site with contents from the tarball. We have also taken a backup of the running site, just in case anything goes wrong.
This is a very primitive script and deploys only to the local server. To deploy on a remote server, you will need to use some synchronization tools such as rsync to update the content on a remote server. Make sure you are using an SSH connection for your deployments to live servers. Many blogs advise you to have a Git instance running on a live web server and setting it to deploy the live site using a post-receive hook. This can be an option for staging or a demo server, but on a live server I would try to avoid installing any tool other than a web server. Any additional packages will increase the effective attack surface and may compromise the security of your servers. Who knows whether Git contains some unknown shocks (remember shell shock?)
Note that we are creating a backup on each new commit. You may end up with an out of disk space error if your deployment is big or if you are doing frequent commits. That is not a big problem, though. The script can be easily modified to delete any directories created X days before. You can even choose to keep the last, say, 10 backups and delete others.
As we are deploying to a local web server, we have set the script to be a post-commit hook. If you choose to deploy it on a remote server, then make sure you set the script as a post receive or update script. We commit on a local repository and push updates to the remote server.
As we have seen, this is a plain shell script, and you can easily use any bash command in this script. Additionally, you can execute the script manually using the sh script.sh command or the short hand notation, ./script.sh. This will help in debugging the script and monitoring the output without the need to create any Git commits. Also make sure that the script file is set as executable and that all directories you are working with are writable by your user account.
If you are using remote repositories hosted with GitHub or GitLab, they provide a webhook feature which works similar to Git hooks. You will need to set a script accessible over the Web through a URL. When a particular event happens, GitLab will make a POST request to a given URL with the relevant event data.
- Read more about Git hooks at https://git-scm.com/docs/githooks
- Customizing Git hooks at https://git-scm.com/book/en/v2/Customizing-Git-Git-Hooks
How to do it…
Git hooks are located under the .git/hooks directory. We will create a new post commit hook that deploys the latest commit to our local web server. We will be using a shell script to write our hook:
- Create a new file under the
.git/hooksdirectory of your repository:$ touch .git/hooks/post-commit - Add the following contents to our
post-commithook:#!/bin/bash echo "Post commit hook started" WEBROOT=/var/www/git-hooks-demo TARBALL=/tmp/myapp.tar echo "Exporting repository contents" git archive master --format=tar --output $TARBALL mkdir $WEBROOT/html_new tar -xf $TARBALL -C $WEBROOT/html_new --strip-components 1 echo "Backup existing setup" mv $WEBROOT/html $WEBROOT/backups/html-'date +%Y-%m-%d-%T' echo "Deploying latest code" mv $WEBROOT/html_new $WEBROOT/html exit 0
- We need to set executable permissions to a
post-commitfile so that Git can execute it:$ chmod +x .git/hooks/post-commit - Now, update the
index.htmlcontent. Change the line<h2>Deployed Manually </h2>to<h2>Deployed using Git Hooks </h2>. - Commit the changes as usual. We have edited the existing file, so staging and committing can be done in a single command, as follows:
$ git commit -a -m "deployed using hooks"
This time, the git commit result should output all echo statements from our git hook. It should look as follows:
You can check the latest deployed index.html by visiting the IP address of your system:
We have created a simple post commit hook that exports all files from the Git repository, backs up the existing live site, and replaces it with new contents. This is a very simple shell script, set to execute after each commit event on the local repository. A script that starts with a hash bang signature defines that the script is expecting bash runtime. Later, we defined the WEBROOT and TARBALL variables, which contain the full path for the web-root directory and backup location respectively. Next, we created an archive of all the files with the git archive command. This command creates an archive of a named tree; a tree can be a specific commit ID or a branch. We have used a master branch for our export. The contents are exported in a tarball format with the export location set using the --output parameter. Once we have the tarball in place, we need to replace the live site with contents from the tarball. We have also taken a backup of the running site, just in case anything goes wrong.
This is a very primitive script and deploys only to the local server. To deploy on a remote server, you will need to use some synchronization tools such as rsync to update the content on a remote server. Make sure you are using an SSH connection for your deployments to live servers. Many blogs advise you to have a Git instance running on a live web server and setting it to deploy the live site using a post-receive hook. This can be an option for staging or a demo server, but on a live server I would try to avoid installing any tool other than a web server. Any additional packages will increase the effective attack surface and may compromise the security of your servers. Who knows whether Git contains some unknown shocks (remember shell shock?)
Note that we are creating a backup on each new commit. You may end up with an out of disk space error if your deployment is big or if you are doing frequent commits. That is not a big problem, though. The script can be easily modified to delete any directories created X days before. You can even choose to keep the last, say, 10 backups and delete others.
As we are deploying to a local web server, we have set the script to be a post-commit hook. If you choose to deploy it on a remote server, then make sure you set the script as a post receive or update script. We commit on a local repository and push updates to the remote server.
As we have seen, this is a plain shell script, and you can easily use any bash command in this script. Additionally, you can execute the script manually using the sh script.sh command or the short hand notation, ./script.sh. This will help in debugging the script and monitoring the output without the need to create any Git commits. Also make sure that the script file is set as executable and that all directories you are working with are writable by your user account.
If you are using remote repositories hosted with GitHub or GitLab, they provide a webhook feature which works similar to Git hooks. You will need to set a script accessible over the Web through a URL. When a particular event happens, GitLab will make a POST request to a given URL with the relevant event data.
- Read more about Git hooks at https://git-scm.com/docs/githooks
- Customizing Git hooks at https://git-scm.com/book/en/v2/Customizing-Git-Git-Hooks
How it works…
We have created a simple post commit hook that exports all files from the Git repository, backs up the existing live site, and replaces it with new contents. This is a very simple shell script, set to execute after each commit event on the local repository. A script that starts with a hash bang signature defines that the script is expecting bash runtime. Later, we defined the WEBROOT and TARBALL variables, which contain the full path for the web-root directory and backup location respectively. Next, we created an archive of all the files with the git archive command. This command creates an archive of a named tree; a tree can be a specific commit ID or a branch. We have used a master branch for our export. The contents are exported in a tarball format with the export location set using the --output parameter. Once we have the tarball in place, we need to replace the live site with contents from the tarball. We have also taken a backup of the running site, just in case anything goes wrong.
This is a very primitive script and deploys only to the local server. To deploy on a remote server, you will need to use some synchronization tools such as rsync to update the content on a remote server. Make sure you are using an SSH connection for your deployments to live servers. Many blogs advise you to have a Git instance running on a live web server and setting it to deploy the live site using a post-receive hook. This can be an option for staging or a demo server, but on a live server I would try to avoid installing any tool other than a web server. Any additional packages will increase the effective attack surface and may compromise the security of your servers. Who knows whether Git contains some unknown shocks (remember shell shock?)
Note that we are creating a backup on each new commit. You may end up with an out of disk space error if your deployment is big or if you are doing frequent commits. That is not a big problem, though. The script can be easily modified to delete any directories created X days before. You can even choose to keep the last, say, 10 backups and delete others.
As we are deploying to a local web server, we have set the script to be a post-commit hook. If you choose to deploy it on a remote server, then make sure you set the script as a post receive or update script. We commit on a local repository and push updates to the remote server.
As we have seen, this is a plain shell script, and you can easily use any bash command in this script. Additionally, you can execute the script manually using the sh script.sh command or the short hand notation, ./script.sh. This will help in debugging the script and monitoring the output without the need to create any Git commits. Also make sure that the script file is set as executable and that all directories you are working with are writable by your user account.
If you are using remote repositories hosted with GitHub or GitLab, they provide a webhook feature which works similar to Git hooks. You will need to set a script accessible over the Web through a URL. When a particular event happens, GitLab will make a POST request to a given URL with the relevant event data.
- Read more about Git hooks at https://git-scm.com/docs/githooks
- Customizing Git hooks at https://git-scm.com/book/en/v2/Customizing-Git-Git-Hooks
See also
- Read more about Git hooks at https://git-scm.com/docs/githooks
- Customizing Git hooks at https://git-scm.com/book/en/v2/Customizing-Git-Git-Hooks