
An attacker needs to be aware of methods for remote compromise: attacking the VPN, wireless infiltration from a distance using high-gain antennas, and so forth. However, the pen tester can never forget the big picture. This is a field where it's very easy to get caught up in the highly specific technical details and miss the human element of security design.
There's a design flaw concept that pen testers like to call the candy bar model. This simply refers to a network that is tough and crunchy on the outside, but gooey on the inside. In other words, it's a model that emphasizes the threats of the outside world when designing the security architecture, while assuming that someone who is physically inside company facilities has been vetted and is therefore trusted. The mindset here dates back many years; in the earliest days of what became the internet, the physical access points to the network were inside highly secure facilities. Packets coming in over the network were safely assumed to be from a secure environment and sent by an authorized individual. In today's world, a packet hitting the border of a company's network could be from an authorized individual on a business trip, or it could be from a clever teenager in Thailand eager to try out some newly learned tricks.
The candy bar model will come up in later chapters when we discuss other network attacks. Once you crack that outer shell, you'll often find that the path forward seems paved especially for you—and a successful compromise will inform your client of the devastating consequences of this mistaken assumption.
How you social engineer your target is a subject for another book altogether, but for the purposes of this discussion, let's assume that you have physical access to network drops. Not all physical access is the same, though: if you convinced your target to hire you as a full-time employee, then you'll have constant physical access. They'll even hand you a computer. However, what's more likely is that you've exploited a small gap in their physical security stance, and your presence can be undetected or tolerated for only a short period of time. You've snuck in through the smoker's door after striking up some conversation with an unwitting employee; you've been given permission to walk around for an hour with a convincing-looking contractor uniform and clipboard; or (my personal favorite) you've earned trust and affection by bringing in a big box of doughnuts for the people expecting an auditor's visit based on a well-scripted phone call. We'll demonstrate how to set up a Kali box to function as a rogue wireless access point while impersonating the MAC address of a VoIP phone.
You've found an unoccupied cubicle with an empty desk and a generic IP Phone. The phone is plugged in and working, so you know the network drop is active. We'll drop our small laptop running Kali here and continue the attack from outside.
First, we've unplugged the IP Phone so that our bad guy can take the port. We're going to clone the MAC address of the IP Phone on our Kali box's Ethernet port. From the perspective of a simple MAC address whitelisting methodology of NAC, this will look like the phone merely rebooted.
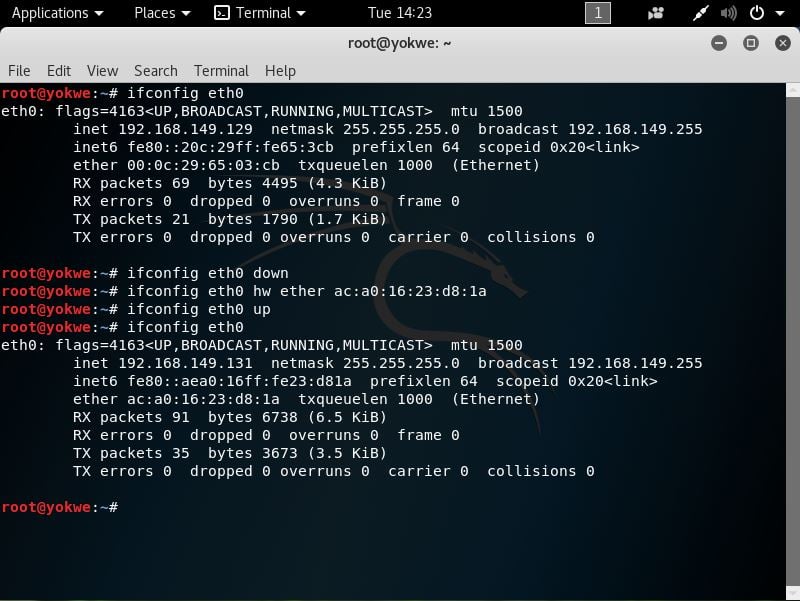
I use ifconfig to bring up the interface configuration. In my example, my Ethernet port interface is called eth0 and my wireless interface is called wlan0. I'll note this for later, as I will need to configure the system to run an access point with DHCP and DNS on wlan0, while running NAT through to my eth0 interface. I can use ifconfig eth0 hw ether to change the physical address of the eth0 interface. I've sneaked a peek at the label on the back of the IP Phone – the MAC address is AC:A0:16:23:D8:1A.
So, I bring the interface down for the change, bring it back up, then run ifconfig one more time to confirm the status of the interface with the new physical address:
Two handy tools in the Kali repository are dnsmasq and hostapd:
dnsmasqis a lightweight network infrastructure utility. Completely free and written in C, this is a nifty tool for setting up a quick and dirty network on the fly, complete with DHCP and DNS forwarding. In our example, we're using it as a DHCP and DNS service for the wireless clients who connect to our access point (which would be you and your colleagues, of course).hostapd(host access point daemon) is, as the name implies, access point software for turning your ordinary wireless network interface into an access point and even an authentication server. You can confirm that whatever Wi-Fi card you're using supports AP mode with this command:
# iw list |grep "Supported interface modes" -A 8If you see AP in the results, you're good to go. We use apt-get install hostapd dnsmasq to grab the tools.
Note
If you run into problems with apt-get (for instance, package not found), always review your repository's sources.list file as a first step. Don't add arbitrary sources to the sources.list file; this is a great way to break your Kali installation. Since the release of Kali 2016.1, the active repository for rolling users is this: deb http://http.kali.org/kali kali-rolling main contrib non-free.
First, let's configure dnsmasq. Open up /etc/dnsmasq.conf using the nano command:
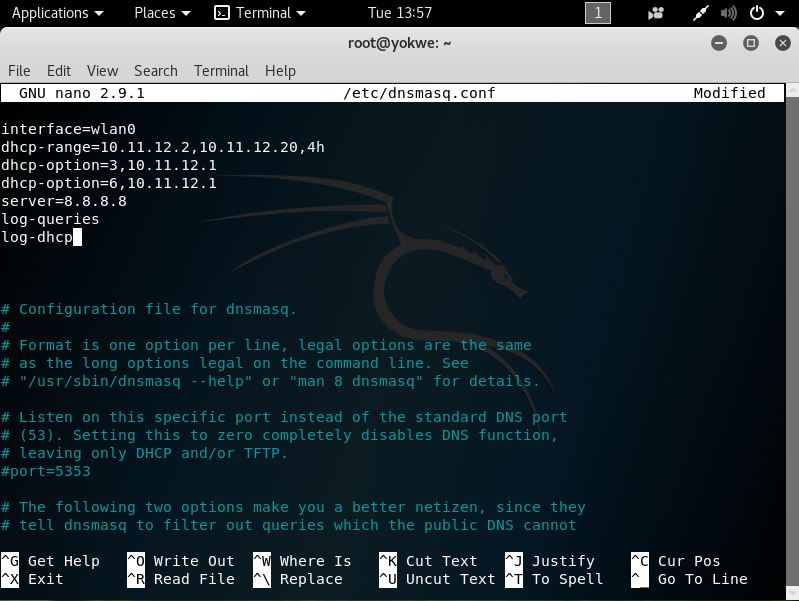
You can see that the configuration file has everything you need to know commented out; I strongly recommend you sit down with the readme file to understand the full capability of this tool, especially so you can fine-tune your use for whatever you're doing in the field. Since this is a hands-on demonstration, I'm keeping it pretty simple:
- I set my interface to
wlan0, where the USB wireless card that will play the role of access point is located. - I set the DHCP range where new clients will be assigned IP addresses when they request an assignment. The format is
[bottom address],[top address],[lease time]. The address range here is what would be assigned to new clients, so make sure you don't overlap with the gateway address. You're the gateway! - DHCP options specification. This isn't arbitrary—these numbers are specified in RFC 2132 and subsequent RFCs, so there's a lot of power here. For our purposes here, I'm setting the gateway with option
3and DNS with option6. In this case, they're the same address as we would expect on a tiny LAN like this one. Note the address:10.11.12.1. That's the gateway that by definition, will be yourwlan0interface. You'll define that address when you bring up the wireless interface just prior to firing up the access point. - I defined the upstream DNS server; I set it to Google
8.8.8.8, but you can use something different. - I did some logging, just in case we need it.
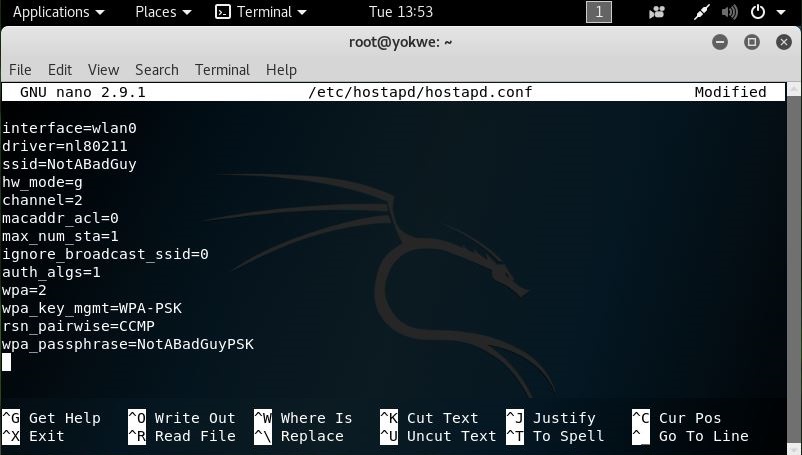
Hit Ctrl + X and confirm the file name to save it. Now, we'll move on to the hostapd configuration. Open up /etc/hostapd/hostapd.conf using the nano command:
Again, this is a tool with a lot of power, so check out the readme file so you can fully appreciate everything it can do. You can create a rather sophisticated access point with this software, but we'll just keep it simple for this example:
- I set the interface to
wlan0, of course. - I defined the wireless driver; this is
nl80211, the interface betweencfg80211and user space, and it allows for management of the device. ssidis our service set identifier – our network's name. I'm usingNotABadGuybecause I want to convince the world that I'm really a good guy, but of course, you'll fine-tune this to your needs. There's a bit of social engineering potential here to minimize suspicion on the part of those casually scanning the environment.hw_modeis the 802.11 modulation standard;b,g, andnare common.- I've defined the channel here, but you can configure it to pick the channel automatically based on surveying.
macaddr_aclis a Boolean flag to tellhostapdif we're using a MAC-based access control list. You'll have to decide if this is something you need for your purposes. In my example, I've configured encryption, and I like to use randomly generated MACs on my devices anyway, so I'd rather not deal with whitelisting MACs.max_num_stais one way to keep the population of wireless clients restricted— this is the maximum number of clients that are allowed to join. I set mine as1here since I only expect myself to be joining, but you could omit this.ignore_broadcast_ssidsimply allows you to hide the network. What it really does is cause your AP to ignore probe request frames that don't specify the SSID, so it will hide your network from active scans, but you should never consider a functional access point to be hidden. I want to see it in my example, so I set it to0.- The remaining options allow me to configure WPA2 encryption.
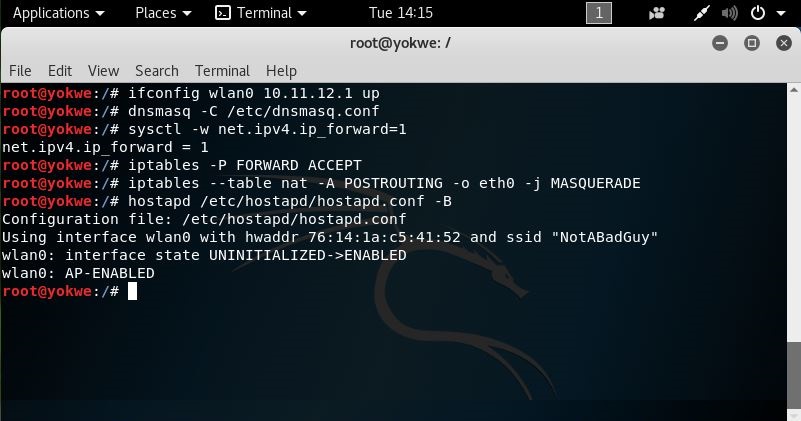
Believe it or not, those are the basics for our quick and dirty access point to the physical network. Now, I'll bring up the wlan0 interface and specify the gateway address I defined earlier. Then I bring up dnsmasq and tell it to use my configuration file. We enable IP forwarding to tell Kali to act like a router with sysctl. We allow our traffic through and enable NAT functionality with iptables. Finally, we fire up hostapd with our configuration file.
When a wireless client connects to this network, they will have access to the corporate network via eth0; to a MAC filter, traffic coming from that port will appear to be coming from a Cisco IP Phone: