

In this section, we will show you how to use the tools provided by the ASDK to enable BizTalk applications for consumption of the ASDK-based adapters. For this purpose, we will employ the Echo adapter, one of the two sample adapters supplied with the ASDK. This is a very simple adapter simulating operations to a fictitious LOB system, but at this point, we don't need anything complicated since the ASDK tools work in exactly the same fashion regardless of the adapter. So, simplicity of the Echo adapter is to our benefit—we will concentrate on the essence, leaving the complexity of the real-world adaptors to their respective chapters. As an additional bonus, the Echo adapter comes with full source code located in C:\Program Files\WCF LOB Adapter SDK\Documents\Samples directory and an installation package. As of the moment of writing this book, the setup package for the Echo adapter was not updated for use with the Visual Studio 2010 and .NET 4.0; to make you life easier, we prepared setup for .NET 4.0 32/64 bit environments and put the packages in the ZIP file containing code samples for the book. If you didn't download the samples yet, please do it now.
Let's start with a brief discussion of the functionality provided by the Echo adapter. Like its big brothers from the BizTalk Adapter Pack 2010, the Echo adapter supports two message exchange patterns.
Inbound: In the inbound scenario, the Echo adapter, being a part of the receive port infrastructure, monitors a specified file folder for new files with TXT extension; once a new file arrives, the adapter sends a notification to the BizTalk application. The notification takes the form of an XML message conforming to the following XSD schema:
 |
The path element contains the name of the folder being monitored for new files; the content element, as its name suggests, holds the content of a new file. If you wish to map this operation to the functionality provided by the real world adapters from BizTalk Adapters Pack 2010, it resembles the notification operations supported by the SQL adapter. When configured for notification, the adapter notifies the client application that there are data in the database meeting the specified criteria. We will discuss these operations in detail in subsequent chapters.
Outbound: In the outbound scenario, being a part of the send port infrastructure, the adapter echoes (or repeats) an incoming string a specified number of times then sends the response back to a caller. The XSD schema for request and response messages are shown in the following image:
 |
The real world analogy for the EchoString operation is executing for example a select statement against a specified table by the SQL adapter and sending the result set back to a client.
To make its operations fully configurable, the Echo adapter exposes two binding properties:
Since the Echo adapter is not automatically installed with the WCF LOB Adapter SDK, we will have to take care of it. The installation is straightforward and unlikely to cause difficulties.
Here are the steps:
1. Navigate to
C:\LOBIntegration\Chapter01\EchoAdapter\Setup32directory and get familiar with thereadme.docfile.2. Launch
setup.exeand follow the setup wizard. Accept the default values for all screens.3. If you are working in a 64-bit environment, now navigate to
C:\LOBIntegration\Chapter01\EchoAdapter\Setup64and repeat the procedure.
Now that you have installed the Echo adapter, we can proceed with building the BizTalk application consuming the Echo adapter. For your convenience, we provided a complete and ready to deploy application identical to what we are going to build. The application is located in the C:\LOBIntegration\Chapter01\Walkthrough directory; you can use it as a reference to be sure that you are on the right track building your own application.
Our BizTalk application will consist of a single orchestration acting in a pretty much "pass-through" mode. The orchestration will receive an inbound OnReceiveEcho message from the Echo adapter, construct an outbound EchoString message by mapping the content element of the inbound message to the aName element of the outbound message, and then submit it to the adapter for echoing. The response will be received by the orchestration and written to the Application Event Log. When we complete the walkthrough, the orchestration will resemble the following image:
 |
Here is the process to follow:
1. To get started, verify that the
c:\tempfolder exists on your computer. If not, please create it. If you recall, the adapter exposes the FileSystemWatcherFolder property to specify the folder to monitor for the files with*.txtextension. We will use the default value which isc:\temp.2. Open Visual Studio and create a new BizTalk project with the settings shown in the following image. For the location, you can specify a folder of your choice.

3. Now, the most important part. We need to generate the schemas representing the operations exposed by the adapter that you intend to use with the current application. The tool of choice for the task is the Consume Adapter Service plug-in, a metadata browser and artifacts generation tool, which you installed recently as a part of the ASDK. Besides XSD schemas, this plugin also generates a physical port binding file. This means that you can configure the port automatically by importing the binding file using the BizTalk Administration Console. The binding file typically contains physical port configuration settings including the connection string to the target LOB and the port SOAP actions based on the operations for which metadata were generated.

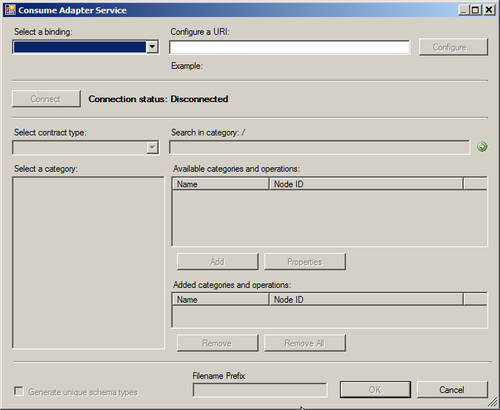


The first step to generating the artifacts is establishing a connection to the target system. Most LOB systems require valid client credentials as part of the connection procedure and our Echo system is not an exception, though it is quite forgiving—after selecting Username for the Client credential type drop down, you can type in anything you like for the User name and Password, but please don't leave them blank.

Further, besides valid credentials, in order to establish a connection we have to provide additional parameters such as host name, port number, and other LOB application specific parameters—this is what the URI Properties tab is for. Switch to this tab and note the properties presented there. As with the user name and password, you can type in anything you like or accept the defaults.

While the Echo Adapter requires only three elements to build the connection URI, the real-world adapters from the BizTalk Adapters Pack 2010 require more details in order to connect to their LOB systems. For comparison, the following image shows the properties required to establish a connection to SAP:


Provided the connection string we've built is correct, clicking the Connect button establishes an active connection to the Echo system. If the connection is accepted, we will see the category tree populated with outbound categories—the outbound contract type is what the Consume Adapter Service plugin chooses by default.
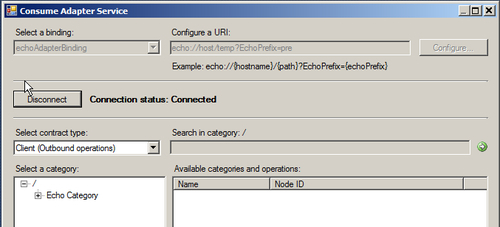
Next, we need to select the operations that we want to use in our application and add them to the list of desired operations. In the Select a category tree click the Echo Category node, then in the Available categories and operations panel, select EchoString and click the Add button. This action adds EchoString to the list of desired operations at the bottom of the screen. The last step is to help the Consume Adapter Service add-in to generate descriptive file names by setting the file name prefix at the bottom of the screen to EchoOutbound.

Finally, click OK to close the Consume Adapter Service Wizard window and return to Visual Studio, where we see two new files added to our BizTalk project. One file is the XSD schema for the EchoString operation, the other is an XML binding file. After deploying the application, you will import this file using the BizTalk Admin Console to create a physical WCF-Custom send port configured to perform the EchoString operation.
Unfortunately, one of the inconveniences we have to deal with is that the Consume Adapter Service add-in doesn't allow generating artifacts for different contract types in one run. To generate the schema and binding file for the inbound operation, we need to open the Consume Adapter Service add-in again and repeat the procedure. On the Security tab, specify the username and password, for the properties on the URI Properties and Binding Properties tabs, you can accept the default values.

Then, once you've established a successful connection, select Service in the Select contract type drop down, click EchoCategory in the Select a category panel, and add OnReceiveEcho to the list of desired operations. Set the Filename Prefix at the bottom of the screen to EchoInbound.

Click OK to return to Visual Studio. Our Visual Studio solution with two new added files should now look like this:


Technically speaking, at this point, we have all bits and pieces required to build our BizTalk application. Before we proceed, let's make a few cosmetic changes.
First, rename the
WcfSendPort_EchoAdapterBinding_Custom.bindinginfo.xmltoSendPort.Bindinginfo.xml. Similarly, rename theWcfReceivePort_EchoAdapterBinding_Custom.bindinginfo.xmltoReceivePort.Bindinginfo.xml.Next, we need to give more descriptive names for the receive port and receive location. Open the
ReceivePort.bindinginfo.xmlfile, and change the ReceivePort and ReceiveLocation Name attributes as follows:

For the
SendPort.bindinginfo.xmlfile, locate the SendPort node and change the Name attribute to SendEchoString.

4. Now that we have prepared all the artifacts, we can proceed and build our sample application.
5. Add a BizTalk orchestration to the project and name it ProcessEcho.

6. Switch to the OrchestrationView and create three orchestration messages with the following values:
Identifier: msgReceiveNotification, Message Type: Walkthrough.EchoInbound
Identifier: msgEchoStringRequest, Type: Walkthrough.EchoOutbound.EchoString
Identifier: msgEchoStringResponse, Type: Walkthrough.EchoOutbound.EchoStringResponse

7. To construct the outbound message, add a map to the project and name it.
8. Inbound_To_Outbound.

9. Specify OnReceiveEcho as the source message type, for the destination schema, specify EchoOutbound, and select EchoString as the root node. Once the source and destination schemas are set, connect the content and aName elements.

10. Next, we need to sketch the orchestration flow. From the toolbox, drag on the orchestration surface the shapes in the order and with the properties as follows:
Shape: Receive, Name: ReceiveNotification, Activate: True, Message: msgReceiveNotification
Shape: Construct, Name: ConstructEchoOutbound, Message Constructed: msgEchoStringRequest. Inside the Construct drag the Transform shape and configure it with the following values: Name: Transform, Input Messages: msgReceiveNotification, Map Name: Inbound_To_Outbound, Output Messages: msgEchoStringRequest
Shape: Send, Name: SendEchoString, Message: msgEchoStringRequest
Shape: Receive, Name: ReceiveEchoResponse, Message: msgEchoStringResponse
Shape: Expression, Name: WriteToLog
11. Configure the WriteToLog expression shape to execute the following code:

12. To enable the orchestration for receiving and sending messages, we need to add two logical orchestration ports. The first port will be a one-way port for receiving an initial inbound message; the second will be a Request-Response port for sending an outbound message to the adapter for processing and receiving a response. Right-click on the Port Surface and select New Configured Port to start the Port Configuration Wizard. Here are the settings for the first one-way port.
Name: ReceiveInitialEcho
Port Type: Create New Port, Port Type Name: InitialEchoType, Communication Pattern: One-Way, Access Restriction: Internal
Port Direction of Communication: I will always be receiving messages on this port, Port Binding: Specify later
13. Run the Wizard one more time to create a logical port for the outbound operation.
Name: SendEchoString
Port Type: Create New Port, Port Type Name: SendEchoStringType, Communication Pattern: Request-Response, Access Restriction: Internal
Port Direction of Communication: I will always be sending request, and receiving response on this port, Port Binding: Specify later
14. Join the logical ports with the relevant shapes. Connect Request of the ReceiveNotification receive port with the ReceiveNotification shape. For the SendEchoString send port, connect Request with the SendEchoString shape, and Response with the ReceiveEchoResponse shape. When you finish, the orchestration should match the following image:
15. Build the application and address error messages, if any.
16. The last thing to do before we deploy the application is specify a strong name key for the application assembly, and provide the name for the BizTalk application. In the Solution Explorer, right-click on the project name and select Properties. From the Project Properties window, switch to the Signing tab to specify a strong name key file. You can either generate a new, or use any existing key file from your computer. Then, activate the Deployment tab and type Chapter01_Walkthrough for the application name.

17. Almost there; we are finally at the deployment stage. Go to the BizTalk Admin Console and create a new application named Chapter01_Walkthrough. You have to create the application first; otherwise Visual Studio will deploy the solution in the default application in the group.
18. In the Solution Explorer, right-click on the solution name, select Deploy, and wait for the message confirming that the deployment succeeded.
19. To complete the deployment, we need to create the application physical ports. This is where the binding files, generated for us by the Consume Adapter Service plugin, come into play. Open the BizTalk Administration Console, expand the Applications node, right-click Chapter01_Walkthrough, and select Import|Bindings. Navigate to the solution directory and import the binding file for the receive port. Then, repeat the procedure to import the bindings for the send port. Disregard a pop-up message informing you of the application name not matching and click Yes.

20. For security reasons, the Consume Adapter Service addin doesn't include the usernames and passwords when generating binding files. For the physical ports, we have to set them manually using the WCF-Custom Transport Properties window. Let's start with the send port. In BizTalk Administration Console, double-click the SendEchoString port, then click Configure, switch to the Credentials tab, and type in any username and password.

21. Specify the username and password for the receive location. In the BizTalk Admin Console, double-click the EchoWcfCustom_ReceiveNotification receive location and then click Configure to open the WCF-Custom Transport Properties window. As you can see, for the receive location, this window has a slightly different look. There is no Credentials tab; instead, you have to switch to the Other tab and specify the username and password there.

22. The last step before we start the application is to bind the orchestration. In the BizTalk Administration Console, double click ProcessEcho orchestration to open the Orchestration Properties window. Activate the Bindings tab and set the properties as shown in the following image:

23. Click OK to close the Orchestration Properties window and then start the application.
If we submit a file to the c:\temp folder monitored by the adapter, we will get the following error message:
The adapter failed to transmit message going to send port "SendEchoString" with URL " echo://host/temp?EchoPrefix=pre ". It will be retransmitted after the retry interval specified for this Send Port. Details:"Microsoft.ServiceModel.Channels.Common.UnsupportedOperationException: Incorrect Action
<BtsActionMapping xmlns:xsi="http://www.w3.org/2001/XMLSchema-instance" xmlns:xsd="http://www.w3.org/2001/XMLSchema">
<Operation Name="EchoString" Action="Echo/EchoString" />
</BtsActionMapping>. Correct the specified Action, or refer to the documentation on the allowed formats for the Actions. Note that Actions are case-sensitive.
The problem is exactly what the error message is telling us—the SOAP action settings applied to the send port are not understood by the adapter. One of the most often asked questions on the MSDN forums is "I imported bindings with the SOAP action settings as generated by the Consume Adapter Service plug-in, so why are they nor understood by the adapter?". We will demystify the subject and shed some light on how the WCF-custom adapter processes the actions shortly, right after we finish the walkthrough. For now, to fix the problem and complete the application, go to the BizTalk Admin Console and do the following:
1. Double-click the
SendEchoStringsend port. In the Send Port Properties windows click Configure to open the WCF-Custom Transport Properties window.
2. In the Action text box of the SOAP Action Header section, note the value of the Name attribute, which is EchoString. What you have to do is to make your orchestration logical send port name match the value of the Name attribute. The first option is to change the logical port name from Operation_1 to
EchoStringand then, of course, to re-deploy the application.
3. An alternative option, if you don't want to redeploy the application, is to set the Name attribute value to Operation_1, so that the content of the Action box looks as follows:

4. Although from a pure technical standpoint this is a perfectly valid solution, using such non-descriptive names is a questionable practice and should be avoided. We presented it here with the only purpose being to illustrate the concept. The best approach is not to leave the operation name with the default value
Operation_1, but to give it a descriptive name upon designing the orchestration and then adjust the physical port action mapping.So, let's do it right and just change the logical port operation name to EchoString. Once done, re-deploy the application. Now, you can create a file containing a single word "Echo", drop it to the C:\temp folder, and watch the event log for the echoed messages returned by the Echo adapter. Please don't forget, the file must have a TXT extension.
