
In this recipe I will explain a procedure for migrating DHCP scope and lease information using the Windows Server Migration Tools. Migrating infrastructure services such as DHCP, DNS, WINS, and so on will have some impact on network operations. So make sure to schedule a maintenance window and place proper change control before you perform these activities.
If the DHCP role is not installed on the target server, the Windows Server Migration Tools will install it during the migration process. However, in this scenario, we will be manually installing the DHCP role and authorizing the DHCP server in Active Directory.
The following diagram explains the high level steps involved in this migration:

Log on to Windows Server 2012.
Open Server Manager. From the Server Manager option, install the DHCP Server role. Refer to the Add and remove roles and features (Must know) recipe for roles and feature installation details.

From the DHCP Admin console, authorize the new DHCP server in Active Directory.
Log on to the source DHCP server. Copy the migration tool package from
\\HOU-MGR-01\MigToolstoC:\MigTools.Stop the DHCP Server service.
Open Command Prompt with elevated permission and navigate to the
C:\MigToolsfolder. Run theSmigDeploy.execommand. This will register the migration tool on the source server and open a PowerShell window as shown in the following screenshot:
The next step is to export the current DHCP configuration from the source server. From the PowerShell window type
Export-SmigServerSetting –FeatureID DHCP –Path C:\DHCPExport\cmdlet. It will prompt you for a password for the export file. Hit Enter to continue with the export process. The export file will be in theC:\DHCPExportfolder.
Copy this export file (
C:\DHCPExport\svrmig.mig) over to the target Windows Server 2012 DHCP server.The next step is to import this file onto the new DHCP server. Log on to the target Windows Server 2012 server and open Windows Server Migration Tools from the Start window as an administrator. If this role is not locally installed on the server, you can copy the installation package from the
\\HOU-MGR-01\MigToolsfolder and run theSmigDeploy.exetool.
From the PowerShell window, run the
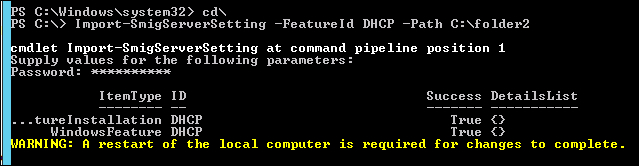
Import-SmigServerSetting –FeatureID DHCP –Path D:\DHCPExportcmdlet and hit Enter. You need to provide only the folder name.As I mentioned before, if the DHCP feature was not installed, the migration tool will install this feature as shown in the following screenshot:

Since we already installed the DHCP feature, it will start the import process. You need to provide the same password as configured in the export process.
The new server needs to be restarted after the import process has completed.
The preceding process migrates DHCP information onto the new Windows Server 2012 server. At this point the new DHCP server will have all the DHCP scope and lease information.
You can verify the scope and lease information from the DHCP admin console. The IP helper address on the router has to be changed with the new DHCP server′s IP address if it is configured with the old DHCP server′s IP address. Once you verified these configurations, the old DHCP server can be decommissioned. Windows Server 2012 provides high-availability and failover capability for DHCP. You may want to take advantage of this new feature right away.
The DHCP scope and lease information can also be migrated using Netsh Export and Netsh Import commands.