
TFS 2012 can be installed in multiple ways. We will cover the most common ones, which are as follows:
Basic installation: This is an install on any local computer you have, and installs on Windows 7, Windows 8, or any of the server operating systems from Windows Server 2008 and upwards. It's a great way to try out TFS, but can be used in production for single developers or small teams, and is covered under the TFS Express license.
The Basic installation gives you Source Control, Work Items, Build automation, and Test Management. There is no Data warehouse, reports, or SharePoint portals included.
Standard/advanced installation: The solution for larger companies is the server installs or Advanced configurations. There are multiple ways to configure this, and we will cover a fundamental single server install with the build server separately.
Team Foundation Service: This is the hosted version of TFS. You only need to sign up to the service. The offering is currently free, but Microsoft will charge for this service at some time in the future.
Basic installation is well suited when you want to try out the core functionality of TFS. You can install and configure TFS Basic on your local machine in less than ten minutes.
Start by running the installation (Setup.exe) from the TFS installation media. The installation itself just installs all the binaries; it doesn't require you to configure anything. It will install the .NET 4.5 Framework, which might require a machine restart as part of the installation.
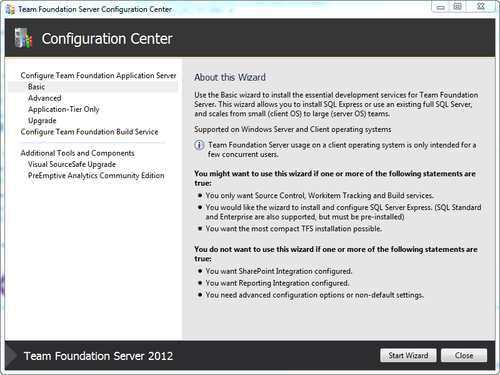
The interesting things happen afterwards when you run the Configuration Center. This wizard launches automatically and lets you choose what kind of installation of TFS 2012 you want.
In the Configuration Center window, select the Basic option and press the Start Wizard button. On the Welcome page that follows, press Next.
Now, you need to choose which database server you want to use. You have the following two options:
Let TFS install SQL 2012 Express for you
Point to an existing SQL Server instance, which must be SQL 2008 R2 or SQL Server 2012
If you already have an existing SQL Express instance on your machine, then the first option is disabled, as shown in the following screenshot:
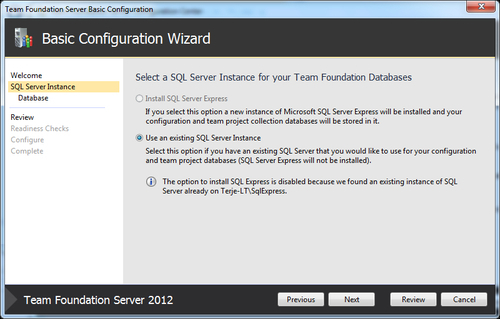
If you do point to an existing SQL instance, then you need to supply a name for SQL Server Instance. Note that the SQL server must be located on the same machine; the Basic installation does not support remote SQL servers.
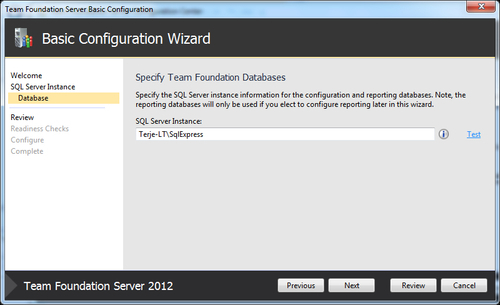
Also note that if the existing SQL instance Express is not a SQL 2012 Express instance, then it will be automatically upgraded to SQL 2012 Express. However, if your installation is not at least SQL 2008 SP2 Express, then you will be asked to upgrade to that level first.
The next page will run through a set of review steps, making sure that everything is configured correctly. If any errors are shown here, you need to correct them and then you can re-run the reviews. Press Next to start the configuration.
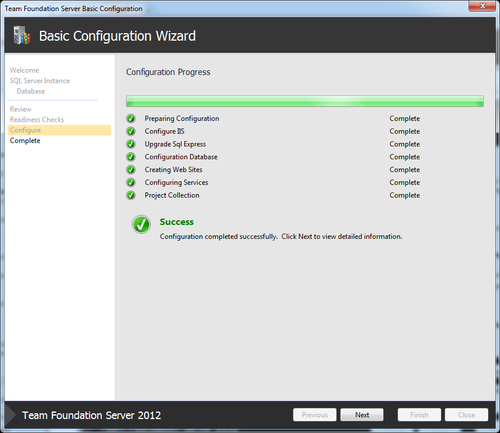
Now, the configuration wizard will perform the configuration to complete the installation of TFS 2012:
The installation is now complete. The information shown on the final screen includes the URL, which all users will use for connection, and some information about what changes were made by the configuration wizard on external resources, such as IIS and the Firewall:
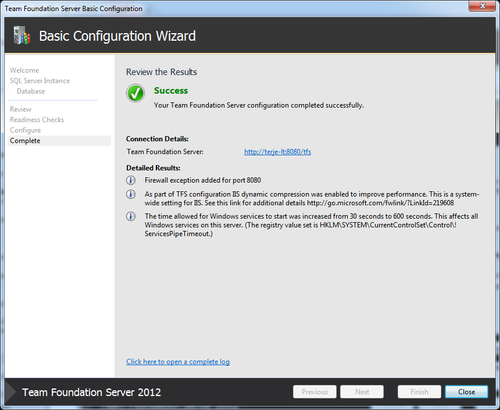
You are now ready to start using TFS 2012! Check out the Quick Start section for how to quickly get started on a new project.
For the production server, a full TFS server install should be used. This includes, in addition to the core TFS components, SQL Reporting Services for the reports, SQL Analysis Services for the data warehouse, and Windows SharePoint Foundation for the team project portals. When using the Standard installation option, everything will be installed on the same machine. If you need to scale out your TFS installation from the beginning (for example, by using a separate server for the data tier) then you must choose the Advanced installation option. Note that you can always scale out your deployment later.
The Standard installation and configuration has three main differences compared to the Basic installation:
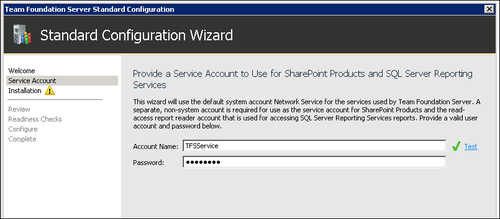
You need to supply a Windows account that is used as the service account for SharePoint Products and for the read-only account, for accessing the SQL Server Reporting Services reports. It does not need to have any special permission; a normal workgroup/domain user is enough:
SQL Server will not be installed; there must be a SQL Server running on the machine before you configure the TFS installation. Note that the SQL Server must have been installed with both SQL Reporting Services and SQL Analysis Services.
The Standard installation option will install Microsoft SharePoint Foundation 2010 as part of the installation process, unless already installed:

Another great option, not only for quickly trying out TFS but also for use in production, is the hosted version of TFS. This is TFS running in Windows Azure. Team Foundation Service fully supports Source Control, Work Items, Test Management, and Build Automation. It does not (currently) include support for data warehouse, reports, and a SharePoint portal.
All you need to sign up to TFS Service is a Live ID account. If you don't have one, sign up at https://signup.live.com.
Go to http://tfs.visualstudio.com, and click on the get started for free link:

Create your TFS account using your Live ID:

There is currently only the Windows Live ID identity provider that works for TFS Service, so leave this screen as it is.