
In this chapter, we will walk through a sample project and, using that as an example, work through the different steps that you need to do to get this into the TFS 2012, including setting up the team project, adding requirements, using the source control, and setting up a build.
We will use the fictional Packt Diner restaurant as the sample project. The restaurant needs an application for its waiters, to help them automate the order processing and payment. This application will be called WaiterApp. We will have two developers on the team, Jakob and Terje, and a project owner, Meeta.
We will connect from our client machine to a TFS 2012 server using Visual Studio or the Web Access.
When you installed TFS2012, you were given a URL to the instance.If you don't remember it, open up Team Foundation Server Administration Console, found under All Programs/Microsoft Visual Studio Team Foundation Server 2012 on the machine where you installed the server:

Select the Team Project Collections under Application Tier, and notice the URL for DefaultCollection. It will look similar to the previous screenshot, except that the first name will be the name of your computer (name of the computer on which you installed TFS 2012 on).
Back in Visual Studio, locate the Team menu, and select Connect to Team Foundation Server.
The Select the Team Foundation Server list will be empty, so press the Add Servers button.
In the Add/Remove Server dialog box, the list will be empty. So press the Add button.
In the Add dialog box, enter the computer name (found in step 2) in the Name or URL of Team Foundation Server field. Leave the other fields as they are by default. Verify that the URL that gets displayed in Preview field must match the one found in step 2. Also notice that you can paste in a complete URL in the first field.

Accept by pressing the OK button. A confirmation dialog will then pop up; accept that. You will now see the connection dialog box. Press the Connect button.
You have now connected Visual Studio to the TFS 2012 instance.
A Team Project is a TFS 2012 organizational term that provides isolation. It can represent many things, but in this case we will let it represent the Packt Diner restaurant. The restaurant may want many applications over time, and all those will be organized under this umbrella. We will also decide that the restaurant will use the Scrum process as its development process.
First, we need to create the team project. For an on-premises installation, you can only do this from the Team Explorer within Visual Studio. For the TFS Service you can also do it from the Welcome page using the Web Access. We will show how to do it from Visual Studio, as follows:
Start Visual Studio.
Open Team Explorer (if you don't see it, go to the View menu and select Team Explorer):

Select Create a New Team Project….

Enter a name for the Team Project. The name can contain spaces, but since the name will also be part of the URL for the Team Project, and any space translates into
20%, it is wise to skip the spaces in the Team Project name.Enter a suitable description and press Next.
You can now select between the available process templates. Accept the default Scrum template and press Next.
You can now select between creating a new empty Source Control folder, or branch from an existing one. We want the former, the default, so just press Next here too.
Select Finish on the last page, and the Team Project creation process will start. It usually takes around one or two minutes to create a team project.
We will now create the next level, which is the Team. In this case, we will equate a Team with an Application, since we will use the actual team (Terje, Jakob, and Meeta) for all the applications, but they will be managed separately.
Go to the Team's Web Access site, using the Web Access node of Visual Studio Team Explorer (from the Home tab):
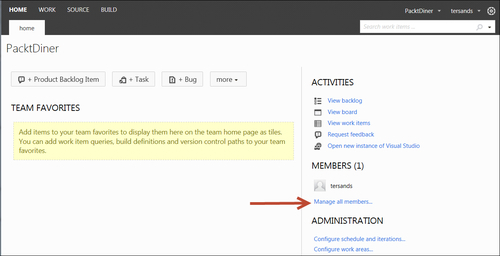
Select Manage all members.
Add the other Team members using the Add button.
Areas are used for categorization of work, and we will assign one area to the top level, which will match the application we are to make, and two sub-areas that will match the two functional levels Meeta wants us to develop, Ordering and Payment. She wants two releases of the product, and we plan to do these with two iterations/sprints each. Release planning is done using the Iteration feature.
Go to the Team's Web Access site, using the Web Access node of Visual Studio Team Explorer (from the Home tab):
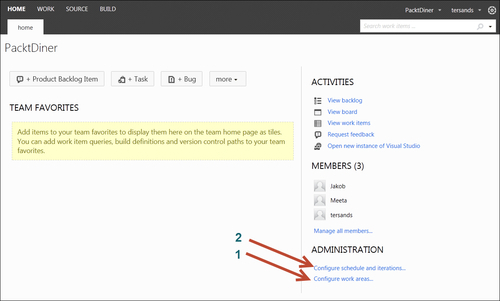
Select 1 (as marked in the preceding screenshot) for configuring the work areas.
Add a child named
WaiterApp, which will be the name of our Application. Below this, add two child areas for Ordering and Payment; these are the two functional areas that we will develop.Remove the checkbox in front of PacktDiner (ignore the warning that comes up)
Select the checkbox for the WaiterApp. Note that default area is also moved down to this area. It should now look similar to the following screenshot:

The areas are now set up as they need to be, and WaiterApp is associated with your team.
Now we will set up the release plan. Close the Areas dialog box, and click on Configure schedule and iterations (highlighted as 2 in the screenshot after step 1). You will see a default setup with releases and sprints.
We will prepare the plan for multiple applications, so add a new child below the root node, and name it
WaiterApp.Consider your company release strategy
You have the following two choices:
Make all the developments follow the same schedule: In this case, use the Microsoft default. There is no requirement to include the application names below the
rootfolder.Let every development have its own schedule: In this case, follow our example and add the application names below the
rootfolder.
Drag the Release 1 and Release 2 nodes under
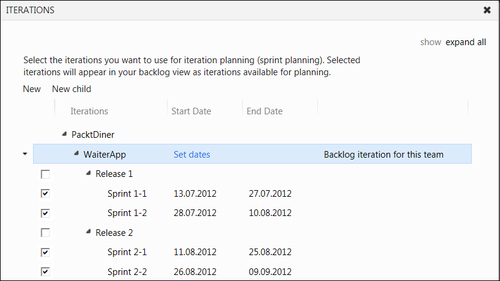
WaiterApp.Decide upon the cadence for your sprints, and add dates to the two sprints in each release following that cadence. It is quite common to set sprint cadence to two or three weeks. You don't need to add dates to the release nodes.
Dates are added to the sprint by selecting the sprint. A clickable Set Dates link appears, and from that you can set the start and end date of the sprint.
Delete the remaining sprints and releases by right-clicking on the nodes, and select Delete. You will be asked where to place any work items with that iteration path; just accept the default, since there are no work items yet.
Move the checked box to the WaiterApp iteration node.
Select the WaiterApp node, right-click and select Set as team's backlog iteration.
Select the checkboxes in front of the sprints.
Rename the four remaining sprints as shown in the following screenshot. Select each of them, right-click and open them to edit the names. We add a prefix to the sprint numbers to indicate the release numbers.
It should now look similar to the following screenshot:
The functional categorization and release plan are now set up, and the team is associated with this project. All Product Backlog Items (PBIs) you want to include in the project should start out by having their iteration path set to WaiterApp, the backlog for this application.
Meeta wants us to focus on two PBIs, namely Place Order and Calculate Bill. This will allow the waiter to take an order, using the Place Order user story, and to calculate the bill afterwards, using the Calculate Bill user story.
Go to the Team's Web Access site, using the Web Access node of Visual Studio Team Explorer (from the Home tab):

You can add the PBIs directly from this page by clicking on Product Backlog Item (marked as 1 in the preceding screenshot), which brings up a detailed work item form, or you can go to the Backlog view by clicking View Backlog (marked as 2 in the preceding screenshot), and add the items from there using a quick add function. For now, click on 1, as we will add some more details than the quick add function allows.
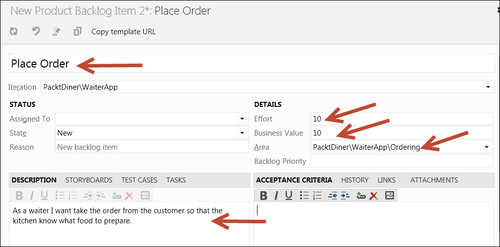
Change the information in the form as indicated in the preceding screenshot (indicated using the arrows).
Add another PBI named Calculate Bill, use the same values, but make the Area point to the Payment sub-area.
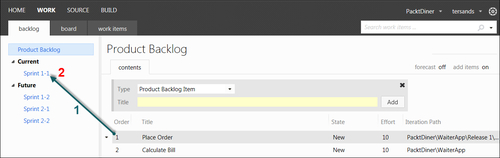
We should now choose the first PBI for development in the first sprint. This is done in the Product Backlog view.
Select View Backlog.
Drag the Place Order user story over the Sprint 1-1 node (arrow 1):
Each PBI should be split into tasks. The developer will work with tasks, and the sprint planning will be done by using tasks.
Select Sprint 1-1, (arrow 2 in preceding screenshot), to see the Sprint 1-1 backlog.
The Place Order user story will be shown in the list.
Press the + sign to add a task to the PBI, and set the title to Implement UI.

Add the 10 remaining hours, and set Activity to Development. Click on Save and Close.
Add two more tasks, Implement Business Logic and Implement Storage Service, in the same way.
Add a task named Add test cases, but set Activity to Requirements.
The Sprint Backlog view should now look similar to the following screenshot:

Add child work items "in context" of the PBI.
Note that the tasks we add here "inherit" some information, such as area and iteration paths, from their "parent". This is because we add the tasks "in context" of the parent PBI. Make a habit of always adding child tasks, test cases and bugs "in context" of the parent. You do that either from this backlog view or by opening the PBI and adding the items using the New button under one of the tabs—Implementation, Test Cases, or All Links.
To set up the source control structure, you use Visual Studio. We will add a structure that will allow further projects for other applications, and which will also allow for possible branching.
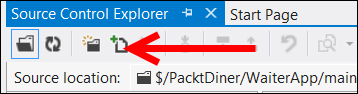
Go back to the Team Explorer node in Visual Studio, choose the Home node if not selected, and select the Source Control Explorer link button, found under the Pending Changes node (arrow 1 in following screenshot), to open up the Source Control Explorer window:
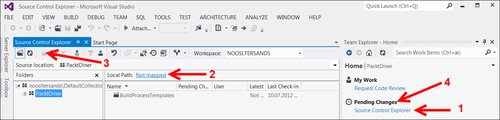
You need to map the source structure to a local disk. Press Not mapped (arrow 2 in preceding screenshot), and select a suitable location in the dialog box that appears (for example,
c:\PacktDiner).Answer No to the question if you want to download all items.
The Create Folder button (arrow 3 in preceding screenshot) is now enabled. Create the folder structure as follows:

Click on the Pending Changes link in the Team Explorer node (arrow 2 in preceding screenshot).
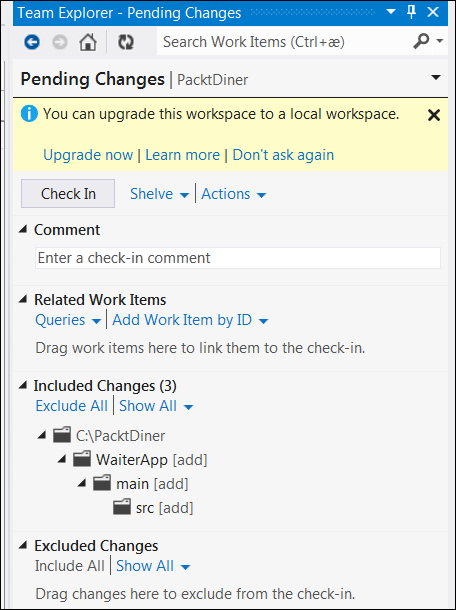
You will now be asked if you want to upgrade the workspace to a local workspace; answer by selecting Upgrade now.
Then enter some data for the Comment text area, such as
Folders added, and click on the Check In button.
We will now add the code for the application to source control. We will use a readymade code snippet for this. In a normal situation, the developer would start out by creating a new solution, place the solution in the src folder, and add that to source control. Keep all code and libraries you need below the solution root folder (src). Avoid spreading them over multiple root folders. This will make the workspace setup much easier as you only need one mapping there, and there is less chance of mixing up the folder structure as it can be from a multiple root solution. If the workspace mapping gets too complex, it can also be hard to make it build correctly on the build server.
To save you the work of writing the code yourself, download the sample code from http://www.packt.com/tfs2012starter/download/waiterapp.zip.
Unzip the code and place it all under the
srcfolder.From the Source Control Explorer window, press the Add files to source control icon:
If you use a local workspace, TFS 2012 will pick up the added files and show them as detected changes in the Pending Changes view.
In the Team Explorer, under the Home tab, press Pending Changes and add a suitable comment, such as Added waiter app solution, and click on Check In.
You should normally install the build system on a separate server. It may very well be a virtual server. If you're just playing around with the system or if there are very few developers, then you may install it to the same machine you have installed the TFS 2012 Server on.
Start the installation from the TFS install media, as mentioned in the Installation section.
When the TFS Configuration wizard appears, go to the Build Configuration tab and select Configure Installed Features.
Start the wizard and press Next.
On the Project Collection page, browse to the DefaultCollection URL (http://TFSServer:8080/tfs).
Add the recommend number of build agents, one per core of your server.
When selecting the build service account, select Use a system account and then choose NT AUTHORITY\NETWORK SERVICE (default).
Run through the rest of the wizard.
You should always create a Continuous Integration (CI) build for your solutions. Make it a habit to have a consistent naming scheme for your builds. We will use the following pattern here: ApplicationName.BuildType, and in this case WaiterApp.CI.
Go to the Team Explorer - Builds window in Visual studio.
Select the Builds tab.

Select New Build Definition, and work through the tabs as follows:
General: Set the name to
WaiterApp.CITrigger: Select Continuous Integration
Workspace: Click into the first row of the source folder column and change the folder here to
$/PacktDiner/WaiterApp/main/srcBuild Defaults: The controller you installed should already be visible and selected; if not, select it
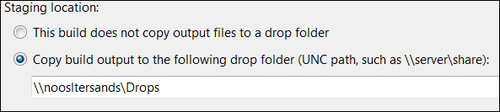
Open Explorer on the build server. Create a folder named
Drops.Change the properties to make this folder a shared folder.
Check the permission to ensure that the account the build service is running under (often the local Network Service account is used) has complete control over this folder.
Add the name of the computer and folder to the Staging location field:
In the Process tab go to Items to build, and select WaiterApp.sln.
Save the build definition.
Right-click on the new build definition, and select Queue a new build.
After a little while, it is shown as a green build, which means that you have succeeded in setting up an integrated TFS 2012 environment.
Now, try to make some small changes in one of the files in the solution/project. Notice that the file is automatically checked out (red check mark). Right-click on the file, choose Check In, and you're taken to the Pending Changes tab. Add a comment and check in the file. Go to the Builds tab and notice that a new build has automatically started. After a while, it goes green (hopefully), indicating a successful build.
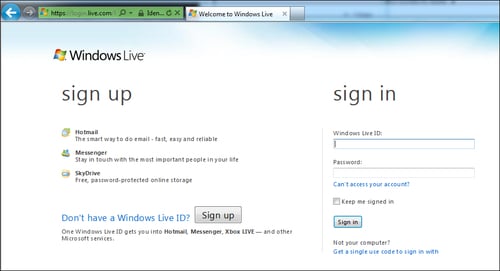
In the Server URL box, you should enter a nice name for your TFS service. Give this some consideration, as currently you can only have one site for an account. Also, you cannot rename this after it has been created. Use your own name or your company name here.
When you continue by clicking on Create your account, you're taken to the Live ID service. Log in with your Live ID:
The integration with Windows Live ID is a big change compared to the on-premise version of TFS. Team Foundation Services doesn't currently support Active Directory integration.
Your account is now created and you're taken to the start page:

That's it; you now have access to TFS anywhere from a PC with an Internet connection! Note that this web access is the same as the one included included in the on-premise installs. In the Top Features section, you will learn how to get started using it.
TFS 2012 can be accessed in many ways. The different roles can use different tools, as described in the introduction. If you are a developer, you can use any of the Visual Studio editions from VS 2005 and upwards, given that you have the appropriate updates for the earlier versions.
If you are a developer, you need a compatible Visual Studio version; one of these would suffice:
Visual Studio 2012 (Professional or above), install from: http://www.microsoft.com/visualstudio/11/en-us/downloads
Visual Studio 2008 or 2010 (Professional or above) with their respective forward-compatibility patches from http://support.microsoft.com/kb/2673642 or http://support.microsoft.com/kb/2662296
The editions of Visual Studio 2012, which can access TFS 2012, are Professional, Premium, and Ultimate, or for testers the Microsoft Test Manager in the Test Professional SKU. Visual Studio Express can use TFS Express edition.
If you are developing code on non-Windows machines, for example using the Eclipse IDE, then you can use Team Explorer Everywhere (TEE) to access your TFS 2012 installation. Download TEE from http://www.microsoft.com/en-us/download/details.aspx?id=29933.
Users of Office Excel and Project 2007 and 2010 can access TFS 2012 by installing the Team Explorer, which also installs the required add-in components for Office.
When installing Visual Studio 2012, it will also install the required components for Office PowerPoint that can be used for storyboarding your applications.
Users who don't use any tools can still use the TFS 2012 Web Access with its new revamped Agile Workbench solution. For license details, see http://www.microsoft.com/en-us/download/details.aspx?id=13350.