
This section goes through the major important features of the TFS 2012, which you need to create a complete development workflow for the team.
The Team Explorer is the main point of access when working with TFS 2012. It ships as a part of Visual Studio 2012, but you can also install it separately. You access Team Explorer from View | Team Explorer.
Team Explorer consists of several "pages", where each page gives access to the main features of TFS. We will list them shortly here; the rest of this chapter expands on the top features.
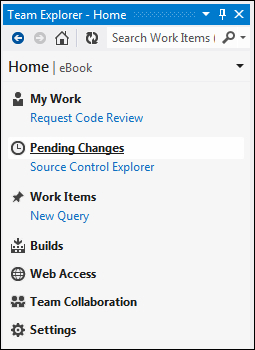
The Home page gives you links to the other pages, which are listed as follows:
My Work: The developers will spend most of their time here. It displays only the work that is relevant for the developer, and provides an easy way to associate their changes with the correct work item.
Also, this page lets developers suspend what they are currently doing to work on something else. When they are finished, they can resume the previous work, which includes modified source files, associated work items, windows that were open, and other IDE settings.
Last but not least, this page contains an integrated workflow for doing code reviews. This page is available in Premium and Ultimate editions. For more information on how to do code reviews in Visual Studio 2012, see http://msdn.microsoft.com/en-us/library/hh474795.aspx.
Note that the My Work page is only available in the Visual Studio Premium Edition and above.
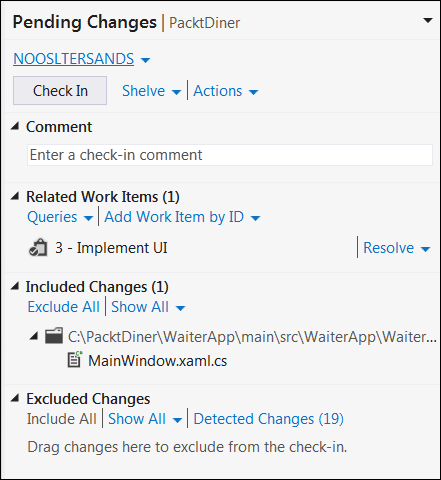
Pending Changes: This page shows all the changes that are done locally and haven't yet been checked in. The changes can be associated to work items, and can also be shelved in order to start working on something else, for example.
Work Items: This page shows all work item queries in the current team project, and lets users create new queries that can be shared with the rest of the team.
Builds: This page gives access to all build definitions in the team project. You can also manage the build resources, for example the build controllers and build agents that will execute your builds.
Web Access: This is just a link to the web access portal for the current team project.
Team Collaboration: If you have installed the Team Foundation Server Power Tools, then Team Explorer will integrate with Microsoft Lync and MSN Messenger in order to promote communication within the team. This hub shows the status for each team member (if they are running Microsoft Lync or MSN Messenger) and lets you see TFS-related information about them, such as their check-in history.
Settings: This page shows links to all the administration tasks that can be done, both for the current team project and the team project collection. Most of these links will redirect the user to the web access to complete the task, but some are available inside the Team Explorer.
Version control is the heart of TFS 2012. You use version control to store your source code and any other artifacts that are a part of the development of your products. In this section, you will learn about the core features and concepts of TFS 2012 version control.
The Source Control Explorer window (available from the Home page in the Team Explorer) shows a full source control repository for the team project collection. Basically, it works in a manner similar to Windows Explorer and lets you browse, search, and perform actions on files and folders.
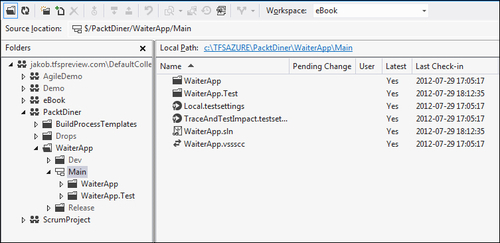
The workspace is a mapping between the TFS source control repository and your local development machine. You must create at least one workspace before you can download and modify anything in the source control. There are two types of workspace, namely Server workspaces and Local workspaces.
A local workspace is new to TFS 2012 and allows for local work in offline scenarios. You can check out, add, and remove files when offline. It synchronizes with the server when you're online again. The server workspace, on the contrary, keeps all the information about your workspace on the server.
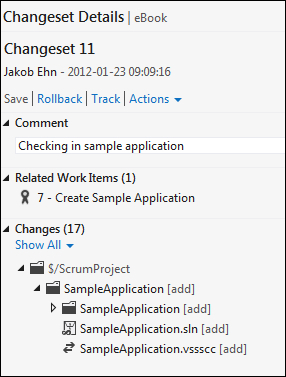
Every time you check in one or more modified source files, TFS bundles these files together into a changeset. A changeset contains the modified source files, and the following information:
A Changeset ID that is unique across a Team Project Collection
A comment written by the person who performed the check-in
The date and time of the check-in
One or more associated work items
Check-in notes, which can be used for code reviews and auditing
Violations of check-in policies
A changeset is atomic, meaning that it will either be fully committed to TFS or, in case of any error, not committed at all.
All the changes that are you are currently working on are automatically added to the set of pending changes. Every type of change is a pending change, including edits, moves, branches, and deletes. It is not until you check in your pending changes that these are committed to the TFS source control repository as a changeset.
The Pending Changes tab will show the files as included if they match the Team Explorer rules for files to include by default. Normally, these files are a part of the current solution. The remaining modified files in your workspace will be shown under excluded. You can move files between included and excluded by dragging them between their headings:
When you want to download the latest changes that have been checked in, you need to right-click and select Get Latest Version in the source control explorer.
Sometimes, you will need to get another specific version of a file or project. This is done by using the Get Specific Version command, located under the Advanced sub-menu in the source control.
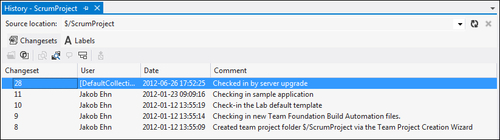
TFS keeps a track of all changes made to the items in the source control and users who performed the change. Often, you will want to view the history of a file or a complete folder, which can be done right in the source control explorer:
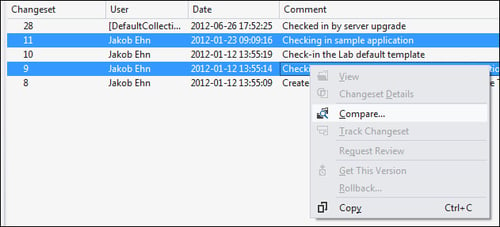
You can view details of each changeset within the history list, and you can also compare the differences for a file or folder between any given versions:
When looking at the source code, you will often find yourself wondering who wrote that code and why. You can answer this question by using the Annotate function. It will show which user had last modified any particular line of code, with a link to the corresponding changeset.
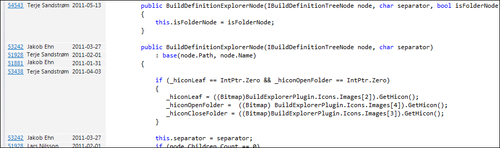
When clicking on the link in the left bar, you will get the full changeset details, including comments and work items that should answer why the change was made.
Sometimes, you may work on a new feature that is partly done and suddenly get interrupted by something else. At such times, you may not want to keep your changes lying around on your local machine, but commit them back into the main repository. These changes might not even compile. This is one occasion where shelvesets are very useful. A shelveset is basically a changeset that is not checked into the main repository. You can gain several benefits by shelving your changes, a few of which are listed as follows:
The changes are stored and backed up together with the rest of the repository
You can "unshelve" the changes onto another machine
Other team members can unshelve your changes onto their machine, for reviewing your code or helping you out with something
When setting up the source code structure for a new project, you should always prepare for branching. To support branching, you need to make sure that the project is contained within a top-level node that indicates which branch it belongs to. The following screenshot is an example:
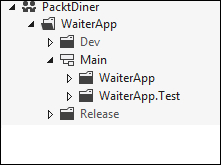
We have created a Main branch, where the source will be added in the beginning of the project. Later on, you can branch from the Main folder. Here we have created a Dev folder that will contain the development branches and a Release folder, which will contain the released branches. This will make sure that Main is the parent of all other branches, and any changes that are done must flow through the Main branch.
To create a new branch, select a folder in the source control explorer, right-click and select Branching and Merging | Branch.
In this example, we create a branch from the Main folder (source) and name the Target (child) branch Release\1.0.
A common scenario is that a bug may occur in production that needs to be fixed as soon as possible. We can fix the bug in the Release branch and build a new version of the product. Later, we need to merge the bug fix back to Main. Do this by selecting the Release/1.0 branch in source control, and select Branching and Merging | Merge.
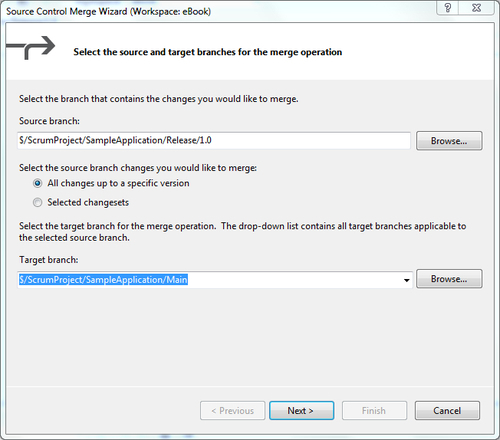
In the preceding dialog box, we can select the source and the target branches (we can only select the branches that are either a child or a parent of the source branch). We can also select to merge all the changes up to a specific version (often the latest version), or select specific changesets (often called a Cherry Pick Merge).
Branch hierarchies can grow complex over time, making it hard to visualize how they are connected to each other. To view the branch hierarchy, select Branching and Merging | View Hierarchy.
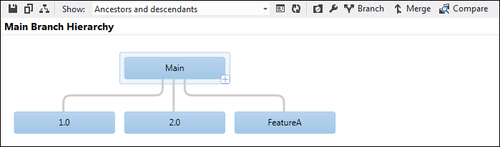
In the preceding screenshot, you can see a branch hierarchy where the Main branch has three child branches—one development branch (FeatureA) and two release branches (1.0 and 2.0).
Tip
Give branches meaningful names
When visualizing branches, only the branch name is visible so give them meaningful names. For example, ProjectName_1.0 instead of just 1.0, but keep in mind the total path length limits (260 chars on file, and 399 chars in source control after TFS 2012 Update 1).
A bug is initially fixed in one of the branches. Use the Track Changeset/Work Item feature in TFS to see where the work item or changerset was initially resolved and to which branches the change have been merged.
In the following example, we have a bug (ID 27) that was initially fixed in the Release 1.0 branch:
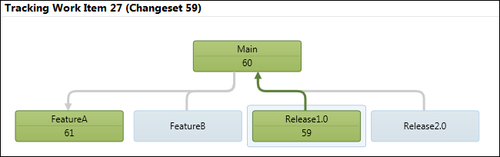
As indicated by the colors, the bug fix was merged to Main (Changeset 60) and then it was merged to the FeatureA development branch (Changeset 61). However, it has NOT been merged to the FeatureB or the Release 2.0 branch.There is also a Timeline Tracking view that shows the same information in time sequence, which can be very useful.
Tip
Merge changes by drag-and-drop between the branches
In both these views, we can merge the changes by dragging the boxes between the branches. The drag/drop operation will open the Merge dialog box.
The Visual Studio ALM Rangers have published a branching guidance, containing industry best practices; see http://vsarbranchingguide.codeplex.com/.
You must use work items when you need to track work in TFS. Work items exist in different types, for tracking a specific type of work that needs to be done.
The set of work item types you have available is determined by the process template you selected while creating the Team project. TFS comes with different process templates. These can be thought of as blueprints for new team projects, and may contain default information for work item types, default permissions, and build templates.
One of the most popular process templates is the Microsoft Visual Studio Scrum 2.0 process template , which contains the following main work item types:
Product Backlog Item: These work items are the work that a product owner wants to be implemented and that can be prioritized against other items on the backlog.
Task: PBIs are broken down into smaller Task work items. Each Task work item can then be assigned to a developer for implementation.
Bug: These work items represent a bug that has occurred either in production or during internal testing. Bugs are normally prioritized against other PBIs on the backlog
Impediment: An impediment in scrum is something that stops the team from finishing their sprint goal.
Here is an example of a work item of the PBI type:
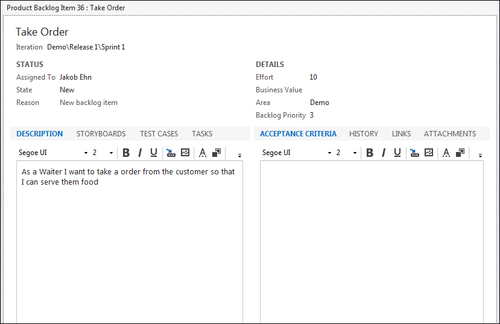
In this work item type, there are a total of eight different tabs that contain information. TFS 2012 Power Tools includes a tool that lets you customize process templates and work item types using a GUI. After the power tools have been installed, you can access the features from Tools | Process Editor.
Tip
When customizing work item types, start from one of the existing work item types and make your modifications to it.
Also, it's best practice to keep your work items under the source control. Create a separate team project to keep all your TFS-related artifacts.
For more information on Work Item Type customization, see http://msdn.microsoft.com/en-us/library/ms195025(v=vs.90).aspx.
There are several tools at your disposal when it comes to creating (and viewing) work items in TFS. When creating one or a few work items, you will normally use either Team Explorer or TFS Web Access.
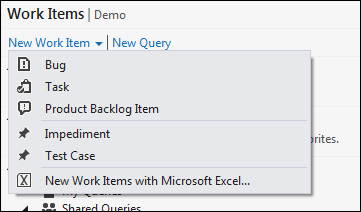
The following screenshot shows how it looks in the Team Explorer. From the Work Items page, you can create new top-level work items from the menu:
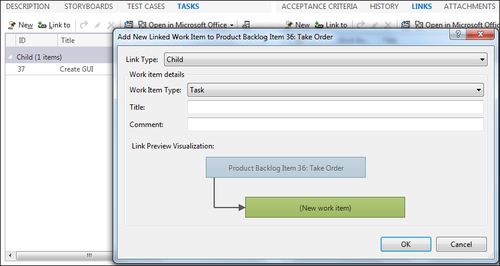
Subsequent child work items are created inside the parent work item form. Every work item can be linked to many other artifacts in TFS, such as other work items, source control changesets, and external URLs. This is a core feature that enables full traceability in your project between requirements, design, implementation, testing, and deployment.
You create links to other items of a variety of types by using the Links tab, and pressing either New or Link to.
The most common link type is Parent/Child. This is most commonly used to break down work into smaller tasks. Since this is so common, there is a separate tab called Tasks in the Product Backlog Item work item type. This lets you create subtasks for your PBI that are automatically linked as children.
Another important tab is the Test Cases tab. This lets you create test cases (which are a work item type as well) for your requirements. You will learn more about this later in this section.
You can find work items in three ways:
Work item ID: Select Team | Go To Work Item and then enter the ID of the work item that you want to find
Searching the work items box in team explorer: This lets you search for any string value in all the work items in the current team project.
Refining your search by adding search filters: You can filter by Assigned To, Created By, State and Work Item Type. Each filter type can be expressed by a compact syntax, such as
C:"@Me", which will only return work items that were created by the current user.Work item queries: This is the most powerful way to access a list of work items. Since they can be saved and accessed by all team members, they are the main way to organize your project management.
A query can have several AND and OR clauses that filter the result; clauses can be grouped, and each query can be configured to return a specific set of columns and sort the order.
Tip
Prefer fewer queries
Avoid having too many queries, as they tend not to be used. Prefer a few good queries that are well used. Note that you can add your own queries to My own queries. This will avoid the team queries from getting clutter up.
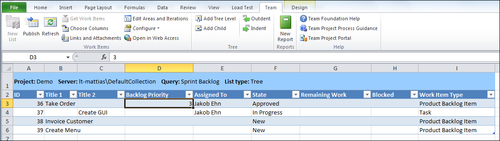
Here is an example of a work item query that returns all the tasks in Sprint 1 that are blocked:
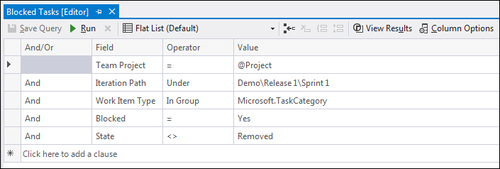
This query contains five different clauses, each of which filters in a different field. Clauses can be grouped by marking them and selecting Group.
Work item queries exist in three different flavors:
Flat list: This returns a list of work items that matches the filters. No linked work items are returned.
Work items and direct links: This returns the work items and any work items that are directly linked. Filters can be set for both the root and the link levels.
Tree of work items: This returns a hierarchical set of work items; meaning all matching work items and their children recursively.
Work item queries are organized per team project in a hierarchical fashion, using folders to separate groups of queries:

Current Sprint is a folder, which contains all the queries that apply to the current sprint. Note that this is only a convention, and there is no semantic relationship between the folder and the queries it contains. Also note that you can add work item queries to either My Favorites or Team Favorites, which also shows the total number of work items that those queries returned the last time they were executed.
Tip
Organize folders per team
If you use multiple applications per-team project, then you should mimic the same organization in the work item queries. Make one folder per application (or per "team", since team = application). Under each such folder, arrange the rest of the hierarchy in the same fashion.
Updating a few work items using either Team Explorer or the Web Access works fine, but often you will need to update many work items at the same time. In this scenario, you can use Microsoft Excel to batch update work items at the same time.
When using work item queries, you can right-click on them and select Open in Microsoft Excel, which will show the results of the query inside it. This works for all types of Work Item Queries; for example, flat lists, with direct links, and tree of work items.
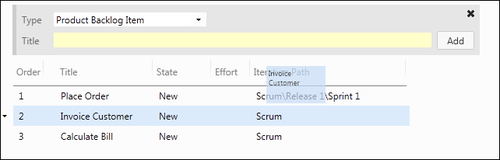
Here is how the PBI query looks in Microsoft Excel:
When you install TFS 2012 Team Explorer (or Visual Studio 2012) on a computer that has Microsoft Excel installed, the Team ribbon is created. This is what makes the Excel TFS aware and lets you work efficiently with work items.
Since Excel cannot show a hierarchical date, it flattens the result by adding extra columns for each level.
To create a new child task for the Take Order PBI, select the row containing the Take Order work item and then press the Add Child button in the Team ribbon:

When the work item is saved, it will be given an ID (shown in the ID column). Press the Publish button to save.
The My Work hub contains all the artifacts that you are involved with during your work, across types. Work items can be activated (move to In Progress) directly in the hub, and you will also see all the code review feedback you're involved in.
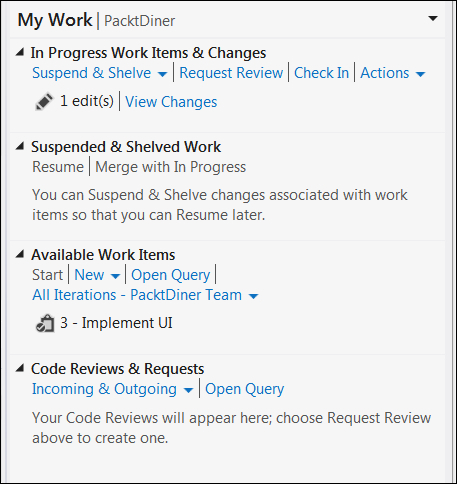
The Implement UI task is available here. You can drag it directly to In Progress Work Items & Changes, to tell that you're now working on this item:
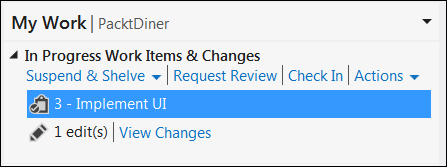
When you do this, it will automatically change the state to Active and become associated with the current pending changes.
In TFS 2012, the TFS Web Access was rewritten in order to fully embrace the concept of Agile planning. This includes concepts such as Product Backlogs, Sprint Backlogs, Tasks, and Kanban boards, and is a common practice among teams who practice Agile methodologies.
In the Quick Start section, we covered iteration planning and setting up a product backlog. We will now expand on this with the remaining features.
A product backlog is central in Agile planning; this should contain everything that needs to be done for the corresponding product. Items in the product backlog are prioritized by their order on the backlog in a top to down manner.
To prioritize, you drag-and-drop the items:
To assign items to sprints, you select the item on the backlog and drag it to the sprint on the left of the screen. You will see the Iteration Path field update automatically when you do this.
To view the sprint backlog, click on the sprint link on the left side of the screen. This will show all the backlog items that are assigned to the selected sprints and their tasks:
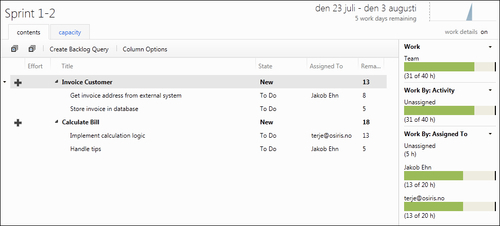
You can add new subtasks to the backlog items by clicking on the large plus icon (+) to the very left.
To the right, you can see the current capacity information for the current sprint. It shows how much of the total work is assigned to the team in this sprint (40 hours in this case) and how much of that work is allocated to each person and to the team in total (31 hours). In this case, the sprint looks OK; we haven't over allocated the team. If we add too much work, the fields will be marked with red color.
To be able to show this information, you need to define the capacity of each team member. This is done for each sprint and is done by clicking on the capacity tab:
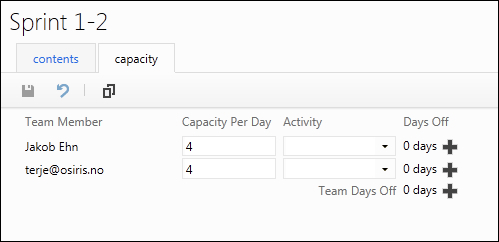
You set the capacity to how many hours per day each member can contribute (also restricting it to a certain activity), and to how many days during the sprint they will not be able to commit.
Development starts when the sprint is fully planned. During the course of the sprint, you normally have a daily stand-up meeting, where each team member briefly describes what they have been doing, what they will do today, and if they have any impediments. It is also a good moment to go through the remaining work for each task that is assigned to them. When doing this, you use the board task in the TFS Web Access:
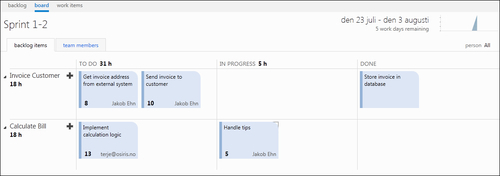
The board task shows all the backlog items to the left, with the total numbers of hours of remaining work below. All the implementation tasks are shown to the right in the corresponding state column.
In the upper-right corner, a small burn-down graph is shown; you can expand it by clicking on it. This is always up-to-date. Every time you change the remaining work or add a new task, the burn-down graph will reflect it immediately.
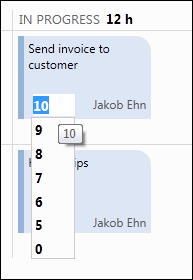
To change the state of a task, just drag it from the left to the right. Under the hood, TFS will update the necessary fields. You can easily assign a work item to another team member by clicking on the name in the task. You can also change the remaining work by clicking on the number in the lower-left of the task:
When you drag a task from IN PROGRESS to CLOSED, Remaining Work will automatically be cleared.
Tip
Prefer to create small tasks
Keep your tasks small. If they get too large, it will be too difficult to estimate the remaining, or even knowing if you're on track or not. Break it down into smaller tasks. A good range is 4 to 40 hours per task, with the majority of around 8 hours.
To see which tasks that are allocated to a specific team member, filter the board by clicking on the All link in the upper-right corner and then select that member. You can also group the entire board by team members.
Tip
Always keep Remaining Work updated
The Remaining Work field is central to make the burn-down graph and planning work. As a scrum master for your team, coach everyone to keep this updated. Never think about the past, always update with the value you feel is right TODAY.
There is a corresponding Kanban board, which is also very useful to get an overview of the state of the product backlog items.
Next to source control, the most important part in getting a continuous integration process working is build automation.
TFS 2012 Build is an end-to-end build automation engine for orchestrating the build process.
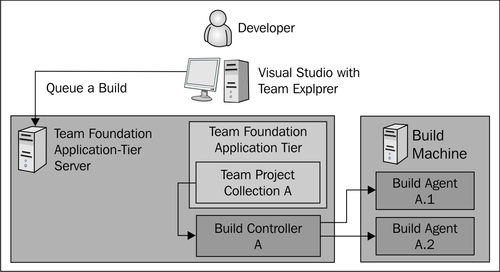
The two components of TFS Build are the Build Controller and the Build Agent. These are services running on one or multiple servers. Each build controller is registered with a single team project collection, and receives the request when a build is triggered. The build controller then queues the build on a suitable build agent.
Tip
Place the build controller on the TFS server
The build controller distributes a build to any available build agent on any build machine. By placing your build controller on the TFS server, and NOT on one of the build machines, you can avoid making any build machine a critical point of failure.
To create a build definition in TFS 2012, follow these steps:
In Team Explorer, click on the New Build Definition link on the Builds hub.
General: Enter a name for the build definition in a manner similar to the following:
<Product>.<Branch>.<Trigger>. For example,MyApplication.Dev.CI.Trigger: The trigger determines how the build should start.
Manual: The build must be triggered manually by a team member.
Continuous Integration (CI): The build will start automatically when a check-in occurs inside the workspace of the build.
Rolling Builds: Accumulate check-ins until the prior build finishes. You also have the option to define a fixed interval. If you set it to 15 minutes, the build will start at most every 15 minutes.
Gated check-in: A gated check-in is similar to a CI build, but with the difference that the check-in will only be accepted if the builds runs successfully. Larger and/or distributed teams can sometimes end up in a situation where the builds keep failing and no-one manages to get it back to the working stage again. A gated check-in build makes sure that no one can check in something that breaks the build.
Tip
Use gated check-in in non-ideal situations
In a non-ideal world, teams do not always communicate as well as you would like them to. Especially when the teams are distributed globally, this can be a challenge. A broken build will then cause more pain than you can accept, and the pain killer is the gated check-in. However, if you can improve team communication, prefer that over a gated check-in.
For more information on gated check-in builds, see http://msdn.microsoft.com/en-us/library/dd787631(v=vs.110).aspx.
Schedule: Used for daily/nightly builds that should run once every day.
Workspace: Here, you define the workspace for the build. It is very important to make the workspace as small as possible, otherwise the build will download a lot of unnecessary source code every time the build runs.
Build Default: This specifies which build controller should handle the build.
You also define the
Dropfolder path here. This must be a server share where the build service account has read/write permissions. The recommended drop path is\\<Server>\<Share>\<TeamProject>\<Project>\<Trigger>, for example:\\server\drop\eBook\SampleApplication\CI.Process: Configure what the build should do. First of all, you must select which build process template should be used. By default, you have three different templates to choose from:
DefaultTemplate11.X.xaml: This is the standard template that you should use for most build definitions. It also serves as the basis for customizations. It implements a full end-to-end build with label, compile, analyze, test, copy to drop, report, and notification.
UpgradeTemplate.xaml: This is used for build definitions that were upgraded from earlier versions of TFS 2005 and 2008. It is a minimal workflow template that launches MSBuild to execute a MSBuild project file. Use this as a temporary solution until you have converted your older builds to TFS 2012.
LabDefaultTemplate.11.xaml: This is used for builds that implement a full Build-Deploy-Test (BDT) workflow. This is related to lab management, where you want to deploy the build to one or more virtual or physical machines and then perform tests on those machines as a part of the build.
For more information on this topic, see http://msdn.microsoft.com/en-us/library/ee471614(v=vs.110).aspx.
Select DefaultTemplate.11.X.xaml. Now, you need to define the build process parameters for this build definition:

The only required parameter is Items to Build. This is the path to one or more projects/solutions in source control that should be built. You can also configure the configuration(s), such as Debug | Any CPU, for example.
The rest of the parameters have default values, which do not require any extra input, but you will want to learn what these are and what they do. You can, for example, configure log verbosity, the format of the build number, which build agent should be selected for the build, and so on.
Retention Policy: On the last tab, you can configure how many builds of each outcome should be stored. This is to avoid the drop folders and the TFS database to grow too much. For each outcome, you can configure what should be deleted.
You are done; save the build definition.
To run a build manually, right-click on the build definition in Team Explorer and select Queue New Build.
This brings up the Queue Build dialog box, where you can override several build settings and parameters for this build before starting it. The CI, Rolling, or Gated Check-in builds will start automatically when you check in. The queued build shows up under the My Builds section in the Builds hub. Double-click on it to see the build summary:
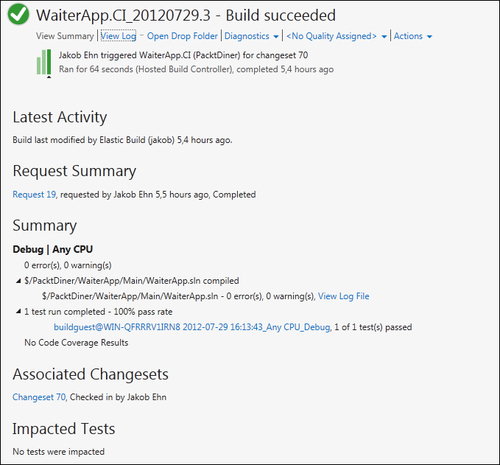
The build summary shows all the relevant information of the build, with links to the complete log and drop folders where you can access the output from the build.
You will eventually need to modify the build workflow, for example, if you want to copy the build output to a specific location. For guidance and best practices on build customization, see the Visual Studio ALM Rangers guidance for how to do that at http://vsarbuildguide.codeplex.com/.