
Modules are a way of grouping functions for similar types of tasks or components into a common module. These modules can then be loaded, used, and unloaded together as needed. Modules are similar in concept to libraries in the Windows world—they are used to contain and organize tasks, while allowing them to be added and removed dynamically.
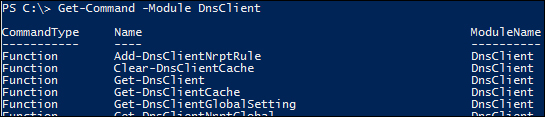
An example of a module is working with the DNS client. When working with the DNS client, you will have various tasks to perform: get configuration, set configuration, resolve hostname, register client, and so on. Because all of these tasks have to do with a common component, the DNS client, they can be logically grouped together into the DNSClient module. We can then view the commands included in the module using Get-Command –Module DnsClient as shown in the following screenshot:
Here we will show how to create a module for containing common functions that can be loaded as a unit. Because modules typically group several functions together, we will start off by creating multiple functions.
For our recipe, we will be creating a module named Hello. In this example, we have created two simple "Hello World" type functions. The first simply replies "Hello World!", while the second takes a name as a variable and replies "Hello <name>".
Carry out the following steps:
Create several functions that can be logically grouped together.
Function Get-Hello
{
    Write-Host "Hello World!"
}
Function Get-Hello2
{
    Param($name)
    Write-Host "Hello $name"
}
Using the PowerShell ISE or a text editor, save the functions into a single file name
Hello.PSM1.If the folder for the module doesn't exist yet, create the folder.
$modulePath = "$env:USERPROFILE\Documents\WindowsPowerShell\Modules\Hello"
if(!(Test-Path $modulePath))
{
    New-Item -Path $modulePath -ItemType Directory
}
Copy
Hello.PSM1to the new module folder.$modulePath = "$env:USERPROFILE\Documents\WindowsPowerShell\Modules\Hello" Copy-Item -Path Hello.PSM1 -Destination $modulePath
In a PowerShell console, execute
Get-Module –ListAvailableto list all the available modules:
Run
Import-Module Helloto import our new module.Run
Get-Command –Module Helloto list the functions included in the module:
Execute the functions in the module as normal:

We start off by identifying several functions or commands to group together as a module. These commands do not necessarily have to relate to each other, but it is often best to organize them as well as possible. The commands are then saved into a single file with a .PSM1 file extension. This file extension indicates to PowerShell that the file is a PowerShell module.
The module is then stored in the user's profile directory. If the folder doesn't already exist, we create a new folder named the same as the module. Once the folder exists, we copy the .PSM1 file into the folder. PowerShell automatically searches this location for new modules to load.
Note
There are two locations PowerShell looks for installed modules: C:\Windows\system32\WindowsPowerShell\v1.0\Modules\ and %userprofile%\Documents\WindowsPowerShell\Modules. The first location is used by the entire system and requires administrative permission to access; most third party modules are installed here. The second location is user specific and does not require elevated rights to install scripts.
Once saved, we can load the module to the memory. The command Import-Module loads the contents of the module and makes the commands available for use. We can then view the contents of the module using Get-Command –Module Hello. This returns all publicly available functions in the module.
Note
Modules are viewed by PowerShell similar to scripts and they rely on the same security requirements as other scripts. Because of these restrictions, it is best practice to sign your modules once they have been created.
Finally, once the module is loaded, we can execute the included commands.
Auto-loading of modules: PowerShell 3.0 automatically imports modules as they are needed. While it is best practice to load and unload modules, you do not necessarily have to use
Import-Moduleprior to accessing the functions contained within. As you can see in the following screenshot, I listed the currently loaded modules usingGet-Module. Once I confirmed my newHellomodule was not loaded, I then execute theGet-Hello2function in the module which completed successfully. ExecutingGet-Moduleagain shows the module has been automatically loaded.
Module manifest: In addition to the modules themselves, you can also create a module manifest. A module manifest is a file with a
.PSD1extension that describes the contents of the module. Manifests can be useful because they allow for defining the environment in which a module can be used, its dependencies, additional help information, and even which set of commands to make available. The following code is a basic example of creating a manifest for ourHello Worldmodule:New-ModuleManifest -Path "$env:USERPROFILE\Documents\WindowsPowerShell\Modules\Hello\Hello.PSD1" -Author "Ed Goad" -Description "Hello World examples" -HelpInfoUri "http://blog.edgoad.com" -NestedModules 'Hello.PSM1'
Once the manifest is created, we can view the manifest properties using the following code:
Get-Module Hello -ListAvailable | Format-List -Property *
