
After you've completed the EdgeSight Server installation and configured the server setting, it is time to create users, assign groups, and configure an authentication provider. In this recipe we will use Active Directory as the authentication provider.
Before creating a new Active Directory as the authentication provider we need to get the LDAP path. The LDAP path is formulated as LDAP://DomainName.com.
To configure an authentication provider, browse to Configure | Server Configuration | Authentication and click on the New Provider button.

Select Active Directory from the list of authentication provider and click on Next.
Enter a name and description to identify the provider. If you want to configure this as the default authentication provider then also select Make this the default authentication provider. Also enter the LDAP path with the appropriate user credentials and then click on the Test button. After the message The test completed successfully, click on the Finish button.

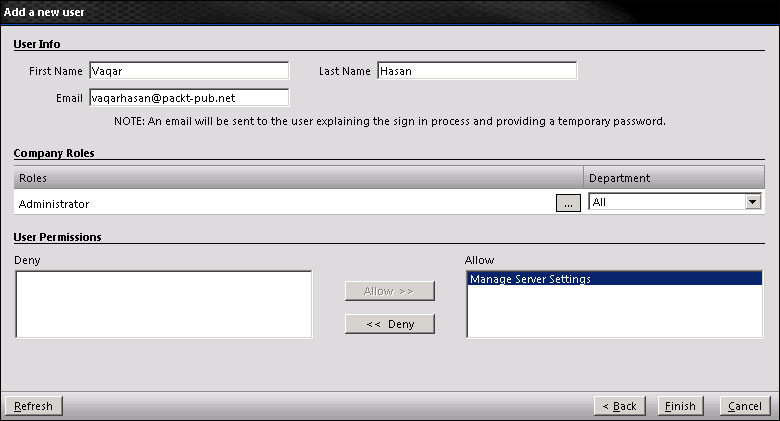
Now we will create a new user in EdgeSight using the Active Directory User Picker and select a user from our Active Directory domain. To do this navigate to Configure | Company Configuration | Security | Users and then click on the New User button.

Select Active Directory as the authentication provider and click on Next.
Click on the Browse button to select User or Group from the Active Directory User Picker window.
Select the appropriate type as Users, Groups, or Users and Groups from the Type drop-down menu and click on the Go button to populate the list from Active Directory. Select the User or Group value you want to assign the permissions to and click on OK. Here we have selected the Domain Admins group.

-
Click on the Save
 button to select the role from the Role Picker pop-up window.

Select the role you want to make this new user a member of and click on OK. You will be then returned to the Add a new user web page.

Select user permissions to be granted to the user from the Deny list box and click on Allow to grant the permission.
Click on Finish and verify that the new user you created now appears in the list.

Let us now see how to manage groups.
The User Groups page enables you to create collections of users by directly selecting users by username, IP address, IP range, or by running a query against the EdgeSight database. The examples of groups include common operating systems and common hardware:
To create a group, browse to Configure | Company Configuration | Device Management | Groups and then click on the New Group button.

The groups in the previous screenshot were created automatically during the installation of the EdgeSight Server.
Enter a name for the group and click on the Create a Group button.

The expiration period is the time after which this newly created group will automatically be deleted. This feature facilitates the management of groups created for short-term projects with a set duration, such as the evaluation of software. Groups can also be set to never expire.
The refresh period refreshes the device cache. This refresh rate generally provides you with sufficient currency of data without performing unnecessary cache refreshes.
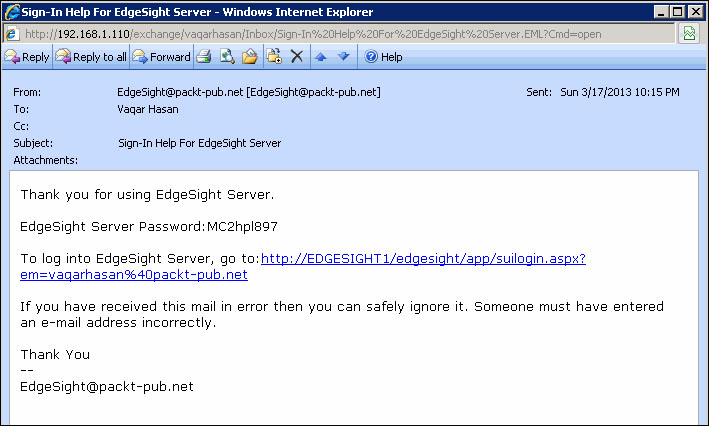
If you do not create the Active Directory authentication provider, you can still use the default authentication provider (Email) that is installed with the installation of the EdgeSight Server. The default authentication provider uses an e-mail address as the username:
When you create a new user, you will have to provide the e-mail address for that user. Then an e-mail is send to the user explaining the first-time login process and also providing a temporary password. When the user first logs in, they are requested to change their password.