
EdgeSight reports are based on the data stored in the agent database as well as the server database. The reports can be historical as well as real-time. In case of real-time reports, the data is pulled directly from the agent database.
In this recipe we will subscribe to a report and configure it to be delivered via an e-mail.
EdgeSight comes with a wide range of built-in reports. We can download these reports and/or export them to a variety of different formats. We can also add our own custom reports to the report server. One great feature that EdgeSight also offers is the automatic delivery of the report of our choice to run at a custom schedule; the report is sent to a specific folder or e-mail addresses.
First we need to verify that the e-mail settings for the Reporting Services are configured properly. Log on to the server hosting your reporting services, open the Reporting Services Configuration Manager, and then select Email Settings. By default the Sender Address and SMTP Server fields are not populated automatically. After entering the appropriate information click on Apply.
Tip
The Sender Address field should be a valid e-mail address and appears as the address of origin in the e-mail.

Open the EdgeSight website, navigate to Configure | Server Configuration | Reporting Services | Schedules, and then click on the New Schedule button.

Specify a name for the schedule and specify other details as per your requirement. Click on the Add Schedule button.

Click on the Browse tab and the Subscriptions link of the report you want to subscribe to.

Click on the New Subscription button to create a new subscription.
The default delivery is through e-mail; in case you want to save the report to a specified folder, you can click on the Delivered by drop-down menu and select File Share. To select the schedule, click on the Schedule drop-down menu and select the schedule you want the report to be processed at; click on the Create Subscription button.

The built-in reports provided by EdgeSight can be modified to meet the business requirements more closely. To modify a report, click on the Download link and save the file with the default extension of .RDL (Report Definition Language). Then use your favorite XML Editor to open the .RDL file and change the SQL query within the <CommandText> tag. You might also need to modify the field names <Field Name> and the data fields <DataField> tags. Once done save the file, navigate to Configure | My Settings | Custom Reports, and then click on the Upload button.
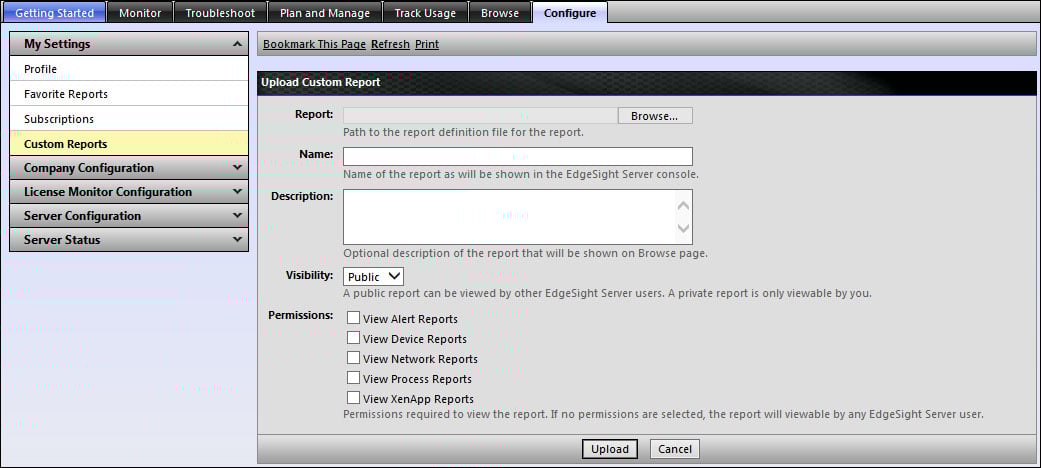
If you set the visibility to Private, then only the user uploading the report can view it.