-
Book Overview & Buying

-
Table Of Contents

Learning Cypher
By :

Learning Cypher
By:
Overview of this book
 Free Chapter
 Sign In
Start Free Trial
If you already have experience in creating a Neo4j database, you can skip this and jump to the next section.
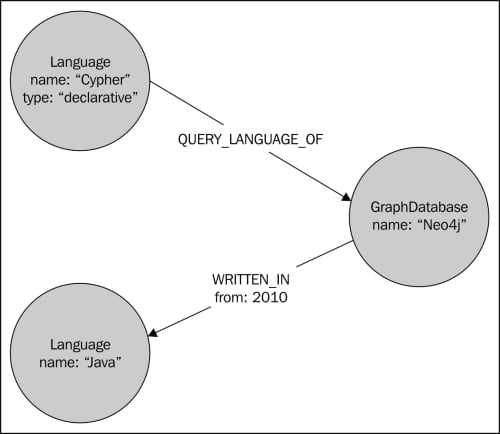
Neo4j is a graph database, which means that it does not use tables and rows to represent data logically; instead, it uses nodes and relationships. Both nodes and relationships can have a number of properties. While relationships must have one direction and one type, nodes can have a number of labels. For example, the following diagram shows three nodes and their relationships, where every node has a label (language or graph database), while relationships have a type (QUERY_LANGUAGE_OF and WRITTEN_IN).
The properties used in the graph shown in the following diagram are name, type, and from. Note that every relation must have exactly one type and one direction, whereas labels for nodes are optional and can be multiple.

Neo4j can be run in two modes:
An embedded database in a Java application
A standalone server via REST
In any case, this choice does not affect the way you query and work with the database. It's an architectural choice driven by the nature of the application (whether a standalone server or a client server), performance, monitoring, and safety of data.
Neo4j Server is the best choice for interoperability, safety, and monitoring. In fact, the REST interface allows all modern platforms and programming languages to interoperate with it. Also, being a standalone application, it is safer than the embedded configuration (a potential crash in the client wouldn't affect the server), and it is easier to monitor. If we choose to use this mode, our application will act as a client of the Neo4j server.
To start Neo4j Server on Windows, download the package from the official website (http://www.neo4j.org/download/windows), install it, and launch it from the command line using the following command:
C:\Neo4jHome\bin\Neo4j.bat
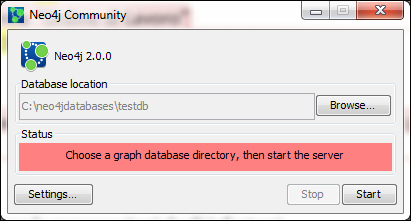
You can also use the frontend, which is bundled with the Neo4j package, as shown in the following screenshot:

To start the server on Linux, you can either install the package using the Debian package management system, or you can download the appropriate package from the official website (http://www.neo4j.org/download) and unpack it with the following command:
# tar -cf <package>
After this, you can go to the new directory and run the following command:
# ./bin/neo4j console
Anyway, when we deploy the application, we will install the server as a Windows service or as a daemon on Linux. This can be done easily using the Neo4j installer tool.
On the Windows command launch interface, use the following command:
# bin\Neo4jInstaller.bat install
When installing it from the Linux console, use the following command:
# neo4j-installer install
To connect to Neo4j Server, you have to use the REST API so that you can use any REST library of any programming language to access the database. Though any programming language that can send HTTP requests can be used, you can also use online libraries written in many languages and platforms that wrap REST calls, for example, Python, .NET, PHP, Ruby, Node.js, and others.
An embedded Neo4j database is the best choice for performance. It runs in the same process of the client application that hosts it and stores data in the given path. Thus, an embedded database must be created programmatically. We choose an embedded database for the following reasons:
When we use Java as the programming language for our project
When our application is standalone
For testing purposes, all Java code examples provided with this book are made using an embedded database.
The fastest way to prepare the IDE for Neo4j is using Maven. Maven is a dependency management as well as an automated building tool. In the following procedure, we will use NetBeans 7.4, but it works in a very similar way with the other IDEs (for Eclipse, you will need the m2eclipse plugin). The procedure is described as follows:
Create a new Maven project as shown in the following screenshot:

In the next page of the wizard, name the project, set a valid project location, and then click on Finish.
After NetBeans has created the project, expand Project Files in the project tree and open the pom.xml file. In the <dependencies> tag, insert the following XML code:
<dependencies>
  <dependency>
   <groupId>org.neo4j</groupId>
   <artifactId>neo4j</artifactId>
   <version>2.0.1</version>
  </dependency>
</dependencies>

<repositories>
  <repository>
    <id>neo4j</id>
<url>http://m2.neo4j.org/content/repositories/releases/</url>
    <releases>
      <enabled>true</enabled>
    </releases>
  </repository>
</repositories>
This code informs Maven about the dependency we are using on our project, that is, Neo4j. The version we have used here is 2.0.1. Of course, you can specify the latest available version.
If you are going to use Java 7, and the following section is not present in the file, then you'll need to add the following code to instruct Maven to compile Java 7:
<build>
  <plugins>
    <plugin>
      <groupId>org.apache.maven.plugins</groupId>
      <artifactId>maven-compiler-plugin</artifactId>
      <version>3.1</version>
      <configuration>
        <source>1.7</source>
        <target>1.7</target>
      </configuration>
    </plugin>
  </plugins>
</build>
Once saved, the Maven file resolves the dependency, downloads the JAR files needed, and updates the Java build path. Now, the project is ready to use Neo4j and Cypher.
Creating an embedded database is straightforward. First of all, to create a database, we need a GraphDatabaseFactory class, which can be done with the following code:
GraphDatabaseFactory graphDbFactory = new GraphDatabaseFactory();
Then, we can invoke the newEmbeddedDatabase method with the following code:
GraphDatabaseService graphDb = graphDbFactory
      .newEmbeddedDatabase("data/dbName");
Now, with the GraphDatabaseService class, we can fully interact with the database, create nodes, create relationships, and set properties and indexes.
Neo4j allows you to pass a set of configuration options for performance tuning, caching, logging, file system usage, and other low-level behaviors. The following code sets the size of the memory allocated for mapping the node store to 20 MB:
import org.neo4j.graphdb.factory.GraphDatabaseSettings;
// ...
GraphDatabaseService db = graphDbFactory
                .newEmbeddedDatabaseBuilder(DB_PATH)
                .setConfig(GraphDatabaseSettings
                   .nodestore_mapped_memory_size, "20M")
                .newGraphDatabase();
You will find all the available configuration settings in the GraphDatabaseSettings class (they are all static final members).
Note that the same result can be achieved using the properties file. Clearly, reading the configuration settings from a properties file comes in handy when the application is deployed because any modification to the configuration won't require a new build. To replace the preceding code, create a file and name it, for example, neo4j.properties. Open it with a text editor and write the following code in it:
neostore.nodestore.db.mapped_memory=20M
Then, create the database service with the following code:
GraphDatabaseService db = graphDbFactory
                    .newEmbeddedDatabaseBuilder(DB_PATH)
                    .loadPropertiesFromFile("neo4j.properties")
.newGraphDatabase();Change the font size
Change margin width
Change background colour