

Let's look at the commands we just learned in the IDE and Selenese and how they translate into the Ruby language. In the case of Ruby, we will only look at the key commands and how they translate from Selenese into Ruby. The goal of this exercise is to take away some of the intimidation factor of moving to a programming language for someone who may never have seen software code before.
To start, let's look back at the HTML table that is the Selenese output:

The first line in this table is the name of the test, which happens to be search_test.
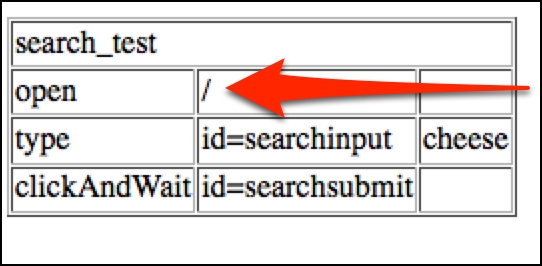
The second item, shown in the preceding screenshot is the open command to the root (/) of the base domain URL. So, the browser will navigate to this exact address http://awful-valentine.com/.
Tip
Downloading the example code
You can download the example code files for all Packt books you have purchased from your account at http://www.packtpub.com. If you purchased this book elsewhere, you can visit http://www.packtpub.com/support and register to have the files e-mailed directly to you.
In Ruby, the open command translates into a very straightforward get method call. The code looks like this:
selenium.get("http://awful-valentine.com/")Tip
Note that we didn't have to use base URL like we did with Selenese. WebDriver talks directly to the web browser, not through JavaScript; this eliminates XSS limitations, and you can test as many websites as you want in a single test run.
Once the browser navigates to the website we want, it needs to locate the search field and input the search term. In the search_test table, it is in the third line:

Since this is a complex multistep action, let's break it down into smaller chunks:
Find the text field element with the help of the
find_elementmethod by passing it the HTML ID of the text field (searchInput), and then store the element in the element variable:element = selenium.find_element(:id, "searchInput")
Once the text field is located and stored in the
elementvariable, we will type thecheesestring into it by using thesend_keysmethod:element.send_keys("cheese")We have now typed the text we wanted into the search bar. We used the
elementvariable to store the reference to the text field, and then applied some typing action on that variable.We can use method chaining to get the same result in a more condensed version; the search and type text action would look like the following code with method chaining:
selenium.find_element(:id, "searchInput").send_keys("cheese")
Note
Method chaining is a common type of syntax that allows the programmer to invoke multiple method calls without using intermittent variables. Each method call in the chain returns an object that answers to the next method call in the chain. We will go deeper into object-oriented programming in the The Page Objects pattern section of Chapter 7, The Page Objects Pattern.
The last action our test performs is clicking on the search submit button. In the Selenese table, it is the fourth row of our test:

Using method chaining as before, we will find the submit button and send a
clickcommand to it:selenium.find_element(:id, "searchsubmit").click
The clickAndWait command translates to a simple click method call in Ruby.
Note
Notice that with Selenium WebDriver, the wait for page to load part of the clickAndWait command is implicit. As of Selenium 2, when navigating from page to page, Selenium will automatically wait for the new page to finish loading. This, however, does not apply for any AJAX requests to finish. We will discuss AJAX waits in Chapter 5, Stabilizing the Tests.