
Operating a Jenkins master from a single machine inherently creates a Single Point of Failure (SPOF). If the Jenkins master was lost for any reason, rebuilding it could be time consuming and may not be very easy. If the Jenkins master is lost or destroyed, there may be a crippling impact on your organization's ability to build, test, or release. Let's address this and create a disaster-recovery plan for Jenkins to ensure a high level of availability and quick turnaround time for any failures that may occur.
Snapshot backups of the $JENKINS_HOME directory can provide a level of fault tolerance, and offer an effective solution for system-wide backups. There are a number of Jenkins plugins that can effectively assist us in creating snapshot backups. The most popular backup plugins include BackUp, thinBackup, and SCM Sync configuration. You will need to choose the one that best suits your specific needs.
All of the above listed plugins are available from the Jenkins Manage Plugins screen. You can access this area by opening Jenkins, logging in as an administrator, and then going to Jenkins -> Manage Jenkins -> Manage Plugins -> Available plugins.
The following screenshot shows some of the available backup plugins on the Jenkins Manage Plugins screen:
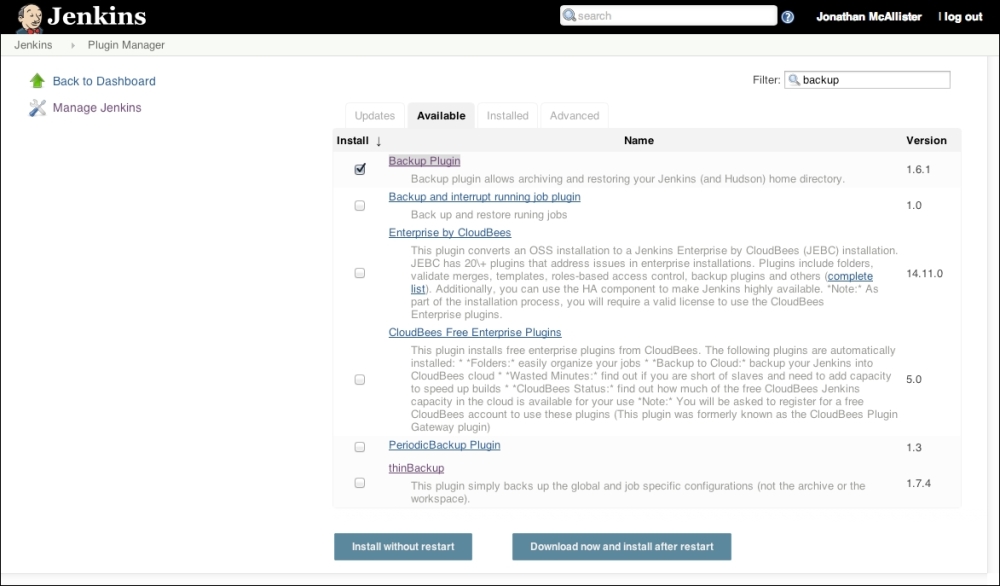
Figure 1-4: The Manage Jenkins screen
Installing any of the available backup plugins (or any plugin for that matter) can be accomplished by simply marking the appropriate checkbox and clicking on the Download now and install after restart button.
Once the plugin has been installed, it is highly recommended that you read any usage instructions and documentation. A direct link to the documentation for all Jenkins plugins can be found at https://wiki.jenkins-ci.org/display/JENKINS/Plugins.
Tip
Downloading the example code
You can download the example code files for all Packt books you have purchased from your account at http://www.packtpub.com. If you purchased this book elsewhere, you can visit http://www.packtpub.com/support and register to have the files e-mailed directly to you.
If resources are available, another disaster-recovery option might be to set up a Jenkins mirror. A Jenkins mirror replicates a primary Jenkins instance in real time onto another host. This way, if there is an outage on the primary Jenkins instance, we can simply alternate traffic over to the mirror.
To implement a Jenkins mirror, we can use rsync to create a synchronized duplicate of the $JENKINS_HOME directory structure; this includes synchronizing all content, configuration files, and data onto our mirror. The Jenkins master can then be swapped with the mirror if there is a failure, or even if the primary instance is undergoing maintenance that requires downtime.
To begin the implementation of a Jenkins mirroring solution, we will need two systems with matching configurations (OS, disk, RAM, and so on). The first system will have Jenkins installed and may already be in production use. This system will be referred to as the Jenkins-Primary.
The second system will need to be preconfigured with a basic installation of Jenkins (which will be replaced later). This system will be referred to as the Jenkins-Mirror. Once Jenkins is installed on the Jenkins-Mirror, we will need to shut down the Jenkins service.
Shutting down the Jenkins service can be accomplished by executing the following command:
$> sudo service jenkins stop
Our next step in creating a Jenkins mirroring solution is to install the rsync and openssh-clients packages on both hosts (primary and mirror). Rsync is a widely utilized file and folder synchronization tool that replicates files, folders, and data across devices. It has the ability to synchronize entire folder structures or just the deltas. This makes it an optimal tool for our implementation of the Jenkins mirroring solution. The openssh-clients package works in tandem with rsync and enables rsync to perform its synchronization tasks over the SSH protocol. Let's take a minute to get these installed on the Jenkins primary and mirror systems.
To install rsync and OpenSSH, execute the following commands for your target OS:
RHEL/CentOS:
$> sudo yum install rsync
$> sudo yum install openssh-clients
Debian/Ubuntu:
$> sudo apt-get install rsync
$> sudo apt-get install openssh-clients
Once rsync has been installed, let's verify that it is operating properly. Execute the following commands in the command-line terminal:
$> which rsync
$> rsync --version
If everything is functioning correctly, RSYNC will return an output similar to the examples provided here (for both primary and mirror):
Jenkins-Mirror:
[root@jenkinsmirror jenkins]# which rsync
/usr/bin/rsync
[root@jenkinsmirror jenkins]# rsync --version
rsync  version 3.0.6  protocol version 30
Copyright (C) 1996-2009 by Andrew Tridgell, Wayne Davison, and others.
Jenkins-Primary:
[root@jenkinsprimary jenkins]# which rsync
/usr/bin/rsync
[root@jenkinsprimary jenkins]# rsync --version
rsync  version 3.0.6  protocol version 30
Copyright (C) 1996-2009 by Andrew Tridgell, Wayne Davison, and others.
Now that we have verified that the necessary packages are installed, it is time to perform an initial pull of the $JENKINS_HOME directory from the Jenkins-Primary server over to the Jenkins-Mirror. To accomplish this, we need to use the command sudo to access the root user account on the Jenkins-Mirror, and have rsync fetch the contents from the Jenkins-Primary.
Enter the following commands into the terminal on the Jenkins-Mirror (replace jenkinsprimary in the following command with your Jenkins-Primary IP address):
$> sudo su - Jenkins
$> sudo rsync -avuh --delete -e ssh root@jenkinsprimary:/var/lib/jenkins/* /var/lib/jenkins
Note
The initial pull of the $JENKINS_HOME directory and its contents may take some time, depending on the size and network connection speed. Upon completion, you should see something similar to the following message in your terminal:
sent 3.55M bytes received 77.70G bytes 15.78M bytes/sec
total size is 79.64G speedup is 1.02
Once rsync has completed, we need to verify that the initial transfer was successful by starting the Jenkins service on the Jenkins-Mirror. We should inspect it to make sure it looks identical to the Jenkins-Primary server. Enter the following commands into the command line terminal to fire up Jenkins on the Jenkins-Mirror:
$> sudo service jenkins start
Once the initial pull of the $JENKINS_HOME directory has been verified, we need to implement SSH key-based authentication so that we can execute our rsync commands without password prompts and manual intervention.
To get SSH key-based authentication implemented we will need to create SSH keys and share them across our server solutions. This includes the Jenkins-Primary and Jenkins-Mirror hosts.
Note
It is important to mention that this step may not be necessary if your host already has the RSA or DSA keys generated for the root user account.
To connect from Jenkins-Primary to Jenkins-Mirror with SSH-key based authentication, use the following commands:
$Jenkins-Primary>sudo su – root
$Jenkins-Primary>ssh-keygen –t rsa
$Jenkins-Primary>scp ~/.ssh/id_rsa.pub root@jenkins-mirror:/tmp/
$Jenkins-Mirror>sudo su – root
$Jenkins-Mirror>cat /tmp/id_rsa.pub >> ~/.ssh/authorized_keys
To connect from Jenkins-Mirror to Jenkins-Primary with SSH-key based authentication, use the following commands:
$Jenkins-Mirror>sudo su – root
$Jenkins-Mirror>ssh-keygen –t rsa
$Jenkins-Mirror>scp ~/.ssh/id_rsa.pub root@jenkins-primary:/tmp/
$Jenkins-Primary>sudo su – root
$Jenkins-Primary>cat /tmp/id_rsa.pub >> ~/.ssh/authorized_keys
Once the SSH keys are generated, we need to create a line item in the authorized_keys file to implement SSH-keybased authentication. An example of the line item in the authorized_keys file is shown below.
ssh-rsa AAAAB3NzaC1yc2EAAAABIwAAAQEA/QIL17A1XSjDLZVqf49F0Y785Foq4A6UaBAaVQApB0yyOXVIwqu2H035nI4zDlhymgii6zfHeylHgKrjJyS2MLoiO0pFo4XEFo2UNoy8CXKPJR+Sf9WeWjSvvoX3OE0YTfiFDMb29MvIc+bfUKRoAPeCqj4s81Vf/v3f3JteT7ExQAN22AjUNceiIr2bxLbr7I8bMdN4886gtXYFPAtkQ3YXe1SWb3xlYDtL8jtAl39Cw5FSCkQM5ToLYsk95+0DAAfNAeUx/sWYVrKU+AvrkMranJdmOa86vEnuhqOaGD3r2y+AVuLGid1r3Mcg7VrJBs0oKlj4OH9vNZF68xCQdw== [email protected]
Once this step has been completed successfully, we should have the proper prerequisites in place to connect bidirectionally via SSH without being prompted for a password.
Let's test this functionality by executing the following commands on both the Jenkins-Primary and Jenkins-Mirror hosts:
$Jenkins-Mirror>ssh root@jenkins-primary
$Jenkins-Primary>ssh root@jenkins-mirror
Once the SSH key authentication has been verified, we will need to implement our synchronization solution on a schedule. Once the authentication has been verified, we will need to implement our syncing on a scheduled basis for this we will use the CRON tab. Finally, we can configure our CRON tab to execute rsync. This will enable the Jenkins-Mirror to automatically retrieve the filesystem deltas (once every 30 minutes). To achieve this, we need to open the crontab on the mirror (crontab –e) and add a directive, like the one shown here:
*/30 * * * * /usr/bin/rsync -avuh --delete -e ssh root@jenkinsprimary:/var/lib/jenkins/* /var/lib/jenkins
Once the crontab entry has been input and saved, we should see data transferred from the Jenkins-Primary server to Jenkins-Mirror every 30 minutes.