
In Android, each application runs with distinct system IDs known as Linux user ID and Group ID. The system parts are also separated into distinct IDs, forming isolated zones for applications—from each other and from the system. As part of this isolated life cycle scheme, accessing services or other applications' data requires that you declare this desire in advance by requesting a permission.
This is done by adding the uses-permission element to your AndroidManifest.xml file. Your manifest may have zero or more uses-permission elements, and all of them must be the direct children of the root <manifest> element.
Trying to access data or features without proper permission would give out a security exception (using a SecurityException class), informing us about the missing permission in most cases.
The
sendBroadcast(Intent) method is exceptional as it checks permissions after the method call has returned, so we will not receive an exception if there are permission failures. A permission failure
should be printed to the system log. Note that in Android versions prior to Marshmallow, missing permissions were due to missing declarations in the manifest. Hence, it is important that you keep permissions in mind when you come up with the feature list for your app.
When using Android platform as an app, you have restrictions preventing access to some hardware, system APIs, private user data, and application data.
Permission is needed in order to allow access to a specific API, data, or hardware; it was asked upon the installation of your app up until Android Marshmallow. Most permissions are used to restrict access. When a permission is granted, you then have access to that specific restricted area. A feature can be protected by one permission at most.
The uses-permission element takes a name attribute, android:name, which is the name of the permission your application requires:
<uses-permission android:name="string" android:maxSdkVersion="integer" />
Did you know that the android:maxSdkVersion attribute, added in API level 19, is used to notify the version of the API from which this permission should not be granted? This is useful if a permission is no longer needed on higher versions of the API. For example, take a look at the following:
<uses-permission
  android:name="android.permission.READ_EXTERNAL_STORAGE"
  android:maxSdkVersion="18" />
In API 19, your app doesn't need to ask for this permission—it's granted to you.
Your application can also protect its own components, such as activities, services, broadcast receivers, and content providers with permissions.
It can employ any of the permissions defined by Android and declared by other applications, or it can define its own.
For more information on permissions, you can read http://developer.android.com/reference/android/Manifest.permission.html.
Permissions are divided into groups. According to Google, we can say that a permission group puts together related permissions in a single name/tag. You can group permissions together using the permissionGroup attribute inside the <permission> element.
Permissions grouped in the same permission group are shown as one group when approving permissions or when checking an app for its permissions.
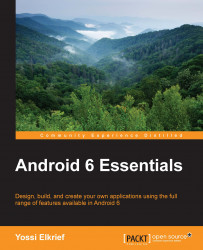
The permission group is what you see when installing an application from the Play Store; for example, take a look at the following screenshot:
Let's take a look at the structure of the permission-group tag:
<permission-group android:description="string resource"
                  android:icon="drawable resource"
                  android:label="string resource"
                  android:name="string" />
The elements of the preceding structure can be explained as follows:
android:description: This refers to simple text used to describe the group.android:icon: This refers to an icon from a drawable resource that represents the permission.android:label: This refers to a simple text name for the group.android:name: This is the name of the group. It is used to assign permissions to a specific group.
The following table shows you the various categories of permissions that are there in a permissions group:
|
Permissions group | |
|---|---|
|
In-app purchases |
Device and app history |
|
Contacts |
Calendar |
|
Phone |
Photos, media, and files |
|
Wi-Fi connection information |
Bluetooth connection information |
|
Identity |
Cellular data settings |
|
SMS |
Location |
|
Microphone |
Camera |
|
Device ID and call information |
Wearable sensors/activity data |
|
Other | |
Some permissions are implied by feature requirements; we will cover this next.
When declaring a feature in the manifest, we must also request the permissions that we need.
Let's say, for example, that we want to have a feature that sets pictures for our contacts. If we want to take a picture via the Camera API, then we must request a Camera permission.
The <users-feature> tag makes sure we declare that we need devices that support the required feature for our application to work and use that feature. If this feature is not a required feature and our app can work without it but with fewer features, we can use android:required="false", keeping it in mind that this feature is optional.
The <uses-feature> declarations always take precedence over features implied by permissions. The complete list of permission categories that imply feature requirements can be found at http://developer.android.com/guide/topics/manifest/uses-feature-element.html#permissions.
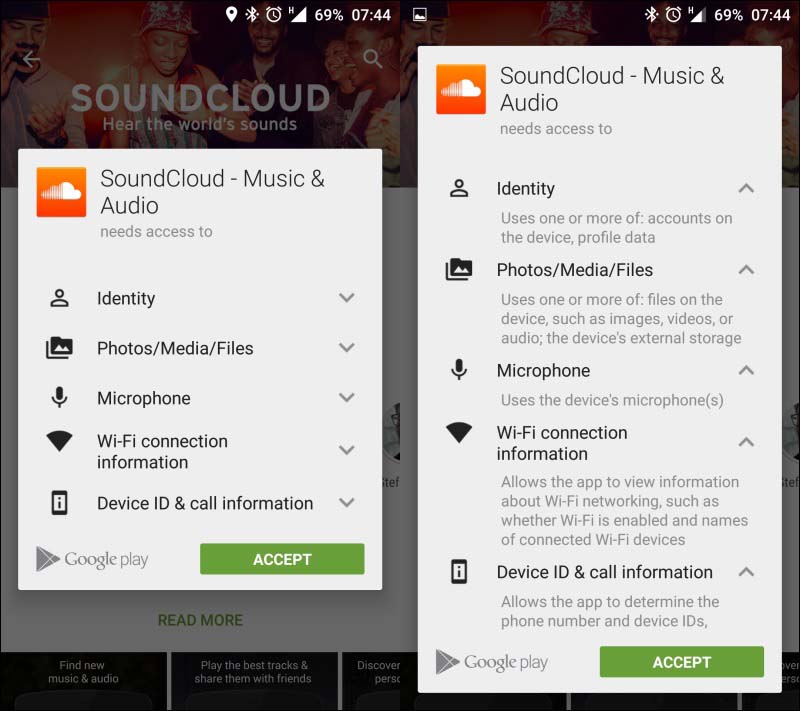
You can look at the permissions for each app using the settings app or the adb shell command.
To use the settings app, go to Settings | Apps. Pick an app and scroll down to see the permissions that the app uses You can see the Lollipop version in the following screenshot:
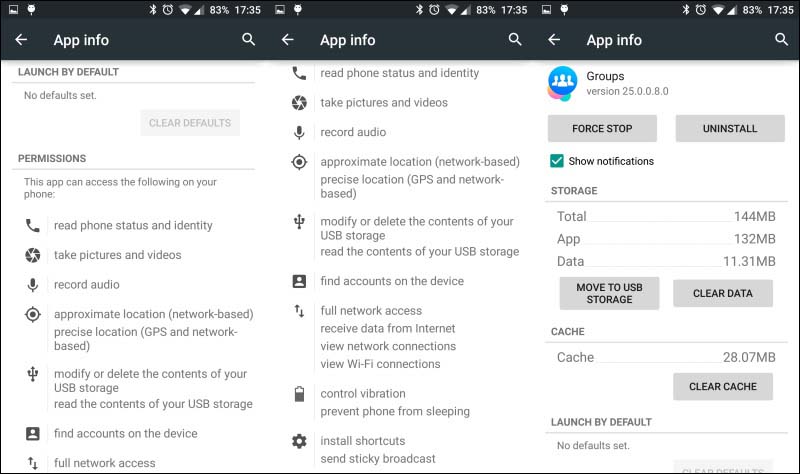
In Android Marshmallow, the UI is different.
The second option is to use the adb shell commands with the aapt command:
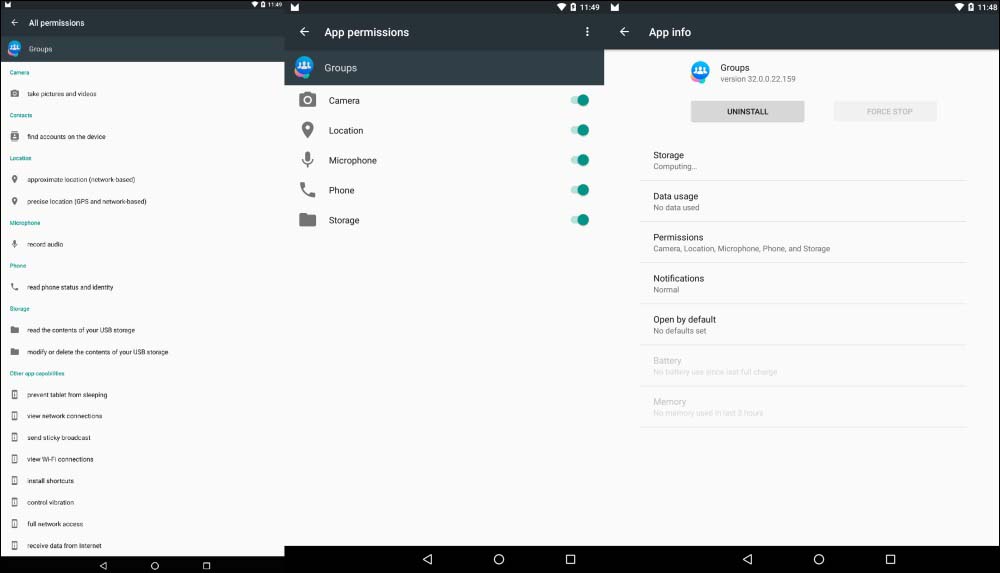
List all the applications along with their installation paths. As an example, let's try to find out Facebook groups' app permissions using the following command:
adb shell pm list packages –fWe can use the
-3flag to just show the third-party apps instead of the entire list.Once we get the package location (
apk), we need to pull it from the device via theadbpull:adb pull /data/app/com.facebook.groups-1/base.apkOur final step to show permissions is to use
aaptfound in thebuild-toolsfolder of your specific build tools version:aapt d permissions base.apkThis gives us the following screenshot as a result:

To view the permissions for the entire device, take a look at the following screenshot:

Using an adb command, you can print all known permissions on the device. The package manager (pm) command inside the adb command looks something like the following:
$ adb shell pm list permissions [options] <GROUP>
List permissions get the [options] and <GROUP> arguments (both optional).
Here, options can be as follows:
-g: This refers to a list of permissions organized by a group-f: This prints all the information-s: This prints a short summary, and this is what the user sees on screen when checking permissions or approving them-d: This looks up and prints only permissions that are considered dangerous-u: This lists permissions visible to the user only