
There are so many potential workflows, analysis settings, and datasets within the broad field of GIS that no out-of-the-box software could contain the tools for every scenario. Fortunately, QGIS has been developed with a plugin architecture. Plugins are add-ons to QGIS that provide additional functionality. Some are written by the core QGIS development team, and others are written by QGIS users.
Tip
You can also browse the QGIS Python Plugins Repository at https://plugins.qgis.org/plugins/.
You can explore the QGIS plugin ecosystem by navigating to Plugins | Manage and Install Plugins. This opens the Plugins Manager window (shown in the following figure) which will allow you to browse all plugins, those that are installed, those that are not installed, and plugins that are newly available, and also adjust the plugin manager settings. If there are installed plugins with available upgrades, there will also be an Upgradable option. The search bar can be used to enter search terms and find available plugins related to the topic. This is the first place to look if there's a tool or extra type of functionality that you need! To install a plugin, simply select it and click on the Install Plugin button. Installed plugins can be toggled on and off by checking the box next to each:

You will be notified by a link at the bottom of the QGIS Desktop application if there are updates available for your installed plugins. Clicking on the link will open the Plugins Manager window, where the Upgrades tab will allow you to install all or some of the available updates. Plugins themselves may show up as individual buttons, toolbars, or as items under the appropriate menu, such as Plugins, Vector, Raster, Database, Web, or Processing. The following information box describes a great plugin for adding base maps.
Note
To add a base map to QGIS, enable the Quick Map Services plugin. Once it's installed, it appears as an item on the Web menu. You can configure it to include more map services. From the menu bar, choose Web | QuickMapServices | Settings. Click on the Contributed Services tab and click the Get contributed pack button. At this point, it will allow you to add base maps from OpenStreetMap, Google Maps, Bing Maps, Map Quest, OSM/Stamen, Apple Maps, and several more. This plugin requires an Internet connection.
A new feature of QGIS since version 2.12 is custom variables. Variables can be set at several different scopes or levels:
Global
Project
Layer
Global variables are available at the application level in any QGIS Desktop instance. These can be managed from Settings | Options | Variables. Project variables are available throughout a given project. These can be set from the Project Properties window on the Variables tab. Layer-level variables are available from Layer Properties on the Variables tab and are available only for that layer. The other important aspect of these variables is that they cascade from most specific scope to least specific scope. In other words, a @my_var set at the Global level will be overwritten by a @my_var set at the Project level.
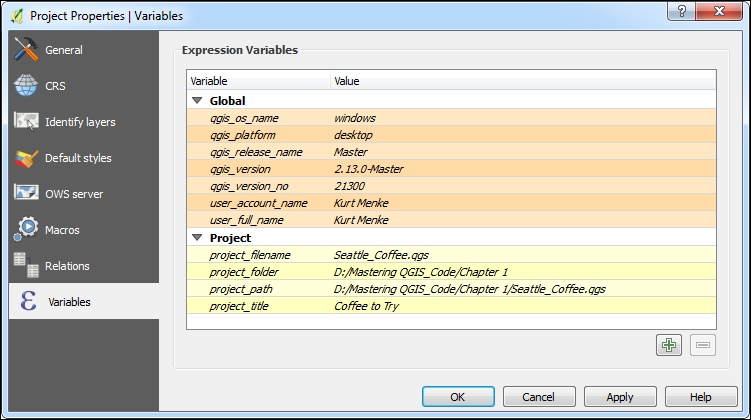
To begin, we will explore the variables for a project that was just saved. We will click on Project | Project Properties | Variables (see the following figure). Here you can browse both the default Global and Project variables. When a project is saved, three Project-level variables are populated by default: @project_filename, @project_folder, and @project_path. @project_title will also be populated if you have set that on the General tab. Note that when referencing variables, they are preceded by an ampersand to differentiate them from fields or functions. These variables can be used anywhere and expressions can be written such as the Field calculator, Label expressions, or Map Composer labels. With that introduction, we will go through several example use cases:
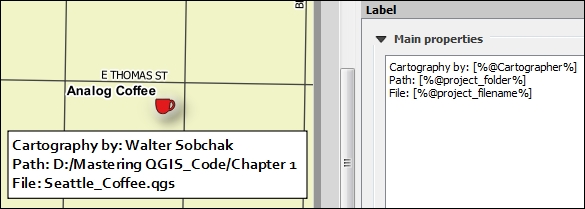
One use case for variables is in the Print Composer. Say you want to have variables for the cartographer's name and the project path to be used on each map in a project. You can add a new Project-level variable by clicking on the green plus button and typing in a variable name and the value. In this example, a new variable has been added named @Cartographer and populated with the name. (Note: if you want to add a Global variable, you can do that from Settings | Options | Variables.)

Once the Print Composer is open, a label can be added to a map composition using these variables. To reference a variable in a Print Composer Label, use the following syntax: [%@variable%]. If you have multiple map compositions in a project, these variable can be used in each. Better yet, the composition can be saved as a template for future use, along with the variables. Using custom variables can be a real time saver and can help avoid mistakes. In this example, the path to the project is important to have on a map. If the project is moved, you may forget to update that item. Using a variable causes that information to be updated automatically.
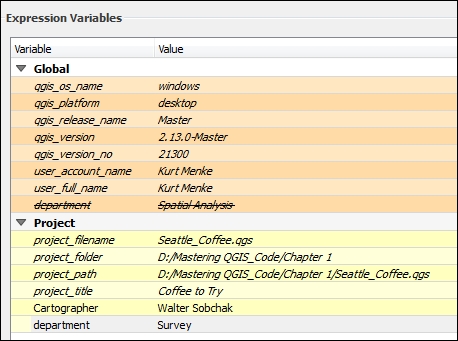
Any text that needs to be used repeatedly can be stored in a custom variable. Remember that Global variables are also available in this context. If you want information to be accessible in any QGIS project, make it a Global variable. Additionally, creating a Project level variable with the same name as a Global variable will overwrite the Global variable. The Global variable can be used as a default setting. If that needs to change in a particular map project, simply create a Project level variable with the same name. In the following example, the Global variable @department has been overwritten by a Project level variable:
Data defined overrides are available for most layer labeling parameters. For example, these can be used to control label placement by linking to attribute columns containing the X/Y coordinates for the label position. Now custom variables can also be used as inputs to Data defined override. If we want use the font Calibri for all the labels on a map, we can set that as a Project variable called @label_font with a value of Calibri. Then when we open Layer Properties | Labels | Text, we can set Data defined override for the font to that variable by choosing the Variable option from the context menu (see the following figure).
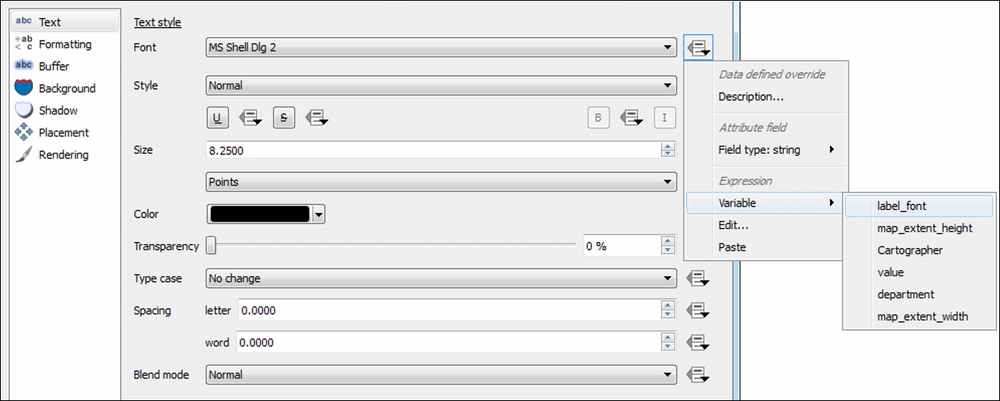
We can repeat this step for each labeled layer. If we then decide Calibri is not working, and we are not using a variable for font, we have to open Layer Properties | Labels | Text for each layer and make the change. Using a variable, we can simply change the value of the @label_font variable to Franklin Gothic. All the labels will be updated automatically! This makes seeing the effects of such changes quick and easy. Variables can be used for any Data defined override.
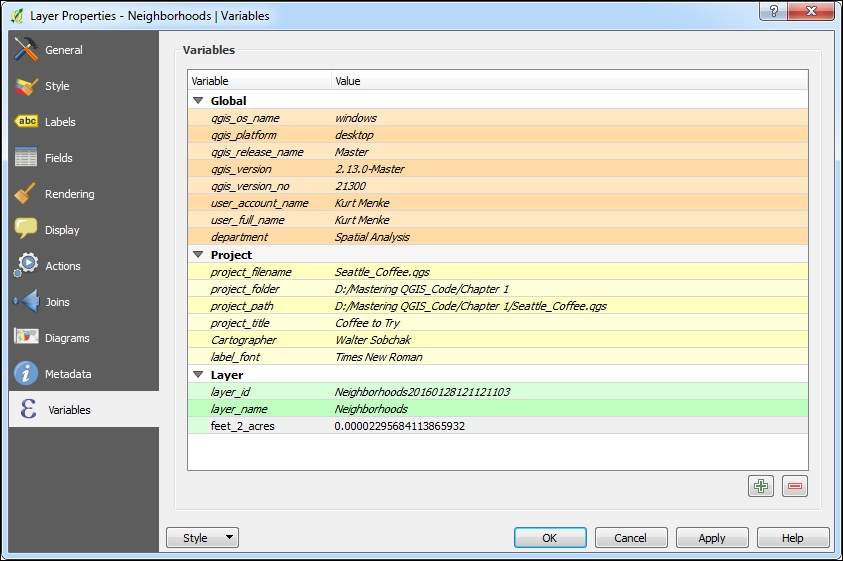
Layer level variables can be used in expressions that are evaluated within a layer. This includes rule-based styling or labeling expressions, diagrams, and the Field calculator. In this example, we frequently need to update the acreage for a set of polygons in a State Plane CRS. We can store the conversion factor from square feet to acres as a Layer level variable called @feet_2 acres. To manage Layer level variables, open Layer Properties | Variables. You will be able to see Global, Project, and Layer level variables:
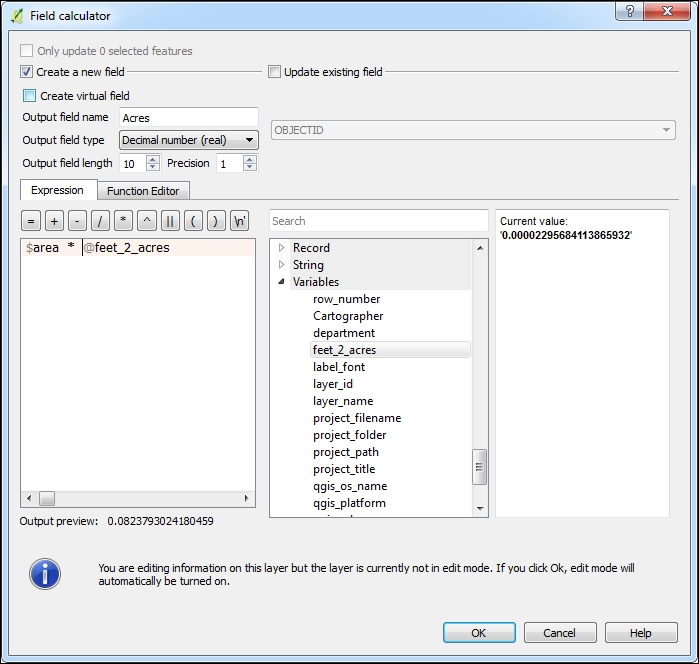
When we open the Field calculator to update the acreage field, we can use the @ft_2_acres variable to calculate the acreage with the following expression: $area * @ft_2_acres. All the available variables are listed in the Variables section:
Variables are still a very new feature, but have a lot of potential for creating more efficient workflows. You will learn additional use cases for variables in the final section of Chapter 8, The Processing Toolbox, where the Atlas feature is described. Once you begin using them, you will undoubtedly discover many other use cases.