Book Image

Hands-On GUI Programming with C++ and Qt5

By : Lee Zhi Eng
Book Image

Hands-On GUI Programming with C++ and Qt5

By: Lee Zhi Eng

Overview of this book

Qt 5, the latest version of Qt, enables you to develop applications with complex user interfaces for multiple targets. It provides you with faster and smarter ways to create modern UIs and applications for multiple platforms. This book will teach you to design and build graphical user interfaces that are functional, appealing, and user-friendly. In the initial part of the book, you will learn what Qt 5 is and what you can do with it. You will explore the Qt Designer, discover the different types of widgets generally used in Qt 5, and then connect your application to the database to perform dynamic operations. Next, you will be introduced to Qt 5 chart which allows you to easily render different types of graphs and charts and incorporate List View Widgets in your application. You will also work with various Qt modules, like QtLocation, QtWebEngine, and the networking module through the course of the book. Finally, we will focus on cross-platform development with QT 5 that enables you to code once and run it everywhere, including mobile platforms. By the end of this book, you will have successfully learned about high-end GUI applications and will be capable of building many more powerful, cross-platform applications.
Table of Contents (18 chapters)

Image scaling and cropping

Since we learned about the File Selection Dialog in the previous section, I'd thought we should learn something fun this time!

First off, let's create a new Qt Widgets Application. Then, open up mainwindow.ui and create the following user interface:

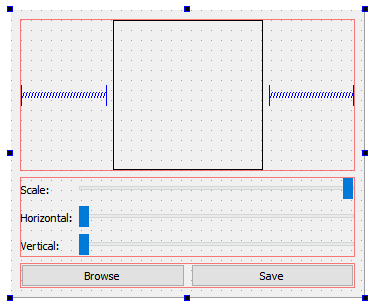
Let's dissect this user interface into three parts:

  • Top—Image preview:
    • First, add a Horizontal Layout to the window.
    • Then, add a Label widget into the Horizontal Layout we just added, then set the text property to empty. Set both the label's minimumSize and maximumSize properties to 150x150. Finally, set the frameShape property under the QFrame category to Box.
    • Add two Horizontal Spacers to the sides of the label to make it centered.
  • Middle—Sliders for adjustments:
    • Add a Form Layout to the window, below the Horizontal Layout we just added previously in step 1.
    • Add three...