Book Image

Delphi Cookbook - Third Edition

By : Daniele Spinetti, Daniele Teti
Book Image

Delphi Cookbook - Third Edition

By: Daniele Spinetti, Daniele Teti

Overview of this book

Delphi is a cross-platform integrated development environment (IDE) that supports rapid application development on different platforms, saving you the pain of wandering amid GUI widget details or having to tackle inter-platform incompatibilities. Delphi Cookbook begins with the basics of Delphi and gets you acquainted with JSON format strings, XSLT transformations, Unicode encodings, and various types of streams. You’ll then move on to more advanced topics such as developing higher-order functions and using enumerators and run-time type information (RTTI). As you make your way through the chapters, you’ll understand Delphi RTL functions, use FireMonkey in a VCL application, and cover topics such as multithreading, using aparallel programming library and deploying Delphi on a server. You’ll take a look at the new feature of WebBroker Apache modules, join the mobile revolution with FireMonkey, and learn to build data-driven mobile user interfaces using the FireDAC database access framework. This book will also show you how to integrate your apps with Internet of Things (IoT). By the end of the book, you will have become proficient in Delphi by exploring its different aspects such as building cross-platforms and mobile applications, designing server-side programs, and integrating these programs with IoT.
Table of Contents (12 chapters)

Using owner-draw combos and listboxes

Many things are organized in a list. Lists are useful when you have to show items or when your user has to choose from a set of possible options. Usually, standard lists are flat, but sometimes you need to transmit more information in addition to a list of items. Let's think about when you go to choose a font in an advanced text editor such as Microsoft Word or Apache OpenOffice. Having the name of the font drawn in the font style itself helps users make a faster and more reasoned choice. In this recipe, we'll see how to make listboxes more useful. The code is perfectly valid for TComboBox as well.

Getting ready

As we saw in the Customizing TDBGrid recipe, many VCL controls are able to delegate their drawing, or part of it, to user code. This means that we can use simple event handlers to draw standard components in different ways. Let's say that we have a list of products in our store and we have to set discounts for these products. As there are many products, we want to set up the processing so that our users can make a fast selection in terms of the available discount percentages using a color code.

How to do it...

Let's look at the following steps:

  1. Create a brand new VCL application and drop a TListBox onto the form. Set the following properties:

Property

Value

Style

lbOwnerDrawFixed

Font.Size

14

  1. In the Items listbox property, add seven levels of discount. For example, you can use no discount, 10% discount, 20% discount, 30% discount, 40% discount, 50% discount, 60% discount, and 70% discount.
  2. Then, drop a TImageList component onto the form and set the following properties:

Property

Value

ColorDepth

cd32Bit

DrawingStyle

dsTransparent

Width

32

Height

32

  1. TImageList is our image repository and will be used to draw an image by index. Load seven PNG images (size 32 x 32) into TImageList. You can find some nice PNG icons in the respective recipe project folder (ICONS\PNG\32).
  2. Create an OnDrawItem event handler for TListBox and write the following code:
procedure TMainForm.ListBox1DrawItem(Control: TWinControl; Index: Integer;
Rect: TRect; State: TOwnerDrawState);
var
LBox: TListBox;
R: TRect;
S: string;
TextTopPos, TextLeftPos, TextHeight: Integer;
const
IMAGE_TEXT_SPACE = 5;
begin
LBox := Control as TListBox;
R := Rect;
LBox.Canvas.FillRect(R);
ImageList1.Draw(LBox.Canvas, R.Left, R.Top, Index);
S := LBox.Items[Index];
TextHeight := LBox.Canvas.TextHeight(S);
TextLeftPos := R.Left + ImageList1.Width + IMAGE_TEXT_SPACE;
TextTopPos := R.Top + R.Height div 2 - TextHeight div 2;
LBox.Canvas.TextOut(TextLeftPos, TextTopPos, S);
end;
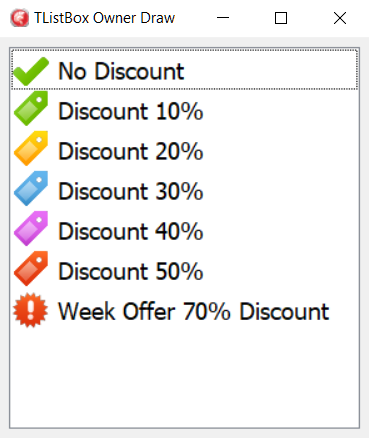
  1. Run the application by hitting F9 (or by going to Run | Run) and you will see the following:
Figure 1.7: Our listbox with some custom icons read from TImageList

How it works...

The TListBox.OnDrawItem event handler allows us to customize the drawing of the listbox. In this recipe, we've used TImageList as the image repository for the listbox. Using the Index parameter, we've read the correspondent image in TImageList and drawn on the listbox Canvas. After this, all the other code is related to the alignment of image and text inside the listbox row.

Remember that this event handler will be called for each item in the list, so the code must be fast and should not do too much slow canvas writing. Otherwise, your GUI will be unresponsive. If you want to create complex graphics on the fly in the event, I strongly suggest that you prepare your images the first time you draw the item and then put them in a sort of cache memory (TObjectList<TBitmap> is enough).

There's more...

While you are in OnDrawItem, you can do whatever you want with the TListBox Canvas. Moreover, the State parameter (of type TOwnerDrawState) tells you which states the listbox item is in (for example, Selected, Focused, HotTrack, and so on). So, you can use a different kind of drawing, depending on the item state. Check out the Customizing TDBGrid recipe to find out about TDBGrid owner-drawing for an example of the State parameter.

If you want to make your code aware of the selected VCL Style, changing the color used according to the style, you can use StyleServices.GetStyleColor(), StyleServices.GetStyleFontColor(), and StyleServices.GetSystemColor() in the Vcl.Themes unit.

The icons used in this recipe are from the ICOJAM website (http://www.icojam.com). The specific set used is available at http://www.icojam.com/blog/?p=259.