Book Image

Tkinter GUI Application Development Cookbook

By : Alejandro Rodas de Paz
Book Image

Tkinter GUI Application Development Cookbook

By: Alejandro Rodas de Paz

Overview of this book

As one of the more versatile programming languages, Python is well-known for its batteries-included philosophy, which includes a rich set of modules in its standard library; Tkinter is the library included for building desktop applications. Due to this, Tkinter is a common choice for rapid GUI development, and more complex applications can benefit from the full capabilities of this library. This book covers all of your Tkinter and Python GUI development problems and solutions. Tkinter GUI Application Development Cookbook starts with an overview of Tkinter classes and at the same time provides recipes for basic topics, such as layout patterns and event handling. Next, we cover how to develop common GUI patterns, such as entering and saving data, navigating through menus and dialogs, and performing long-running actions in the background.You can then make your apps leverage network resources effectively and perform graphical operations on a canvas and related tasks such as detecting collisions between items. Finally, this book covers using themed widgets, an extension of Tk widgets that have a more native look and feel. Finally, this book covers using the canvas and themed widgets. By the end of the book, you will have an in-depth knowledge of Tkinter classes, and will know how to use them to build efficient and rich GUI applications.
Table of Contents (10 chapters)

Working with buttons

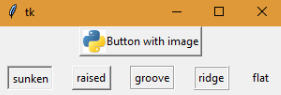
Button widgets represent a clickable item of your GUI applications. They typically use a text or an image indicating the action that will be performed when clicked. Tkinter allows you to easily configure this functionality with some standard options of the Button widget class.

How to do it...

The following contains a button with an image that gets disabled when clicked and a list of buttons with the different types of available reliefs:

import tkinter as tk 
 
RELIEFS = [tk.SUNKEN, tk.RAISED, tk.GROOVE, tk.RIDGE, tk.FLAT] 
 
class ButtonsApp(tk.Tk): 
    def __init__(self): 
        super().__init__() 
        self.img = tk.PhotoImage(file="python.gif") 
        self.btn = tk.Button(self, text="Button with image", 
                             image=self.img, compound=tk.LEFT, 
                             command=self.disable_btn) 
        self.btns = [self.create_btn(r) for r in RELIEFS]         
        self.btn.pack() 
        for btn in self.btns: 
            btn.pack(padx=10, pady=10, side=tk.LEFT) 
 
    def create_btn(self, relief): 
        return tk.Button(self, text=relief, relief=relief) 
 
    def disable_btn(self): 
        self.btn.config(state=tk.DISABLED) 
 
if __name__ == "__main__": 
    app = ButtonsApp() 
    app.mainloop()

The purpose of this program is to show several configuration options that can be used when creating a Button widget.

After executing the preceding code, you will get the following output:

How it works...

The most basic way of instantiation of Button is using the text option to set the button label and the command option that references the function to be invoked when the button is clicked.

In out example, we also added PhotoImage via the image option, which takes precedence over the text string. The compound option serves to combine image and text in the same button, determining the position where the image is placed. It accepts the following constants as valid values: CENTER, BOTTOM, LEFT, RIGHT, and TOP.

The second row of buttons is created with a list comprehension, using the list of RELIEF values. The label of each button corresponds to the name of the constant, so you can note the difference in the appearance of each button.

There's more...

We used an attribute to keep a reference to our PhotoImage instance, even though we are not using it outside our __init__ method. The reason is that images are cleared when they are garbage collected, which will happen if we declare it as a local variable and the method exists.

To avoid this, always remember to keep a reference to each PhotoImage object as long as the window where it is shown is still alive.