
The Listbox widget contains text items that can be selected by the user with the mouse or keyboard. This selection can be individual or multiple, depending on the widget configuration.
Displaying a list of items
How to do it...
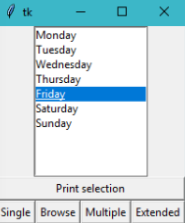
The following program creates a list selection with the days of the week. There is a button to print the actual selection and a list of buttons to change the selection mode:
import tkinter as tk

DAYS = ["Monday", "Tuesday", "Wednesday", "Thursday",
        "Friday", "Saturday", "Sunday"]
MODES = [tk.SINGLE, tk.BROWSE, tk.MULTIPLE, tk.EXTENDED]

class ListApp(tk.Tk):
    def __init__(self):
        super().__init__()
        self.list = tk.Listbox(self)
        self.list.insert(0, *DAYS)
        self.print_btn = tk.Button(self, text="Print selection",
                                   command=self.print_selection)
        self.btns = [self.create_btn(m) for m in MODES]

        self.list.pack()
        self.print_btn.pack(fill=tk.BOTH)
        for btn in self.btns:
            btn.pack(side=tk.LEFT)

    def create_btn(self, mode):
        cmd = lambda: self.list.config(selectmode=mode)
        return tk.Button(self, command=cmd,
                         text=mode.capitalize())

    def print_selection(self):
        selection = self.list.curselection()
        print([self.list.get(i) for i in selection])

if __name__ == "__main__":
    app = ListApp()
    app.mainloop()
You can try out changing the mode of selection and printing the selected items:
How it works...
We create an empty Listbox object and add all the text items with the insert() method. The 0 index indicates that the items should be added at the beginning of the list. In the following code snippet, we unpacked the DAYS list, but individual items can be appended at the end with the END constant:
self.list.insert(tk.END, "New item")
The current selection is retrieved using the curselection() method. It returns the indices of the selected items to transform them to the corresponding text items we called the get() method for each index in a comprehension list. Finally, the list is printed in the standard output for debugging purposes.
In our example, the selectmode option can be changed programmatically to explore the different behaviors, as follows:
- SINGLE: Single choice
- BROWSE: Single choice that can be moved with the up and down keys
- MULTIPLE: Multiple choice
- EXTENDED: Multiple choice with ranges that can be selected with the Shift and Ctrl keys
There's more...
If the number of text items is large enough, it may be necessary to add a vertical scroll bar. You can easily connect it using the yscrollcommand option. In our example, we can wrap both widgets in a frame to keep the same layout. Remember to specify the fill option when packing the scroll so that it fills the available space in the y axis:
def __init__(self):
    self.frame = tk.Frame(self)
    self.scroll = tk.Scrollbar(self.frame, orient=tk.VERTICAL)
    self.list = tk.Listbox(self.frame, yscrollcommand=self.scroll.set)
    self.scroll.config(command=self.list.yview)
    # ...
    self.frame.pack()
    self.list.pack(side=tk.LEFT)
    self.scroll.pack(side=tk.LEFT, fill=tk.Y)
Similarly, there is a xscrollcommand option for the horizontal axis.
See also
- The Creating selections with radio buttons recipe