JupyterLab is a new, extended version of Jupyter Notebook. Before installing it, make sure that you have successfully completed the Configuring Julia in Jupyter Notebook tutorial. Running JupyterLab requires Python to be installed. We strongly recommend Python Anaconda as the standard execution environment.
The configuration of JupyterLab requires having IJulia configured on your system:
Prepare a Linux or Windows machine with Julia installed.
- Follow the Configuring Julia in Jupyter Notebook tutorial and install
IJulia.
Note
In the GitHub repository for this recipe, you will find the commands.txt file that contains the presented sequence of shell and Julia commands.
By default, Julia does not include JupyterLab. However, it is possible to add JupyterLab by using the Conda.jl package. We will show, step-by-step, how to add JupyterLab to a Julia installation and run it from bash:
- Press the ] key to go to the Julia package manager and install the
Conda.jlpackage:
(v1.0) pkg> add Conda- Use
Condato add JupyterLab to Julia's installation:
julia> using Conda

julia> Conda.add("jupyterlab")
- Once JupyterLab is installed, exit Julia and run it from the command line:
$ ~/.julia/packages/Conda/hsaaN/deps/usr/bin/jupyter lab- Please note that the preceding command in Windows will look different:
C:\>%userprofile%\.julia\packages\Conda\hsaaN\deps\usr
\Scripts\jupyter-lab- If the preceding command did not automatically start the web browser, do it manually andlook for console output similar to this:
Copy/paste this URL into your browser when you connect for the first time,
to login with a token:
http://localhost:8888/?token=b86b66b81a62d4be1ae34e7d6bd006a8ba5cb937e74b99cf- Paste the link (in the preceding output marked with bold font) into your browser's address bar.
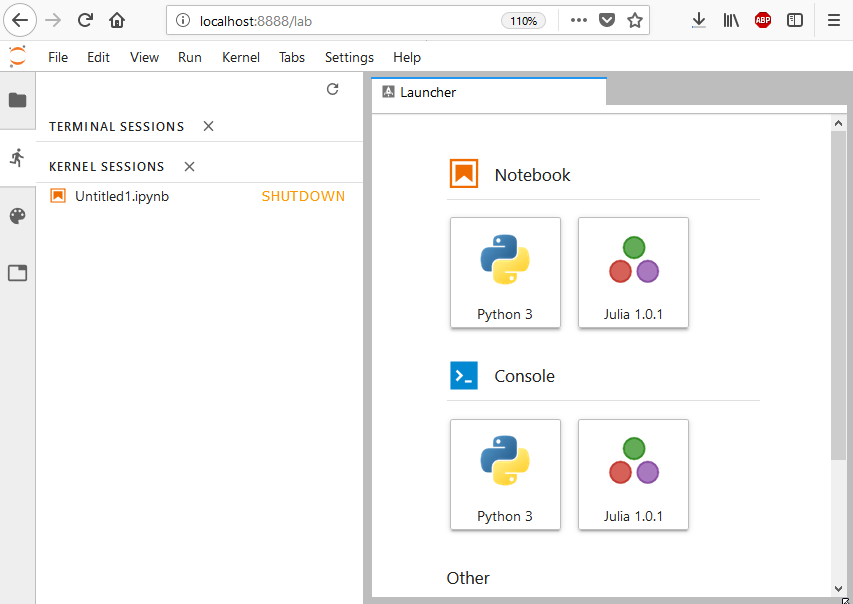
Once you have followed the preceding steps, you should see in the browser a screen similar to the one shown here (please note that since Python is installed with IJulia.jl, it is also available alongside Julia):

JupyterLab is an extension of Jupyter Notebook and hence it works in a very similar fashion. JupyterLab runs a local web server on port8888 (the same port that would have been used by Jupyter Notebook). Once it is started, you can simply connect to it via a web browser. It is also possible to run such environments on a separate machine. Please check the Configuring Julia with Jupyter Notebook headless cloud environments recipe for more details (that recipe is valid for both Jupyter Notebook and JupyterLab).
Yet another option is to use JupyterLab from a completely external Anaconda installation. Since the installation process differs for Linux and Windows, we present both versions.
In order to install JupyterLab on Linux, perform the following steps:
- Go to the Anaconda for Linux download website (https://www.anaconda.com/download/#linux) and find the current download link for the 64-bit Python 3 version (usually it can be done in a web browser by right-clicking the
Downloadbutton and selectingCopy link location). - Download Anaconda Python. Please note that depending on the time when you perform the installation, the exact link might look different—new Anaconda versions are being released frequently:
$ wget https://repo.anaconda.com/archive/Anaconda3-5.3.0-Linux-x86_64.sh- Run the Anaconda installer:
$ sudo bash Anaconda3-5.3.0-Linux-x86_64.sh- Now, you can launch JupyterLab (we assume that you have selected the standard install locations):
$ /home/ubuntu/anaconda3/bin/jupyter lab- If the preceding command did not automatically start the web browser, do it manually andlook for console output similar to this:
[I 11:07:55.625 LabApp] The Jupyter Notebook is running at:
[I 11:07:55.625 LabApp] http://localhost:8888/?token=c3756ac2013d780af16b0401d67ab017c5e4a17cc9bc7924
[I 11:07:55.625 LabApp] Use Control-C to stop this server and shut down all kernels (twice to skip confirmation).
[W 11:07:55.625 LabApp] No web browser found: could not locate runnable browser.- Paste the link (in the preceding log marked with bold font) your browser's address bar.
Please note that if you follow the preceding steps (including the installation of the IJulia.jlpackage), once you open the JupyterLab welcome screen, you should see Python 3 as well as Julia Notebook execution kernels.
In the following steps, we describe to run JupyterLab with Anaconda on Windows:
- Go to the Anaconda for Windows download website (https://www.anaconda.com/download/#windows) and find the current download link for the 64-bit Python 3 version. Download the
*.exeinstallation file to your computer. - Run the installer. Here, we assume that you are installing it to the default folder, which on Windows is
C:\ProgramData\Anaconda3\.
- Once Anaconda 3 is installed, simply run
jupyter-lab.exe:
C:\> C:\ProgramData\Anaconda3\Scripts\jupyter-lab.exe- If the preceding command did not automatically start the web browser, do it manually andlook for console output similar to this:
Copy/paste this URL into your browser when you connect for the first time,  to login with a token:
http://localhost:8888/?token=7f211507e188ecfc22e2858b195c8de915c7c221f012ee86- Paste the link (in the preceding log marked with bold font) into your browser's address bar.
Please note that if you follow the preceding steps (including the installation of the IJulia.jl package), once you open the JupyterLab welcome screen, you should see Python 3 as well as Julia Notebook execution kernels.
The JupyterLab project is developing rapidly, so it is worth checking the latest news on the project's website(https://github.com/jupyterlab/jupyterlab).


