Book Image

Java 11 Cookbook - Second Edition

By : Nick Samoylov, Mohamed Sanaulla
Book Image

Java 11 Cookbook - Second Edition

By: Nick Samoylov, Mohamed Sanaulla

Overview of this book

For more than three decades, Java has been on the forefront of developing robust software that has helped versatile businesses meet their requirements. Being one of the most widely used programming languages in history, it’s imperative for Java developers to discover effective ways of using it in order to take full advantage of the power of the latest Java features. Java 11 Cookbook offers a range of software development solutions with simple and straightforward Java 11 code examples to help you build a modern software system. Starting with the installation of Java, each recipe addresses various problem by explaining the solution and offering insights into how it works. You’ll explore the new features added to Java 11 that will make your application modular, secure, and fast. The book contains recipes on functional programming, GUI programming, concurrent programming, and database programming in Java. You’ll also be taken through the new features introduced in JDK 18.3 and 18.9. By the end of this book, you’ll be equipped with the skills required to write robust, scalable, and optimal Java code effectively.
Table of Contents (18 chapters)

Compiling and running a Java application

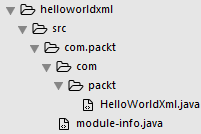
In this recipe, we will write a very simple modular Hello world program to test our JDK installation. This simple example prints Hello world in XML; after all, it's the world of web services.

Getting ready

You should have JDK installed and the PATH variable updated to point to the JDK installation.

How to do it...

  1. Let's define the model object with the relevant properties and annotations that will be serialized into XML:
        @XmlRootElement
        @XmlAccessorType(XmlAccessType.FIELD) 
        class Messages{     
          @XmlElement 
          public final String message = "Hello World in XML"; 
        }

In the preceding code, @XmlRootElement is used to define the root tag, @XmlAccessorType is used to define the type of source for the tag name and tag values, and @XmlElement is used to identify the sources that become the tag name and tag values in the XML.

  1. Let's serialize an instance of the Message class into XML using JAXB:
public class HelloWorldXml{
  public static void main(String[] args) throws JAXBException{
    JAXBContext jaxb = JAXBContext.newInstance(Messages.class);
    Marshaller marshaller = jaxb.createMarshaller();
    marshaller.setProperty(Marshaller.JAXB_FRAGMENT,Boolean.TRUE);
    StringWriter writer = new StringWriter();
    marshaller.marshal(new Messages(), writer);
    System.out.println(writer.toString());
  } 
}
  1. We will now create a module named com.packt. To create a module, we need to create a file named module-info.java, which contains the module definition. The module definition contains the dependencies of the module and the packages exported by the module to other modules:
    module com.packt{
      //depends on the java.xml.bind module
      requires java.xml.bind;
      //need this for Messages class to be available to java.xml.bind
      exports  com.packt to java.xml.bind;
    }
We will explain modules in detail in Chapter 3, Modular Programming. But this example is just to give you a taste of modular programming and to test your JDK installation.

The directory structure with the preceding files is as follows:

  1. Let's compile and run the code. From the hellowordxml directory, create a new directory in which to place your compiled class files:
      mkdir -p mods/com.packt

Compile the source, HelloWorldXml.java and module-info.java, into the mods/com.packt directory:

      javac -d mods/com.packt/ src/com.packt/module-info.java
src/com.packt/com/packt/HelloWorldXml.java
  1. Run the compiled code using java --module-path mods -m com.packt/com.packt.HelloWorldXml. You will see the following output:
<messages><message>Hello World in XML</message></messages>

Don't worry if you are not able to understand the options passed with the java or javac commands. You will learn about them in Chapter 3, Modular Programming.