Book Image

R Programming Fundamentals

By : Kaelen Medeiros
Book Image

R Programming Fundamentals

By: Kaelen Medeiros

Overview of this book

R Programming Fundamentals, focused on R and the R ecosystem, introduces you to the tools for working with data. You’ll start by understanding how to set up R and RStudio, followed by exploring R packages, functions, data structures, control flow, and loops. Once you have grasped the basics, you’ll move on to studying data visualization and graphics. You’ll learn how to build statistical and advanced plots using the powerful ggplot2 library. In addition to this, you’ll discover data management concepts such as factoring, pivoting, aggregating, merging, and dealing with missing values. By the end of this book, you’ll have completed an entire data science project of your own for your portfolio or blog.
Table of Contents (6 chapters)

Basic Flow Control

Flow Control includes different kinds of loops that you can use in R, such as the if/else, for, and while loops. While many of the concepts are very similar to how flow control and loops are used in other programming languages, they may be written differently in R.

Generally speaking, most loops are not considered best practice for coding in R. Some alternatives to loops, especially for loops, include the apply family of functions and functions contained in the purrr package, which you are encouraged to look up and learn about after this book.

If/else

The if loop will only run a block of code if a certain condition is TRUE. It can be paired with else statements to create an if/else loop. This will work similarly to an if/else loop in other programming languages, though the syntax may be different.

The usual syntax for using if is as follows:

if(test_condition){
some_action
}

Here, the action only occurs if the test_condition evaluates to TRUE, so, for example, if you wrote 4 < 5, the code in the curly braces would definitely run.

If there's something you want to happen, even if the test condition isn't true, you would use an if/else, where the syntax usually looks like this:

if(test_expression){
some_action
}else{
some_other_action
}

Even if the test_expression isn't true, some_other_action will still happen. Finally, you can evaluate multiple test conditions with if/else if/else, as shown in the following syntax:

if(test_expression){
some_action
}else if(another_test_expression){
some_other_action
}else{
yet_another_action
}

Let's do some actual examples to help illustrate these points. Take a look at the following code:

var <- "Hello"
if(class(var) == "character"){
print("Your variable is a character string.")
}

What output would you expect here? What output would you expect if the variable was assigned the value var <- 5 instead? When var is "Hello", the if statement is TRUE, and "Your variable is a character string" will print to the console. However, when var is 5, nothing happens, because we didn't specify an else statement.

With the following code, when var is 5, something will print:

var <- 5
if(class(var) == "character"){
print("Your variable is a character string.")
}else{
print("Your variable is not a character")
}

Because we specified else, we will see the output "Your variable is not a character." This isn't very informative, however, so let's expand and use an else if:

if(class(var) == "character"){
print("Your variable is a character string.")
}else if (class(var) == "numeric"){
print("Your variable is numeric")
}else{
print("Your variable is something besides character or numeric.")
}

If var is 5, now we'll see "Your variable is numeric". What if var was a date? What would print then? Yup, you got it! "Your variable is something besides character or numeric" will print to the console.

For loop

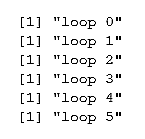
For loops are often used to go through every column or row of a dataframe in R.

Say, for example, that we're interested in the mean of all of the numeric columns of the built-in iris dataset (which is four out of the five—everything but the Species column, which is a factor variable of character strings indicating the species of each iris.) We could type, four times, mean(iris$Sepal.Length), with each input variable name changing each time. However, a far more efficient way to complete this exercise would be to use a for loop.

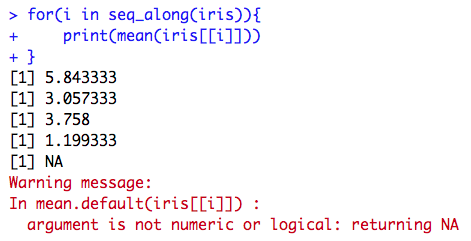
If we simply want to print the means to the console, we could use a for loop as follows:

for(i in seq_along(iris)){
print(mean(iris[[i]]))
}

The output will be as follows:

We'll come back to the output, especially that warning message, in a second—first, let's break down the components of the for loop. The syntax will always be as follows:

for(i in a range of numbers){
some_action
}

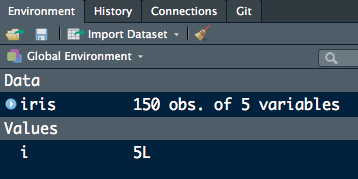
In this particular for loop, we chose i as our iterator variable. A for loop in R will automatically iterate this variable, which means that every time it reaches the end of the loop, it will increase i by one. You might have noticed that once the loop has finished completing, i was added to the global environment as a Value, 5L (which means it's an integer, the number 5). Our iterator will always get added to the environment when a loop concludes.

It is displayed on the screen, as shown in the following screenshot:

The R function seq_along() is very helpful for the for loops, because it automatically moves along the number of columns of the dataframe (if that's the input) or more generally, iterates along the number of items contained in whatever is input into it.

We also chose to print the mean of each column in this particular for loop. Accessing the columns is done using indexing, so when i = 1, iris[[i]] is equal to the Sepal.Length variable, which is column 1, and so on. We got an error for column 5, because it isn't numeric (the Species variable!) Species doesn't have a mean, because it's a character variable.

This is actually a great example of where we can combine for loops with an if statement. Take a look at the following code:

for(i in seq_along(iris)){
if(class(iris[[i]]) == "numeric"){
print(mean(iris[[i]]))
}
}

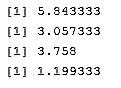
The if statement here will only print the mean of an iris column if the class of that column is numeric (which makes sense, since only numeric columns should have means!) The output is now only as follows:

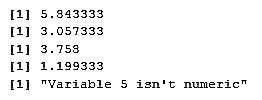
If we're really feeling fancy, we could have even added an else statement with a different message for when the class of a column isn't numeric, such as in this loop:

for(i in seq_along(iris)){
if(class(iris[[i]]) == "numeric"){
print(mean(iris[[i]]))
}else{
print(paste("Variable", i, "isn't numeric"))
}
}

The output is as follows:

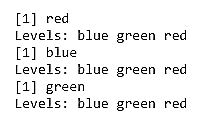
seq_along() returns a sequence of numbers and makes for loops more straightforward. However, if you need to iterate using any other function, the syntax of the for statement will change slightly. The following code will print every row of the Species column in iris:

for(i in 1:nrow(iris)){
print(iris[i, "Sepal.Width"])
}

You have to explicitly use 1:nrow(iris) in the for statement, or this loop will not run. nrow() simply returns the number of rows of iris versus the entire sequence of the number of columns that seq_along() returns as shown below:

nrow(iris)
[1] 150
seq_along(iris)
[1] 1 2 3 4 5

While loop

Versus the for loop, which walks through an iterator (usually, this is a sequence of numbers), a while loop will not iterate through a sequence of numbers for you. Instead, it requires you to add a line of code inside the body of the loop that increments or decrements your iterator, usually i. Generally, the syntax for a while loop is as follows:

while(test_expression){
some_action
}

Here, the action will only occur if the test_expression is TRUE. Otherwise, R will not enter the curly braces and run what's inside them. If a test expression is never TRUE, it's possible that a while loop may never run!

A classic example of a while loop is one that prints out numbers, such as the following:

i = 0
while(i <= 5){
print(paste("loop", i))
i = i + 1
}

The output of the preceding code is as follows:

Because we set our test expression to be i less than or equal to 5, the loop stopped printing once i was 6, and R broke out of the while loop. This is good, because infinite loops (loops that never stop running) are definitely possible. If the while loop test expression is never FALSE, the loop will never stop, as shown in the following code:

while(TRUE){
print("yes!")
}

The output will be as follows:

[1] "yes!"
[1] "yes!"
[1] "yes!"
[1] "yes!"
……

This is an example of an infinite loop. If you're concerned about them, R does have a break statement, which will jump out of the while loop, but you'll see the following error:

Error: no loop for break/next, jumping to top level

This is because break statements in R are meant more for breaking out of nested loops, where there is one inside another.

It's also possible (though you likely wouldn't code this on purpose, as it will be an error of some kind) for a while loop to never run. For example, if we forgot that i is in our global environment, and that it equals 5, the following loop will never run:

while(i < 5){
print(paste(i, "is this number"))
i = i + 1
}

Let's now try and get a feel of how loops work in R. We will try to predict what the loop code will print. Follow the steps below:

  1. Examine the following code snippet. Try to predict what the output will be:
vec <- seq(1:10)
for(num in seq_along(vec)){
if(num %% 2 == 0){
print(paste(num, "is even"))
} else{
print(paste(num, "is odd"))
}
}
  1. Examine the following code snippet. Try to predict what the output will be:
example <- data.frame(color = c("red", "blue", "green"), number = c(1, 2, 3))
for(i in seq(nrow(example))){
print(example[i,1])
}
  1. Examine the following code snippet. Try to predict what the output will be:
var <- 5
while(var > 0){
print(var)
var = var - 1
}

Output: The output for the first step will be as follows:

The output for the second step will be as follows:

The output for the third step will be as follows:

It's important as you code in R that you understand how loops work, both because other people will write code with them and so you need to understand how other methods that can be substituted in for loops in R work.

Activity: Building Basic Loops

Scenario

You've been asked to create loops to examine the variables inside the ChickWeight and iris built-in R datasets.

Aim

To implement of if, if/else, for, and while loops, including combinations of the four types of loops.

Prerequisites

You must have R and RStudio installed on your machine.

Steps for Completion

  1. Open a new R script and save it with the name lesson1_activityC.R.
  2. Load the iris and ChickWeight built-in R datasets. You will need to load them in separate data() functions.
  3. If loop: Set var = 100 and create an if statement that prints Big number if var divided by five is greater than or equal to 25.
  4. If/else: Expand and add an else statement that prints Not as big of a number
  5. If/else if/else: In the middle, add an else if statement that prints Medium number if var divided by five is greater than or equal to 20.
  6. For: Create a for loop that prints out Iris NUMBER is SPECIES for each row of iris:
Remember that seq_along() is for moving along columns. To move down rows, use seq(nrow(iris)). You may want to print the Species using an as.character() function, because it's a factor variable by default.
  1. While: Set i = 12. While i > 0, print out i is a positive number, where i should be the number the loop is in.
  1. For and if:
    • For an extra challenge, first declare four NULL objects, Diet1 through Diet4.
    • Use a for loop to loop through all the rows of ChickWeight. If the chick's diet is Diet1, add that row to Diet1 using the rbind() function. You should use rbind(Diet1, that row of ChickWeight).
    • Then, check to see whether you got only the correct chicks in each dataset by viewing them.
This is by no means the best way of creating these four datasets, but it is an interesting challenge to think about how loops work.