
It is fundamental to know how C++ compilation works to understand how programs are compiled and executed. Compiling C++ source code into machine-readable code consists of the following four processes:
Preprocessing the source code.
Compiling the source code.
Assembling the compiled file.
Linking the object code file to create an executable file.
Let's start with a simple C++ program to understand how compilation happens.
Create a file named HelloUniverse.cpp and save it on the Desktop after copy-pasting the following code:
#include <iostream>
int main(){
	// This is a single line comment
	/* This is a multi-line
        comment */
	std::cout << "Hello Universe" << std::endl;
	return 0;
}
Now, using the cd command on the Terminal, navigate to the location where our file is saved and execute the following command if you are on UNIX:
> g++ -o HelloUniverse HelloUniverse.cpp
> ./HelloUniverse
If you are on a Windows system, a different compiler must be used. The command to compile the code with the Visual Studio compiler is as follows:
> cl /EHsc HelloUniverse.cpp
> HelloUniverse.exe
This program, once executed, will print Hello Universe on the Terminal.
Let's demystify the C++ compilation process using the following diagram:

Figure 1.1: C++ compilation of the HelloUniverse file
When the C++ preprocessor encounters the #include <file> directive, it replaces it with the content of the file creating an expanded source code file.
Then, this expanded source code file is compiled into an assembly language for the platform.
The assembler converts the file that's generated by the compiler into the object code file.
This object code file is linked together with the object code files for any library functions to produce an executable file.
Source files contain the actual implementation code. Source files typically have the extension .cpp, although other extensions such as .cc, .ccx, or .c++ are also quite common.
On the other hand, header files contain code that describes the functionalities that are available. These functionalities can be referred to and used by the executable code in the source files, allowing source files to know what functionality is defined in other source files. The most common extensions for header files are .hpp, .hxx, and .h.
To create an executable file from the header and the source files, the compiler starts by preprocessing the directives (preceded by a # sign and generally at the top of the files) that are contained in them. In the preceding HelloUniverse program, the directive would be #include. It is preprocessed by the compiler before actual compilation and replaced with the content of the iostream header, which describes standard functionality for reading and writing from streams.
The second step is to process each source file and produce an object file that contains the machine code relative to that source file. Finally, the compilers link all the object files into a single executable program.
We saw that the preprocessor converts the content of the directives into the source files. Headers can also include other headers, which will be expanded, creating a chain of expansions.
For example, let's assume that the content of the logger.hpp header is as follows:
// implementation of logger
Let's also assume that the content of the calculator.hpp header is as follows:
#include <logger.hpp>
// implementation of calculator
In the main.cpp file, we include both directives, as shown in the following code snippet:
#include <logger.hpp>
#include <calculator.hpp>

int main() {
  // use both the logger and the calculator
}
The result of the expansion will be as follows:
// implementation of logger
// implementation of logger
// implementation of calculator
int main() {
  // use both the logger and the calculator
}
As we can see, the logger has been added in the resulting file twice:
It was added the first time because we included logger.hpp in the main.cpp file
It was added the second time because we included calculator.hpp, which then includes logger.hpp
Included files that are not directly specified in a #include directive in the file we are compiling, but are instead included by some other included file, are called transitive included files.
Often, including the same header file multiple times creates a problem with multiple definitions, as we will see in Lesson 2, Functions, and the Lesson 03, Classes.
Including the same file multiple times is very likely because of the transitive included files we explained before, and will often result in a compilation error. In C++, there is a convention to prevent problems that originate from including a header file multiple times: include guards.
An include guard is a specific pattern of instructing the preprocessor to ignore the content of the header if it has been included before.
It consists of writing all the header code inside the following structure:
#ifndef <unique_name>
#define <unique_name>
// all the header code should go here
#endif /* <unique_name> */
Here, <unique_name> is a name unique throughout the C++ project; it typically consists of the header file name, such as LOGGER_HPP for the logger.hpp header.
The preceding code checks whether a special preprocessor variable, <unique_name>, exists. If it does not exist, it defines it and it proceeds to read the content of the header. If it exists, it will skip all the code until the #endif part.
Since initially the special variable does not exist, the first time the preprocessor includes a header, it creates the variable and proceeds to read the file. The subsequent times, the variable is already defined, so the preprocessor jumps to the #endif directive, skipping all the content of the header file.
Compilation is a process that ensures that a program is syntactically correct, but it does not perform any checks regarding its logical correctness. This means that a program that compiles correctly might still produce undesired results:
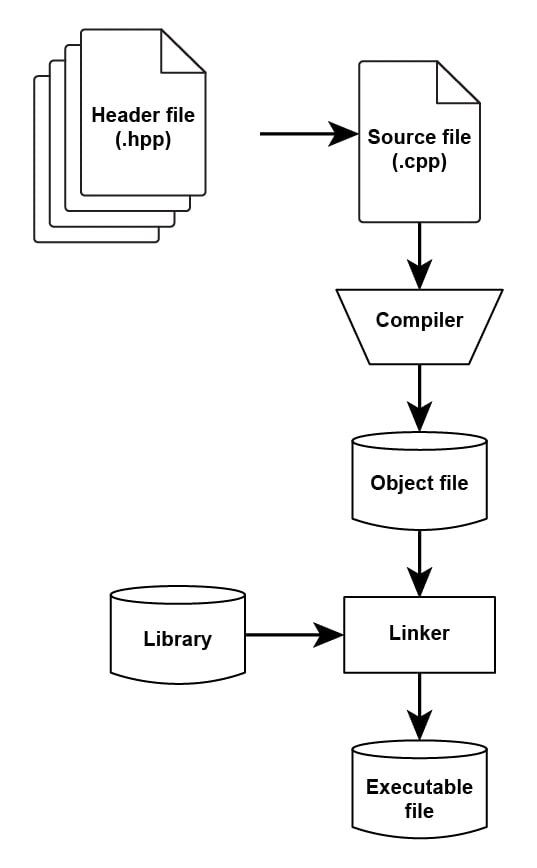
Figure 1.2: Compilation and linking processes for an executable file
Every C++ program needs to define a starting point, that is, the part of the code the execution should start from. The convention is to have a uniquely named main function in the source code, which will be the first thing to be executed. This function is called by the operating system, so it needs to return a value that indicates the status of the program; for this reason, it is also referred to as the exit status code.
Let's see how we can compile a program.
Together with C, C++ is the language with the most supported hardware and platforms. This means that there are many C++ compilers, produced by many different vendors. Each compiler can accept parameters in a different way, and it's important to consult the manual of the compiler you are using when developing in C++ to understand the available options and their meaning.
We'll now see how to compile a program with two of the most common compilers: the Microsoft Visual Studio compiler and GCC.
To compile the myfile.cpp file in to an object file named myfile.obj, we can run the following commands:

Figure 1.3: Compiling the CPP file
When we compile, it is common to include some headers.
We can include the headers defined in the C++ standard without performing any action, but in case we want to include user-defined headers, we need to tell the compiler in which folders to look up the header files.
For MSVC, you need to pass the parameter as /I path, where path is the path to the directory to look in for the header.
For GCC, you need to pass the parameter as -I path, where path has the same meaning as in MSVC.
If myfile.cpp is including a header in the include directory, we would compile the file with the following commands:

Figure 1.4: Compiling the CPP file with the include directory
We can compile several files in their respective object files, and then link them all together to create the final application.
To link together two object files called main.obj and mylib.obj into an executable, we can run the following commands:
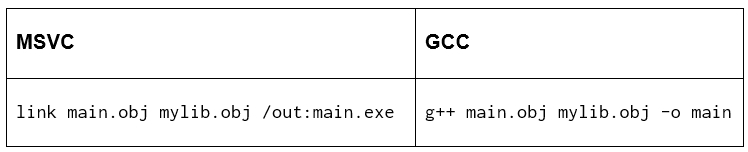
Figure 1.5: Compiling two object files
With MSVC, we will create an executable named main.exe, while with g++, the executable will be named main.
For convenience, MSVC and GCC offer a way to compile several files into an executable, without the need to create an object file for each file, and then link the files together.
Even in this case, if the files are including any user-defined header, you need to specify the header location with the /I or -I flags.
To compile the main.cpp and mylib.cpp files together, which uses some headers from the include folder, you can use the following commands:

Figure 1.6: Compiling files with include folder
In the next chapter, we will discuss functions in more depth; for now, we can define the main function, which does nothing, apart from returning a successful status code in the following way:
int main()
{
  return 0;
}
The first line contains the definition of the function, constituted by the return type int, the name of the main function, and the list of arguments, which in this case is an empty list. Then, we have the body of the function, delimited by curly braces. Finally, the body is composed of a single instruction that will return a successful status code.
Note
As opposed to C, in a C++ program, the return statement is optional. The compiler automatically adds return 0 if you don't explicitly return a value.
We will discuss these topics in more detail later; what is important to know is that this is a valid C++ program that can be compiled and executed.
In this exercise, we will create a source file named main.cpp containing the code. Compile the file and run the program. We will be using it to explore the C++ environment:
Using your favorite text editor (Sublime Text, Visual Studio Code, Atom, or Notepad++ if you use Windows), create a new file and name it main.cpp.
Write the following code in the main.cpp file and save it:
int main()
{
  return 0;
}
Compile the main.cpp file using the following command:
//On UNIX:
> g++ main.cpp

//On Windows:
> cl /EHsc main.cpp
The compilation process will produce an executable file, which will be named main.exe on a Windows system and main.out on a UNIX one.