
In this section, we will look at how we can take user input from the keyboard, how to write comments, and the importance of indentation while writing Python code.
Python has a very handy function for obtaining user keyboard input from the CLI called input(). When called, this function allows the user to type input into your program using their keyboard. The execution of your program pauses until the user presses the Enter key after completing the input. The user's input is then passed to your program as a string that you can use. The following is an example of this:
Declare the following variable:
>>> message = input()
The program execution will halt until you input a value and hit the Enter key:
Peter Piper picked a peck of pickled peppers
>>>
The message variable was assigned to the value that we passed. Let's print it out:
>>> print(message)
Peter Piper picked a peck of pickled peppers
>>>
You may have noted that there is no cue that lets us know when to type or what to type. You can pass a prompt to the input function to do this. The prompt is written to standard output without a trailing newline and serves as a cue for the user to pass in their input. Let's view this in action.
Declare the following variable, passing in the prompt Enter a tongue twister: to the input function. This will be displayed to the user:
>>> tongue_twister = input("Enter a tongue twister: ")
Enter a tongue twister:
Let's type in our tongue twister and hit the Enter key. The tongue_twister variable will then be set, and printing it out should reveal the value we passed:
Enter a tongue twister: She sells seashells by the seashore
>>> print(tongue_twister)
She sells seashells by the seashore
>>>
The values returned by the input function are always strings. Sometimes, a string may not be the data type you're expecting in your program. As we saw earlier, you can convert strings to integers using the built-in int function. To retrieve integer values from user input, all your program needs to do is cast the string that is returned as a value by the input function. Let's take a look at an example of this:
>>> number = int(input("Find the square root of: "))
Find the square root of: 49
>>> print("The square root of", number, "is", number ** 0.5 )
The square root of 49 is 7.0
Here, we take the user's input which is a string, convert it to an integer using the int function, and print out its square root.
In this exercise, we will aim to get better acquainted with fetching and using user input as well as practice multiple assignment:
Open your interpreter.
Declare the following variables:
>>> name, hobbies = input("What is your name? "), input("What are your hobbies? ")Type in the values when prompted:
What is your name? John Doe
What are your hobbies? swimming, reading, playing instruments, drawing, programming
>>>
Print out the values of the variables:
>>> print("Your name is", name, "and your hobbies are", hobbies)
Your name is John Doe and your hobbies are swimming, reading, playing instruments, drawing, programming
We can get user input to use in our program in Python by using the built-in input function. You can pass a prompt argument to the input function that'll act as a cue for the user to pass their input. The input function always returns values as strings that we can optionally cast to the data type we desire.
Comments are an integral part of programming.
Comments can be thought of as notes on the code that give us more contextual information about it. They can tell us why certain decisions were made, some improvements that can be made in future, and also explain the business logic. In short, they make the code easier to understand for humans.
There are three different ways to write Python comments, documentation strings (docstrings for short), inline comments, and block comments.
Block and Inline Comments
Block and inline comments start with a pound sign, #. A block comment comes in the line before the statement it annotates and is placed at the same indentation level:
# increment counter
counter = counter + 1
Inline comments are placed on the same line as the statement it annotates:
>>> print(foobar) # this will raise an error since foobar isn't defined
Block comments are applied to the code that follows them and should be indented at the same level as the code it's meant for. While they serve the same purpose as inline comments, block comments are to be preferred by convention as they are more immediately noticeable and unambiguous as to the code they are annotating.
Documentation Strings
A documentation string, or docstring for short, is a literal string used as a Python comment. It is written and wrapped within triple quotation marks; """ or '''. Docstrings are often used to document modules, functions, and class definitions. The following is an example module that's been documented with a docstring. Module docstrings should be put at the beginning of the file:
"""
This script can be called with two integer arguments to return their sum
"""
import sys
num_1  = int(sys.argv[1])
num_2  = int(sys.argv[2])

print(num_1, "+", num_2, "=", num_1 + num_2)
Furthermore, you can also use docstrings to write multiline comments:
"""
This loop goes through all the numbers from 1 to 100
printing each out
"""
for i in range(1, 101):
    print(i)
Sufficiently commenting our code leads to easily maintainable and easier-to-read code. Since we often spend more time reading code than writing it, it is important that we write comments, but even more important is that we write code readable enough to need as few explanations as possible.
A block is a group of statements that are meant to be executed together. Blocks are a fundamental aspect of modern programming languages since flow of control structures (structures that determine the flow of execution of code) are formed from blocks. Blocks allow a set of statements to be executed as though they were a single statement. Different languages represent blocks differently, but most commonly, the following syntax is used:
if (true) {
  // execute this block of statements
} else {
  // execute other block of statements
}
Note
if is a common control flow structure that evaluates Boolean expressions and determines where the program should go.
In the preceding code snippet, a block is denoted by whatever is inside the curly braces. If the condition is true, then execute a certain block of statements; otherwise, execute the other block. Often, blocks can be nested within other blocks.
In Python, statements are grouped using whitespace, that is, blocks are indented within other blocks instead of using curly braces.
Note
Whitespace is any character in a piece of text that occupies space but doesn't correspond to a visible marking.
Observe the following, which is the Python equivalent of the previous code snippet:
if True:
    # execute this block of statements
    print("Block 1")
else:
    # execute other block of statements
    print("Block 2")
Python uses whitespace to denote blocks. Just as blocks are denoted by statements enclosed in curly braces in several other languages, any statement that's indented in Python forms a new block, becoming a child of the previous statement with the parent statement being suffixed with a colon, :. In place of a closing curly brace, a statement that would come after that block would be outdented outside it, as we've seen with the else statement that came after the if block.
Generally, you can use any number of spaces as long as every statement in the block has an equal amount of indentation, although the standard is four spaces:
if True:
    x = 5
    y = x
print(x, y ** 2)If we try running a piece of code without proper indentation, Python will raise an error. Let's take a look at this:
Open your interpreter and type the following:
>>> if True:
Press the Shift + Enter keys to create a new line. The interpreter will show three dots … in place of the usual >>> prompt, which means you're on another line. Type four spaces and then write your statement:
>>> if True:
...     print(1)
We'll then type our last statement with an unequal number of spaces. This should raise an error when we execute it. Create another new line, type three spaces, and write the final statement as follows. Then, press the Enter key to execute the whole snippet:
>>> if True:
...     print(1)
...    print(2)
Executing this should raise the following indentation error:
  File "<stdin>", line 3
    print(2)
           ^
IndentationError: unindent does not match any outer indentation level
This error tells us that the indentation for our last line, which was three spaces, didn't match our first line's indentation, which was four spaces. Indentation for statements in a block is dictated by the first statement's indentation level. To fix this, indent that line in the same way as the first, and it should run normally now:
>>> if True:
...     print(1)
...     print(2)
...
1
2
>>>
Fix the code snippet in the incorrect_indentation.py file from the code bundle to have the appropriate indentation in each block. Once you fix it, run the script in the terminal and verify that you get the output. Don't worry if you don't understand what the code is doing; the goal is to get comfortable with indentations. The incorrect code is also shown here:
>>> if 5 > 2:
...     print("Greater than")
...    x = 5
...   print(x * 2)
... else:
...     print("Less than")
...    print(2)
Here's a hint: Indentation for statements in a block is dictated by the first statement's indentation level.
The output of the correct syntax should be as follows:
Greater than
10
Write a script that takes a number from a user's input and prints out its multiplication table from 1 to 10.
The steps are as follows:
Open your editor.
Create a file named multiplication_table.py and save it.
On the first line, add a docstring explaining what our file does. Then, we'll assign a variable called number to the user's input and cast it to an integer.
Next, print 20 underscores as the top border of the table.
Multiply our number with each number from 1 to 10 and print that out.
Finally, print 20 underscores again for the bottom border of the table, as in step 4.
Save the file and run it by using the python multiplication_table.py command.
The output should look like this:
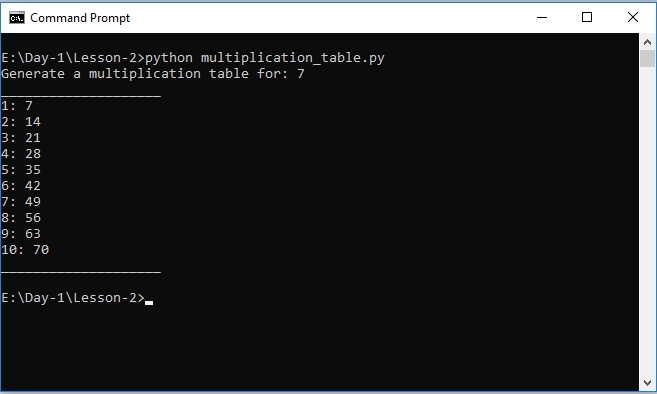
Figure 1.10: Output of running the multiplication_table.py script