Book Image

Application Development with Qt Creator - Third Edition

By : Lee Zhi Eng, Ray Rischpater
Book Image

Application Development with Qt Creator - Third Edition

By: Lee Zhi Eng, Ray Rischpater

Overview of this book

Qt is a powerful development framework that serves as a complete toolset for building cross-platform applications, helping you reduce development time and improve productivity. Completely revised and updated to cover C++17 and the latest developments in Qt 5.12, this comprehensive guide is the third edition of Application Development with Qt Creator. You'll start by designing a user interface using Qt Designer and learn how to instantiate custom messages, forms, and dialogues. You'll then understand Qt's support for multithreading, a key tool for making applications responsive, and the use of Qt's Model-View-Controller (MVC) to display data and content. As you advance, you'll learn to draw images on screen using Graphics View Framework and create custom widgets that interoperate with Qt Widgets. This Qt programming book takes you through Qt Creator's latest features, such as Qt Quick Controls 2, enhanced CMake support, a new graphical editor for SCXML, and a model editor. You'll even work with multimedia and sensors using Qt Quick, and finally develop applications for mobile, IoT, and embedded devices using Qt Creator. By the end of this Qt book, you'll be able to create your own cross-platform applications from scratch using Qt Creator and the C++ programming language.
Table of Contents (19 chapters)
1
Section 1: The Basics
7
Section 2: Advanced Features
12
Section 3: Practical Matters

Hello World using the Qt Widgets library

One of Qt's strengths is its rich collection of GUI elements that you can use to create windowed applications. Making a GUI application is similar in principle to making a console application; instead of choosing Qt Console Application, select Qt Widgets Application from the New dialog presented when you choose New File or Project. Try it now:

  1. First, close the current file and project by clicking on Close All Projects and Editors from the File menu.
  2. Next, click on New File or Project again and click on Qt Widgets Application from the first step of the wizard.
  3. Walk through the wizard again, naming your project HelloWorldGui.
  1. Then, select the default kit. The New project wizard will prompt you for the name of the class implementing your main window. Leave the QMainWindow subclass as is and the name as MainWindow. Skip the build system and version control dialog portions of the wizard.

Qt Creator creates a default subclass of the class that provides the platform's basic window in the mainwindow.h and mainwindow.cpp files and creates a form that will contain the widgets for your application's window.

The following screenshot shows a default form as you're editing it in Qt Designer. If you run the application at this point, you'll see an empty window. Instead, double-click on the Forms folder in the project tree (the second pane) of Qt Creator and then double-click on the mainwindow.ui file. Qt Creator switches to the Design view, and you'll see something similar to the following screenshot:

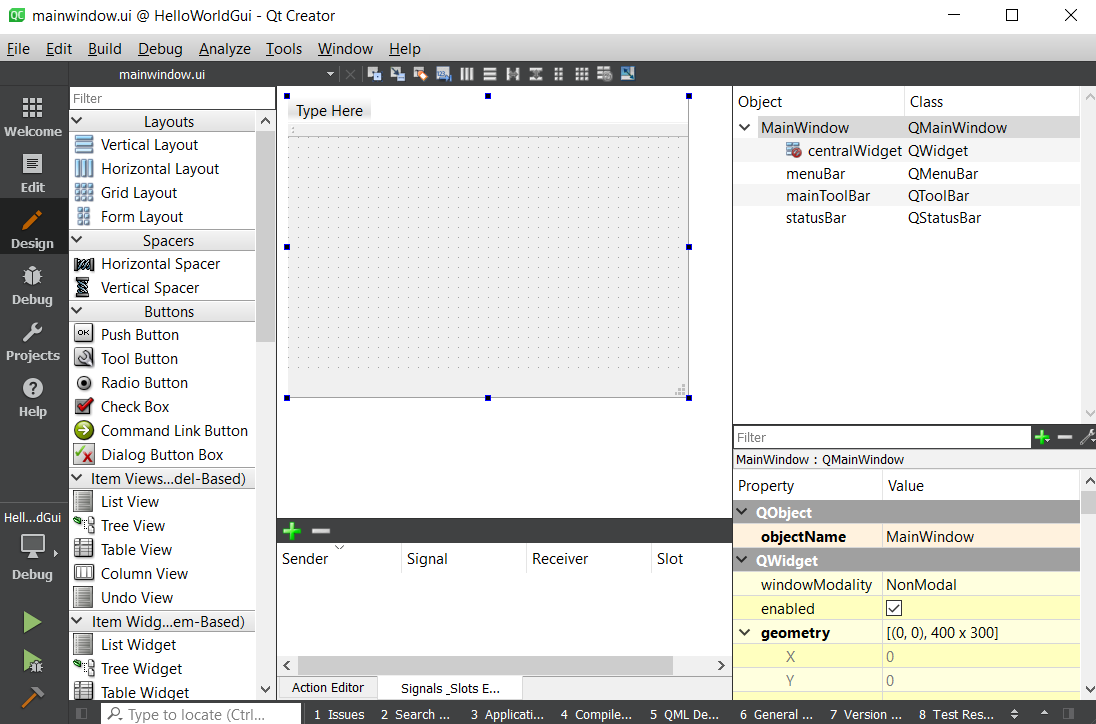
As you can see from the preceding screenshot, on the left-hand side is a list of the layouts that you can choose to organize widgets. These include spacers, views, containers, buttons, and other widgets; other than that, there are a variety of edit and layout options as well. In the middle of the window is the preview of the layout of your application's main window. Further to the right are panes that show the hierarchy of objects in your main window and the properties of any item that you have clicked on in the main window.

Placing widgets in Qt Designer

While we will explore Qt Designer more in Chapter 3, Designing Your Application with Qt Designer, you can get a feel for using it by building a simple UI. Begin by ensuring that you're in the Designer mode, then proceed as follows:

  1. Where it says Type Here, right-click and choose Remove menu bar.
  2. Drag a label (under Display Widgets in the left-hand side pane) and drop it in the window preview in the center pane.
  3. Double-click on the label that appears and type Hello world!.
  1. Grab a corner of the label and resize it so that the entire text is shown. You can also move it around in the window.
  2. Note that when you click on the label, the Property field in the lower-right pane is updated to show the properties of your new label.
  3. Drag a button (under Buttons in the left-hand side pane) and drop it in the window preview in the center pane.
  4. Double-click on the button and change its text to Exit.
  5. With the new button selected, change the objectName field in the Property browser to exitButton. You must follow the name described here so that the code generated when adding the slot function will be identical to the one shown in the next sample code snippet.
  6. Right-click on the button and select Go to slot.... A window appears with a list of slots (for now, you can think of a slot as something that is triggered on an action; we will discuss them more in Chapter 2, Building Applications with Qt Creator).
  7. Choose clicked() from the list that appears.
  8. Qt Creator returns to the Edit view for your mainwindow.cpp file. Change it to read as follows:
#include "mainwindow.h" 
#include "ui_mainwindow.h" 
#include <QApplication> 
MainWindow::MainWindow(QWidget *parent) : 
    QMainWindow(parent), 
    ui(new Ui::MainWindow) 
{ 
    ui->setupUi(this); 
} 
 
MainWindow::~MainWindow() 
{ 
    delete ui; 
} 
 
voidMainWindow::on_exitButton_clicked() 
{ 
    QApplication::exit(); 
}

Before running your application, let's be sure that you understand the implementation of the MainWindow class. The constructor of the MainWindow class loads the description of the user interface for the main window and sets it up using the Qt Creator-generated Ui::MainWindow class. The destructor deletes the implementation of the code layout, and the on_exitButton_clicked method simply terminates the application by calling the exit static method implemented by the QApplication class.

Finally, we have to add the on_exitButton_clicked method declaration to mainwindow.h if it's not already added. Double-click on this file in the browser on the left and make sure that it reads as follows:

#ifndef MAINWINDOW_H 
#define MAINWINDOW_H 
 
#include <QMainWindow> 
 
namespaceUi { 
class MainWindow; 
} 
 
class MainWindow : public QMainWindow 
{ 
    Q_OBJECT 
     
public: 
    explicit MainWindow(QWidget *parent = 0); 
    ~MainWindow(); 
     
private slots: 
    void on_exitButton_clicked(); 
 
private: 
    Ui::MainWindow *ui; 
}; 
 
#endif // MAINWINDOW_H 

The key lines you need to add are highlighted in the previous listing.

We'll learn more about signals and slots in the next chapter; for now, it's enough for you to know that you're declaring a private function to be triggered when you click on the button.

Run the application. It should open a single window with the text Hello World!; clicking on the Exit button in the window (or on the close-box button in the upper-right corner) should close the application:

At this point, if you think you want to learn more about the Qt Widgets application, go ahead and try dragging other GUI items to the window, or explore the help documentation for the Qt Widgets application by switching to the Help view and clicking on Qt GUI from the list of help items.