There are different ways to install the Qt framework and tools on your system. You can download an online or offline installer from the Qt website, or you can build the source packages yourself. Qt recommends using the online installer for first-time installations and the Qt Maintenance Tool for modifying the installation later.
The installers allow you to download and install the following components:
- Qt libraries
- Qt Creator IDE
- Documentation and examples
- Qt source code
- Add-On modules
The online installer allows you to select open source or commercial versions of Qt, tools, and Add-On modules to install based on the chosen license. The online installer doesn't contain the Qt components, but it is a downloader client to download all the relevant files. You can install once the download is complete. You will require a Qt account to download and install Qt. An evaluation version for the commercial Qt gives you free trial-period access, with all commercial packages and access to official Qt support. The installer requires you to sign in with your Qt account. If you don't have a Qt account, you can sign up during the installation process. The installer fetches the license attached to the account from the Qt server and lists down modules according to your license. If you are new to Qt, then we recommend that you start with the open source version.
The offline installer is a platform-specific package that includes all Qt modules and add-ons relevant for the platform. Due to the official policy changes, open source offline installers are not available any more since Qt 5.15. If you have a commercial license, then you can provide the credentials during the installation process. You can locate your license key in your Qt account web portal.
You can download them from the following links:
Downloading Qt
Let's start by downloading Qt onto your machine, as follows:
- To begin, visit the https://www.qt.io/download download page.
- Click on the Download. Try. Buy. button in the top-right corner. You will see different download options here.
- If you want to try the commercial version, then click on Try Qt section. If you already have a Qt account, then you can log in into the account under the Existing customers section.
- Considering that you are new to Qt, we will begin with the open source version. Click on the Go open source button, as shown in the following screenshot:
Figure 1.1 – Qt website download options
- On the next screen, you will find Download the Qt Online Installer button. Click on it to proceed to the download link.
- The web page will automatically detect the underlying platform details from the browser and will show you the Download button. You can also select your intended installer by choosing the other options: you can select 32-bit or 64-bit or download for a different platform.
You will see a Thank you page after you click on the download option. At this stage, you can find the installer in your download folder.
Next, let's begin with the installation process on the Windows platform.
Installing Qt on Windows
Now, let's start the installation process on Windows! Proceed as follows:
- You will find a file with the name
qt-unified-windows-x86-%VERSION%-online.exe inside your download folder. Double-click on the executable, and you will see a Welcome screen.
- Click the Next button, and a credentials screen will appear, asking you to log in with your Qt account. If you don't have one, then you can sign up on the same page, as shown in the following screenshot:
Figure 1.2 – Login screen of the installer
- In the next screen, you will be presented with the open source usage obligations agreement. You won't get this screen if you are installing using a commercial license. Click on the first checkbox, saying I have read and approve the obligations of using Open Source Qt, and acknowledge that you are not using Qt for commercial purposes. Make sure you read the terms and conditions mentioned in the agreement! Then, click on the Next button.
- The next screen will provide you with options related to tracking and sharing pseudonymous data in Qt Creator. You may allow or disable these options based on your preferences. Then, click on the Next button to proceed to the next screen.
- In the next screen, you can specify the installation path. You may continue with the default path, or you can change it to any other path if you don't have enough space on the default drive. You can also choose whether you want to associate common file types with Qt Creator by selecting the checkbox option at the bottom. Click on the Next button.
- Next, you will be presented with a list where you can select the version(s) of Qt you need to install on your system. You may simply proceed with the default options. If you don't need some of the components, then you can unselect them to reduce the size of the download. You can update the Qt components using the Maintenance Tool anytime later. To complete the installation process, click on the Next button. The component selection screen can be seen here:
Figure 1.3 – Component selection screen of the installer
- In the next screen, you will be presented with the license agreement. Click on the first radio button, which says I have read and agree to the terms contained in the license agreements. Again, make sure you read the terms and conditions mentioned in the license agreement, and then click on the Next button.
- On the next screen, you can create Start menu shortcuts on Windows. This screen will not be available for other platforms. Once you have finished doing this, click on the Next button.
- Now, Qt is ready to be installed in your system. Make sure you have a working internet connection and data balance. Click on the Install button to begin the installation. The download process will take time, depending on your internet speed. Once the required files are downloaded, the installer will automatically install them in the previously selected path.
- Once the installation is finished, the installer will make an entry for the Maintenance Tool, which will help you later to make changes to the libraries. Click on the Next button to move to the last screen of the installer.
- In order to complete the installation process, click on the Finish button. If you have left the Launch Qt Creator checkbox checked, then Qt Creator will be launched. We will discuss this in more detail in the next chapter. Now, Qt is ready to be used on your Windows machine. Click on the Finish button to exit the wizard.
Installing Qt on Linux
Now, let's install the Qt framework on the latest LTS version of Linux, such as Ubuntu 20.04, CentOS 8.1, or openSUSE 15.1. We will be focusing on the most popular Linux distribution, Ubuntu. You can follow the same steps as mentioned previously to download the online installer from the Qt website.
On Ubuntu, you will get an installer file such as qt-unified-linux-x64-%VERSION%-online.run, where %VERSION% is the latest version— for example: qt-unified-linux-x86-4.0.1-1-online.run.
- You may have to give write permissions to the downloaded file before executing it. To do that, open the terminal and run the following command:
$ chmod +x qt-unified-linux-x64-%VERSION%-online.run
- You can start the install process by double-clicking the downloaded installer file. The installation requires superuser access. You may have to add a password in the authorization dialog during the installation. You can also run the installer from the terminal, as follows:
$ ./qt-unified-linux-x64-%VERSION%-online.run
- You will see similar screens to those shown for the Windows platform. Apart from the operating system (OS)-specific title bar changes, all the screens remain the same for installation in Ubuntu or similar Linux flavors.
At the time of writing the book, there was no Ubuntu or Debian package available for Qt 6 as the respective maintainers have stepped down. Hence, you may not get the Qt 6 package from the terminal.
Installing Qt on macOS
If you are a macOS user, then you can also install the same way as discussed for the earlier platforms. You can follow the same steps mentioned previously to download the online installer from the Qt website.
You will get an installer file such as qt-unified-mac-x64-%VERSION%-online.dmg, where %VERSION% is the latest version (such as qt-unified-mac-x64-4.0.1-1-online.dmg).
Qt has a dependency on Xcode. To install Qt on your Mac, you will need Xcode installed on your machine, otherwise, it will refuse to install. If you are an Apple developer, then your Mac may have Xcode installed. If you don't have Xcode installed on your machine, then you may proceed to install Xcode's Command Line Tools instead of Xcode. This will save time and storage space on your machine:
- To begin, type the following command on the terminal:
$ xcode-select --install
- If the terminal shows the following output, then your system is ready for the next steps:
xcode-select: error: command line tools are already installed, use
"Software Update" to install updates
- The next step is to install the Qt framework. Double-click on the installer file to launch the installation interface.
- If the installer still complains that Xcode is not installed, then keep clicking OK until the message goes away permanently. Remember the installation path. Once the installation is finished, you are ready to use Qt on your machine.
Further instructions on Qt for macOS can be found at the following link:
https://doc.qt.io/qt-6/macos.html
Updating or removing Qt
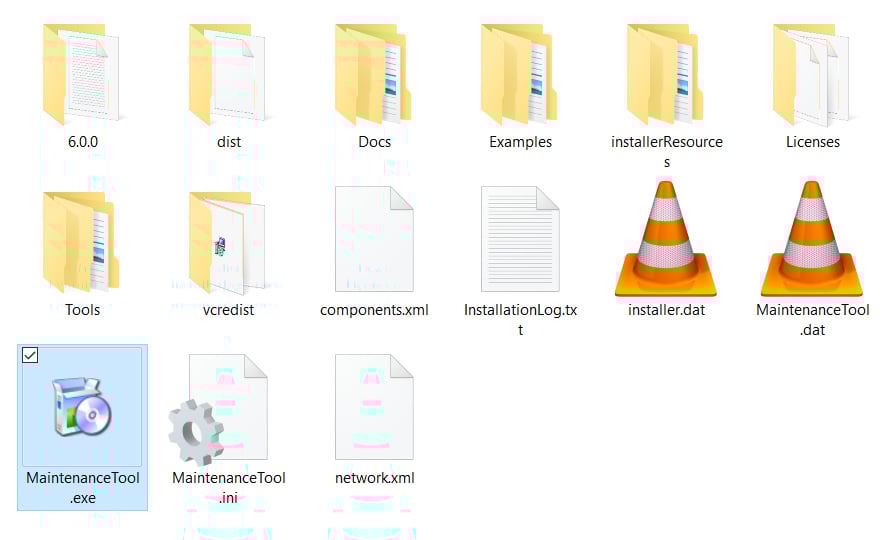
Once Qt is installed, you can modify the components—including updating, adding, and removing components—using the Maintenance Tool under the installation directory. The directory structure remains the same for all desktop platforms. The installation directory contains folders and files, as shown in the following screenshot (on Windows):
Figure 1.4 – The Maintenance Tool inside the installed folder
Let's begin with the maintenance process! You can add, remove, and update modules using the Maintenance Tool. Proceed as follows:
- Click on the
MaintenanceTool.exe executable to launch the maintenance interface. Click on the Next button, and a credentials screen will appear, asking you to log in with your Qt account. The login details will be prefilled from your last login session. You can click Next to add or update components or select the Uninstall only checkbox to remove Qt from your system. The following screenshot shows what the credentials screen looks like:Figure 1.5 – Welcome screen of the Maintenance Tool
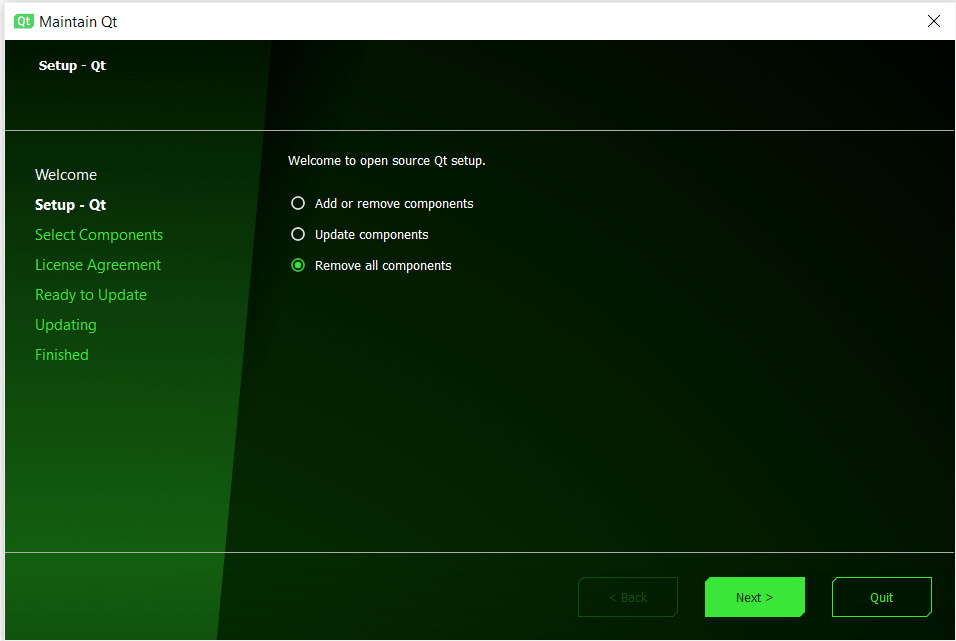
- Once you are logged in, the tool will present you with options to add or remove or update the components, as shown in the following screenshot. Click on the Next button to proceed further:
Figure 1.6 – Setup screen of the Maintenance Tool
- On the next screen, you can select new components from the latest releases or the archived version. You can click on the Filter button to filter versions as per your requirement. You can also add new platform-specific components such as Android from the component list. If the component is existing and you uncheck it, then it will be removed from your desktop during the update. Once you have selected the components, click on the Next button. The following screenshot shows what the component selection screen looks like:
Figure 1.7 – Component selection screen
- You will then come across the update screen. This screen will tell you how much storage space is required for the installation. If you are running out of storage space, then you may go back and remove some existing components. Click on the Update button to begin the process, as illustrated in the following screenshot:
Figure 1.8 – The Ready to Update screen of the Maintenance Tool
- You can abort the update installation process by clicking on the Cancel button. Qt will warn you and ask you for confirmation before aborting the installation process, as illustrated in the following screenshot. Once the process is aborted, click on the Next button to exit the wizard:
Figure 1.9 – The cancel dialog
- Launch the Maintenance Tool again to update existing components from the latest releases. You can click on the Quit button to exit the Maintenance Tool. Please wait while the installer fetches the meta-information from the remote repository. Click on the Next button to see the available components. The update option is illustrated in the following screenshot:
Figure 1.10 – The Update option in the Maintenance Tool
- Next, you can select which components to update from the checkboxes. You can choose to update all or you can update selectively. The installer will show how much storage space will be required for the update, as illustrated in the following screenshot. You can click Next to go to the update screen and begin the update. Then, on the next screen, click on the Update button to download the update packages:
Figure 1.11 – Components available for update
- Once the installation is finished, the installer makes entries for the Maintenance Tool, which will help you make changes to the libraries later. This is illustrated in the following screenshot. Click on the Next button to move to the last screen of the installer:
Figure 1.12 – The Update finished screen in the Maintenance Tool
- In the last screen, you will see Restart and Finish buttons. Click on the Finish button to exit the Qt wizard.
- Similarly, you can restart or launch the Maintenance Tool and select the Remove all components radio button. Click on the Next button to begin the uninstallation process, as illustrated in the following screenshot:
Figure 1.13 – The Remove option in the Maintenance Tool
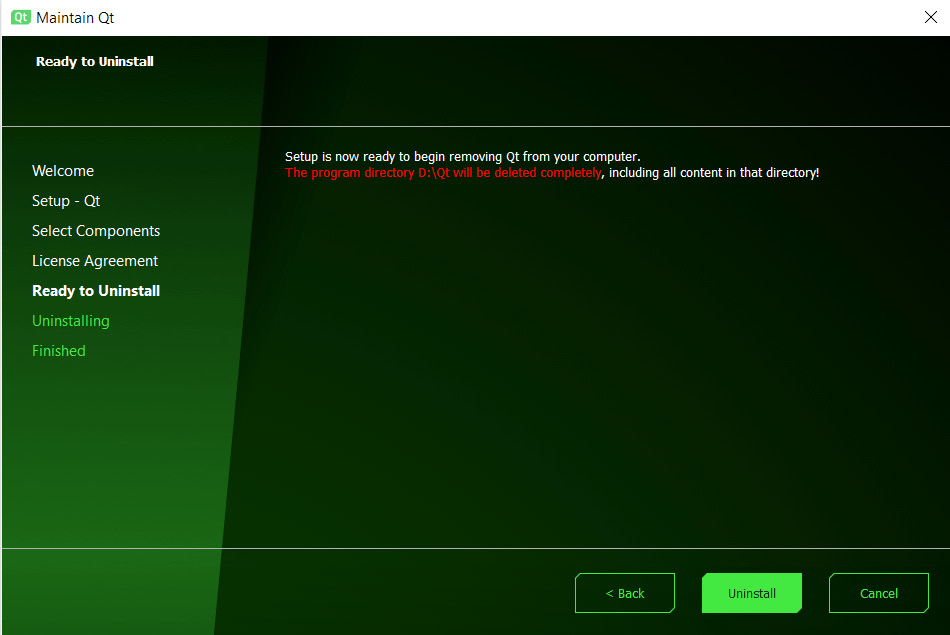
Please note that on clicking the Uninstall button, all the Qt components will be removed from your system; you will have to reinstall Qt if you want to use them again. Click on Cancel if you don't intend to remove the Qt components from your system, as illustrated in the following screenshot. If you intend to remove the existing version and use a newer version of Qt, then select the Add or remove components option, as discussed earlier. This will remove older Qt modules and free up your disk space:
Figure 1.14 – The Uninstall screen in the Maintenance Tool
In this section, we learned about modifying an existing Qt installation through the Maintenance Tool. Now, let's learn how to build and install Qt from the source code.


 Free Chapter