One of the best features present in canvas apps is the ability to access multiple external connectors from the same app. We can leverage this strength by embedding a canvas as a component.
These are sample scenarios in which this can be very helpful:
- A canvas application that is already in production that we want to integrate into our model-driven system.
- A canvas app that connects to a legacy system using the on-premises data gateway.
- An employee tracking system that gives us information about in which of our customer locations our support staff is working at any given moment. This data could be useful to see whether we already have someone from support at the client location from which a new ticket has arrived.
Now let's see how we can integrate a canvas into our model-driven solution.
How to do it…
- From our solution, select to open the
Project table. Then, go to the Forms tab to edit the main form.
- Once the designer opens, select the Switch to classic option from the toolbar. The Power Apps platform is still evolving the form designer experience, so we still need to use the standard version to add some components.
- Select where you want your canvas app to appear, and then, from Field Explorer on the right, drag a column to that position. Keep in mind that this column needs to have data to make the app visible, so make sure you select a required column. In this example, I've selected
Title.
- Double-click on the column and, under the label section, uncheck Display label on the form so that it doesn't appear next to our app.
- Go to the Controls tab and click on Add Control…, select Canvas app from the list, and click on Add. This action will add the Canvas app property section. On the list of controls, select the canvas app and choose Web, Phone, and Tablet.
- In the Canvas property section, you will see the settings needed to link an app. To add a new one, click on Customize; this will create a new canvas app with a form using the
Project table as its data source. You will notice a new control called ModelDrivenFormIntegration, as shown, which acts as a gateway between the model-driven form and the canvas app:Figure 2.19 – ModelDrivenFormIntegration
It works just like the SharePointIntegration control we saw in the previous chapter's Embedding an expense tracking list with SharePoint list Power Apps recipe but with only one action available. Its primary purpose is to act on data refresh.
- Design your app to match your needs. Keep in mind that one of the primary purposes of this integration is to have the ability to link the data from the Dataverse table with our canvas app. This connection gets done by the integration control using the Item property, which carries the column data from the selected item in the model-driven app:
Figure 2.20 – Project columns in the canvas app
- Once you finish building your app, click on Save, and publish it to make it available in our model-driven app. Close the canvas app studio.
- Back in the classic form designer, you will see that the canvas properties were updated to reflect the new app's link. Click OK to save the field properties, and then save the form, and finally, publish it. Close the classic form designer.
- Go back to your solution. You will see that the canvas app appears automatically in the list of components.
How it works…
Let's pretend our company is in the middle of its cloud migration, and we still use a legacy ERP system to control customers' support rights. We can build a canvas app with a custom connector, a data gateway, or a Power Automate cloud flow to get data from the on-premises system. This solution can give support representatives more insight into the customer's rights related to the ticket.
Open a ticket with an associated project. If you click on the Project column value, it will navigate to the project form to display the related information about the project:
Figure 2.21 – Project table navigation
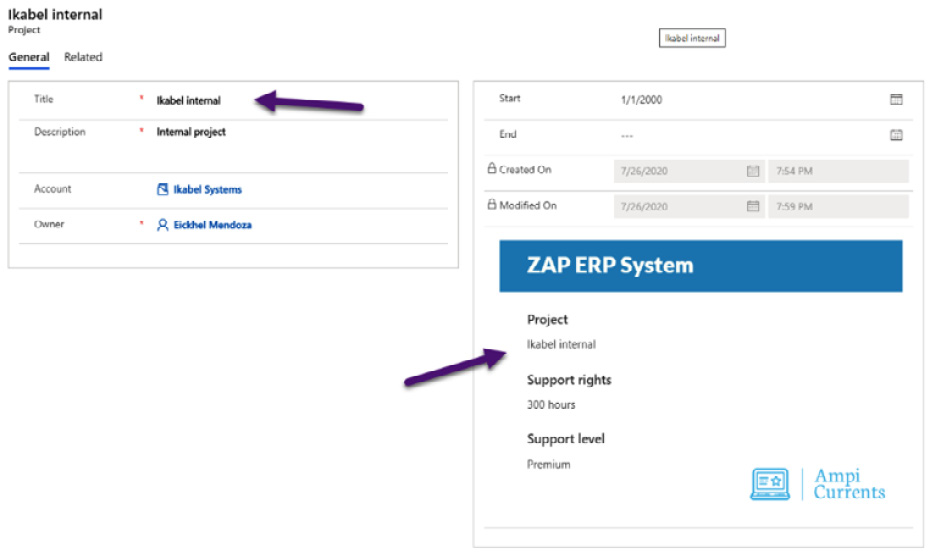
As soon as the project table form appears, the model-driven integration control will notify the canvas app of the currently selected record. That will execute the OnDataRefresh action logic you specified in your app:
Figure 2.22 – Canvas app integrated into the model-driven form
This integration shows just one of the situations where a canvas app can aid a model-driven solution to accomplish something that would require adding a code solution or a third-party component. Make sure you know all the possibilities of each type of app to leverage each one's skills.


 Free Chapter


