When it comes to adopting the Windows App SDK, there are two options:
- Start with a new project using one of the available Visual Studio templates.
- Integrate the Windows App SDK into an existing application. Since this book is dedicated to C# developers, we'll focus on Windows Forms and WPF.
We will discuss each possibility in the next sections.
A new packaged WinUI C# application
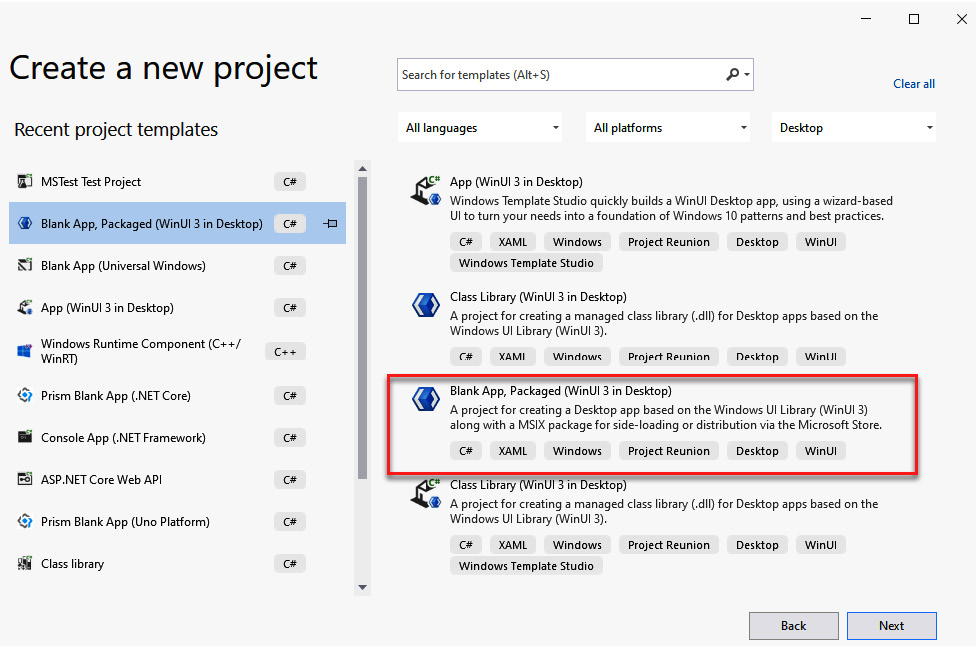
Once you have installed the Windows App SDK extension for Visual Studio, you'll get a few templates to create new projects. The starting point for a Windows App SDK application is called Blank App, Packaged (WinUI 3 in Desktop), as shown in the next screenshot. Why WinUI? Because it's the only feature of the Windows App SDK that can't be integrated into existing applications, so you will likely start with a new project if you want to create a Windows application that uses WinUI as the UI framework:
Figure 1.5 – The template to create a new packaged WinUI 3 application
The template will create a project that contains all the basic building blocks of a WinUI application. Let's take a look at the structure in more detail.
The template will create a project as shown in the following screenshot:
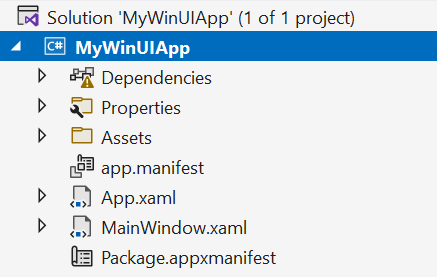
Figure 1.6 – A new solution for a packaged app that uses the Windows App SDK and WinUI 3
This is the project that contains the actual application, and that's where you're going to write most of your code.
One of the key differences between .NET Framework and the new .NET runtime is the adoption of a new project format, called SDK style. This format makes it quite easy to read and change the XML that describes the project. Visual Studio still supplies a more human-friendly UI (which you can see by right-clicking on the project and choosing Properties), but it isn't a must-have feature anymore.
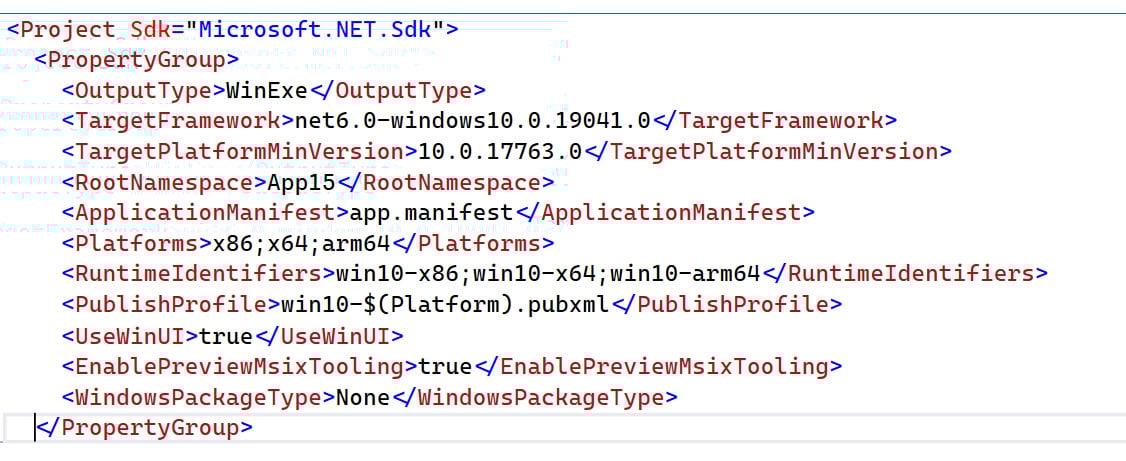
This is what the project file of an application that uses the Windows App SDK looks like (you can see it by simply double-clicking on the project's name in Solution Explorer):
<Project Sdk="Microsoft.NET.Sdk">
  <PropertyGroup>
    <OutputType>WinExe</OutputType>
    <TargetFramework>net6.0-
      windows10.0.19041.0</TargetFramework>
    <TargetPlatformMinVersion>10.0.17763.0
      </TargetPlatformMinVersion>
    <RootNamespace>MyApplication</RootNamespace>
    <ApplicationManifest>app.manifest</ApplicationManifest>
    <Platforms>x86;x64;arm64</Platforms>
    <RuntimeIdentifiers>win10-x86;win10-x64;
     win10-arm64</RuntimeIdentifiers>
    <PublishProfile>win10-$(Platform).pubxml
      </PublishProfile>
    <UseWinUI>true</UseWinUI>
    <EnablePreviewMsixTooling>true</EnablePreview
      MsixTooling>
  </PropertyGroup>
  <ItemGroup>
    <AppxManifest Include="Package.appxmanifest">
      <SubType>Designer</SubType>
    </AppxManifest>
  </ItemGroup>
  <ItemGroup>
    <Content Include="Assets\SplashScreen.scale-200.png" />
    <Content Include="Assets\LockScreenLogo
      .scale-200.png" />
    <Content Include="Assets\Square150x150Logo
      .scale-200.png" />
    <Content Include="Assets\Square44x44Logo
      .scale-200.png" />
    <Content Include="Assets\Square44x44Logo
      .targetsize-24_altform-unplated.png" />
    <Content Include="Assets\StoreLogo.png" />
    <Content Include="Assets\Wide310x150Logo
      .scale-200.png" />
  </ItemGroup>
  <ItemGroup>
    <PackageReference Include="Microsoft.WindowsAppSDK"
      Version="1.0.0" />
    <PackageReference
      Include="Microsoft.Windows.SDK.BuildTools"
        Version="10.0.22000.196" />
    <Manifest Include="$(ApplicationManifest)" />
  </ItemGroup>
</Project>
Let's take a look at the key properties:
TargetFramework: This defines which flavor of .NET we want to use. In our scenario, we need to use the specific workload that gives us access to the Windows Runtime ecosystem, which is net6.0-windows10.0.19041.0.Platforms: Since the Windows App SDK is a native layer of APIs, it can't be used in applications that are compiled for the generic Any CPU architecture. As such, our project must explicitly declare the architectures we can support, which, in the case of the Windows App SDK, are x86, x64, and ARM64.RuntimeIdentifiers: The .NET runtime supports a deployment model called self-contained, in which the runtime itself is bundled together with the application. This helps to reduce the manual steps that a user must take to satisfy all the required dependencies. By default, a packaged Windows App SDK application uses this configuration so that you can generate a standalone package, which includes everything the user needs to run it.UseWinUI: Every .NET project for a Windows application specifies which is the used UI framework so that .NET can load the proper libraries. Since we're building a WinUI application, the property to use is UseWinUI. In the case of a WPF application, the property would be called UseWPF; in the case of Windows Forms, it would be UseWindowsForms instead.- Lastly, every application that uses the Windows App SDK must reference the proper NuGet packages, which contain the library itself. Without these packages, you won't be able to access any of the features exposed by the runtime. The required package is called
Microsoft.WindowsAppSDK and it's a meta-package – it doesn't actually contain any code, but it groups together all the various packages that contain the various components of the framework.
From a project's structure perspective, a WinUI 3 application follows the same pattern as WPF or UWP. The default template contains the following components:
App.xaml: This is the entry point of the application. It takes care of initializing everything that is needed to run the application. From a developer perspective, you can use it to store visual resources (such as styles) that must be shared across the whole application; you can use the code-behind class (the App.xaml.cs file) instead to manage the life cycle of the application and intercept various activation events, such as the application being opened via a custom protocol or a file type association.MainWindow.xaml: This is the main window of the application. If you take a look at the App.xaml.cs file, you will discover that there's an event handler called OnLaunched(), which creates a new instance of the MainWindow class and activates it. This means that when the user launches the application, the content of MainWindow is the first thing they will see.Package.appxmanifest: This is the manifest that describes the application and its identity. If you double-click on the file, Visual Studio gives you the opportunity to customize it through a visual interface. However, the designer was created during the Universal Windows App time frame, and as such, some of the features that we're going to explore in this book that are specific to the Win32 ecosystem aren't available. In these scenarios, you must manually edit the manifest file by right-clicking on it and choosing View code, which will give you direct access to the XML behind it.
If you analyze the XML, you will notice something peculiar in the Capabilities section:
<Capabilities>
    <rescap:Capability Name="runFullTrust" />
</Capabilities>
The MSIX packaging format, which was originally called AppX, was introduced for Windows Store apps (later evolved into UWP apps), and as such, it was tailored for applications that run inside a sandbox. This special capability, called runFullTrust, instead enables packages to also host traditional Win32 applications, such as a WinUI 3 application based on the .NET runtime.
When you use this template, you don't have to worry about managing the Windows App SDK runtime dependency. Even if you don't see it in the Package.appxmanifest file, Visual Studio will automatically inject the required entry into the final manifest of the package to install the runtime if it's not already available on the machine.
Using a separate packaging project
If you look at the available templates to create a new WinUI application, you will find one called Blank App, Packaged with Windows Application Packaging Project (WinUI 3 in Desktop). This template was originally the only supported way to build and deploy WinUI applications, and it's made up of two different projects:
- One with the name you chose during the setup wizard (for example,
MyFirstApp)
- One with the same name, plus the
(Package) suffix (for example, My FirstApp (Package)):
Figure 1.7 – A WinUI project that uses a separate packaging project
The first project is the main one, which contains the application. The second project, the one with the (Package) suffix, is a Windows Application Packaging (WAP) Project. This is a special type of project that doesn't contain actual code, but it enables you to package the main application with MSIX. If you expand the Dependencies node, you will find a section called Applications, which includes a reference to the main project.
This project isn't required anymore, thanks to a feature called single-project MSIX. When we create a new application using the Blank App, Packaged (WinUI 3 in Desktop) template that we have seen before, we're still using the MSIX packaging format. However, the WAP Project is now hidden and incorporated into the main project, thanks to a special property that you can see in the .csproj file:
<EnablePreviewMsixTooling>true</EnablePreviewMsixTooling
However, there might be some scenarios where you still need to use the WAP Project. For example, if you're planning to bundle multiple applications inside the same MSIX package, you must continue to use a WAP Project.
A new unpackaged WinUI application
WinUI applications can also use the unpackaged model, which gives you the flexibility to distribute your application using the technology you prefer. The starting point for a WinUI unpackaged application is the same template we have used for the packaged version, the one called Blank App, Packaged (WinUI 3 in Desktop). However, in this case, we must change the .csproj file by adding the following entry inside PropertyGroup:
<WindowsPackageType>None</WindowsPackageType>
This is how the full .csproj file should look:
Figure 1.8 – A WinUI project configured to support the unpackaged model
Thanks to this property, the application will automatically inject the required code to initialize the Windows App SDK runtime.
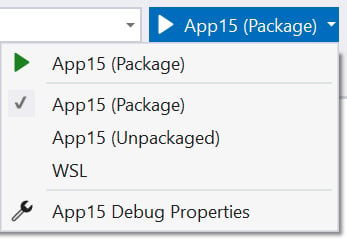
Once you make this change, you will notice that in the debugger drop-down menu, there will be a new entry with the name of your application followed by the (Unpackaged) suffix, as shown in the following screenshot:
Figure 1.9 – The debugger menu once you have configured a WinUI project to run unpackaged
By choosing the unpackaged version as the target and clicking on the button (or pressing F5), you will launch the unpackaged WinUI application with the debugger attached.
Adding support to an existing application
All the features of the Windows App SDK other than WinUI can also be used by existing applications. In this section, we're going to learn how to set up a Windows Forms or WPF application so that it can use the Windows App SDK features.
Regardless of the UI framework of your choice, remember that the Windows App SDK targets the new .NET runtime, so you will have to start with an application that targets at least .NET 5.
Here are the steps to follow:
- Change the
TargetFramework property to at least net5.0—windows10.0.19041.0 or, even better, net6.0—windows10.0.19041.0. If you have an existing Windows Forms or WPF application, you're already using the specific .NET runtime workload for a Windows app. You can verify this by double-clicking on your project in Visual Studio. The property should be equal to net5.0—windows or net6.0-windows. However, this version of the workload isn't enough for our needs. This workload gives you access to generic Win32 APIs such as registry access or event log interaction, but it doesn't include the specific Windows 10 APIs introduced with UWP. As such, we must switch to one of the specific Windows 10 workloads. This is what the property must look like:<TargetFramework>net6.0-windows10.0.19041.0
</TargetFramework>
- Install, through NuGet, the package called
Microsoft.WindowsAppSDK, which is a meta-package; this means that it doesn't actually include any libraries, but it will properly install all the packages that are required to use the Windows App SDK. The easiest way to install it is to right-click on your project in Visual Studio, choose Manage NuGet Packages, and look for the package called Microsoft.WindowsAppSDK.
- Specify the runtime and platforms supported by the project by adding the following entry in the
.csproj file:<Platforms>x86;x64;arm64</Platforms>
<RuntimeIdentifiers>win10-x86;win10-x64;win10-arm64
</RuntimeIdentifiers>
This is needed, since the Windows App SDK is a native dependency, and as such, a project that uses it can't be compiled with the generic AnyCPU architecture, but it must target a specific CPU platform.
Important Note
If you explore the content of the Windows App SDK meta-package, you might be tempted to install only a few of the sub-packages, based on the features you need. However, this isn't a supported scenario. You must always install the whole SDK, even if you aren't going to use all the available features.
The next step is different, based on the way you're going to deploy your application – packaged or unpackaged.
Distribution via a packaged app
If you want to leverage MSIX as a deployment technology, the next step is to add a WAP Project to your solution. At the time of writing, the single-project MSIX feature is supported only by WinUI apps, so you must continue using the WAP Project if you want to package an existing Windows Forms or WPF application. You can achieve this goal by right-clicking on your solution, choosing Add | New project, and selecting the template called Windows Application Packaging Project.
After you have given it a meaningful name, you must perform the following actions:
- Select the application you want to package. To do this, right-click on the project and choose Add | Project Reference, and then look for your solution's project that contains the application you're looking to package.
- Install the
Microsoft.WindowsAppSDK package from NuGet in this project. The package will add the build steps that are required to properly generate a package – for example, thanks to this package, you won't have to manually declare in the manifest the dependency from the Windows App SDK runtime, but it will be automatically added at compile time for you.
From now on, make sure to right-click on Windows Application Packaging Project in Solution Explorer and choose Set as startup project. You will always need to launch and deploy this project to run and debug your application.
Distribution via an unpackaged app
Unpackaged apps use the concept of dynamic dependencies to dynamically take a dependency on the Windows App SDK runtime. This is achieved by using a bootstrapper API, which must be called as the first step when an application starts so that it can properly reference the runtime and start using its APIs and components. If you're creating a new WinUI application using the dedicated template, the bootstrapper API is implicitly used when you add the WindowsPackageType property in a project's configuration. If you want to integrate the Windows App SDK in an existing Windows Forms or WPF application, you must instead manually invoke it. This class, called Bootstrap, is exposed by the Microsoft.Windows.ApplicationModel.DynamicDependency namespace.
Thanks to this class, you will have access to two critical methods needed to reference the Windows App SDK runtime:
Initialize(): This function must be called in the app's startup, passing a reference to the version of the Windows App SDK you want to use – for example, if you want to use the stable 1.0 release, you will have to pass 0x00010000 as the value. The bootstrapper will use this information to reference the version of the framework that matches the Windows App SDK version used in the application. The function also takes care of initializing the DDLM component, which makes sure that the operating system won't try to update the framework while any unpackaged app is using it.Shutdown(): This function must be called when the user quits the application or when you don't need to use any feature provided by the Windows App SDK anymore. This function cleans up the runtime reference and shuts down the DDLM so that Windows can update the framework if needed.
The way you call these functions depends on the platform you have chosen to build your Windows application. If you have a WPF application, you can take advantage of the OnStartup() and OnExit() event handlers available in the App class, as in the following example:
using Microsoft.Windows.ApplicationModel.DynamicDependency;
public partial class App : Application
{
    protected override void OnStartup(StartupEventArgs e)
    {
        Bootstrap.Initialize(0x00010000);
    }
    protected override void OnExit(ExitEventArgs e)
    {
        Bootstrap.Shutdown();
    }
}
In Windows Forms, you can instead leverage the Program class and call the Initialize() function before Application.Run(), calling Shutdown() immediately after:
static class Program
{
    /// <summary>
    ///  The main entry point for the application.
    /// </summary>
    [STAThread]
    static void Main()
    {
        Bootstrap.Initialize(0x00010000);
        Application.SetHighDpiMode
          (HighDpiMode.SystemAware);
        Application.EnableVisualStyles();
        Application.SetCompatibleTextRenderingDefault
          (false);
        Application.Run(new Form1());
        Bootstrap.Shutdown();
    }
}
Now that we have learned how to start a new project based on the Windows App SDK, let's see how we can enrich our project by creating new libraries and components.


 Free Chapter