


As you can imagine, there's more to JavaScript than simply hiding and showing elements. A powerful application is more than just a collection of script tags—JavaScript fits into an overall lifecycle and ecosystem, creating rich user experiences. We'll be diving into single-page applications (SPAs) using React in a Chapter 8, Working with Frameworks and Libraries, so, for now, let's set the stage.
If you're not familiar with the term SPA don't worry—you've already used at least a few without realizing that that's what they were. Perhaps you use Google's Gmail service. If you do, poke around at it a little bit and notice that the page doesn't appear to do hard refreshes to get information from the server. Instead, it communicates asynchronously with the server and dynamically renders content. There may be periods of waiting for content to load from the server that is often filled with a little spinning icon. The name for this underlying paradigm of loading content asynchronously from a server and sending data back is called Ajax.
Ajax, short for Asynchronous JavaScript and XML, is simply a collection of technologies and techniques used on the client side to streamline the user experience by allowing data to be fetched and sent in the background. We'll be discussing calling APIs from the frontend with Ajax a bit later, but for now, let's try a small example.
Our first Ajax application
First, we'll create a very simple Python script, using Flask. If you're not familiar with Flask yet, don't worry—we won't get into it in detail here.
Here's an example of an app.py script:
from flask import Flask
import os

app = Flask(__name__, static_folder=os.getcwd())


@app.route('/')
def root():
    return app.send_static_file('index.html')


@app.route('/data')
def query():
    return 'Todo...'
Here's our HTML with JavaScript (index.html):
<!doctype html>
<html lang="en">
<head>
<meta charset="utf-8">
<title>My Page</title>
</head>
<body>
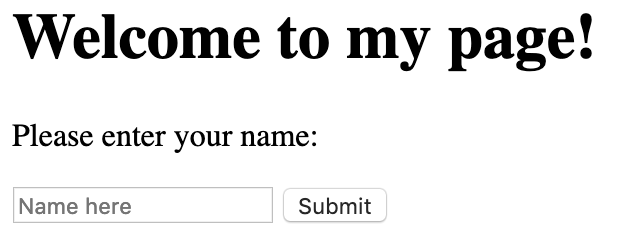
<h1 id="header">Welcome to my page!</h1>
<form>
<label for="name">Please enter your name:</label>
<input type="text" placeholder="Name here" name="name" id="name" />
<button type="submit" id="submit">Submit</button>
</form>
<script>
document.getElementById('submit').onclick = event => {
event.preventDefault()
fetch('/data')
.then(res => res.text())
.then(response => alert(response))
.catch(err => console.error(err))
}
</script>
</body>
</html>
Before we break this down, let's try to run it, by executing the following code:
$ pip install flask
$ export FLASK_APP=my_application
$ export FLASK_DEBUG=1
$ flask run
We should see the following screen:
Let's click Submit, and the following screen should appear:

We successfully displayed the text Todo… from Python in JavaScript! Let's take a quick look at how we did that.
Our base route (the / route) will serve our static index.html file. Great—now, we can see our HTML. But what about the second route, /data? It's simply going to return text. So far, it's not very different from any bare-bones Flask application.
Now, let's take a look at our JavaScript. There's one thing to note first and foremost: in our HTML file, we can wrap our JavaScript with <script> tags. While storing JavaScript in a separate file brought in with its own script tag (we'll get to that), it's convenient to include code directly in your HTML for small, quick, and non-production debugging purposes. There are times when you will insert code directly in your HTML file, but this does not happen often. For now, we'll break our best practices and play with the following snippet:
document.getElementById('submit').onclick = event => {
Hm. What is this cryptic line? It's the beginning of an ES6 arrow function. We'll dive into functions in more depth later, but for now, let's see what we can glean from this line, as follows:
- document.getElementById('submit'): By looking at our HTML, we can see there is an element with the ID attribute of 'submit': the button. So, first, we're looking for our button.
- .onclick: Here's an action verb for us. If you guessed that this function is designed to take action when a user clicks the button, you're correct.
As for the rest of the contents of the function, we can guess that we're doing something with an event—something regarding fetching data and then doing something with it. So, what's that something?
alert(response) is what we’re doing with it! An alert is just one of those annoying little pop-up messages you see in your browser, and, with the data from Flask, we displayed it in one of those! Again, not quite practical, but hopefully you can see where we're going: the frontend doesn't exist in a vacuum—we can communicate back and forth between the client-side and the server-side with just a few lines of code on either side.
We'll take a look at the fetch function in closer detail when discussing APIs, but for now, let's take a minute to look at what we've done so far with this exercise, as follows:
- We created a small web application using Python and Flask to serve a simple HTML page.
- This application also had an endpoint to serve a very simple message as its output: Todo….
- Using JavaScript, we took action when the user clicked the Submit button.
- Upon clicking the Submit button, JavaScript communicated with the Python application to request data.
- The returned data was displayed to the user in an alert window.
And that's it! We made our first successful Ajax call.
JavaScript in practice
Now that we've seen a hands-on example of how JavaScript can be used with Python, let's discuss its uses across the frontend spectrum. Spoiler alert: we'll be using JavaScript on the server side, starting in the next chapter. We encountered some cryptic commands in our Ajax example, so while it may be easy to overlook the use of and need for JavaScript, we see it's a real language with real applications.
Part of the beauty of JavaScript is its nearly universal adoption in browsers. Over time, JavaScript syntax and features have slowly evolved, but support for the different features, which were at one time wildly different between browsers, is now standardizing. Some differences still remain, however, but there are useful tools on the web that are kept up to date on the various features that browsers may or may not support. One of these sites is caniuse.com, and this is illustrated in the following screenshot:
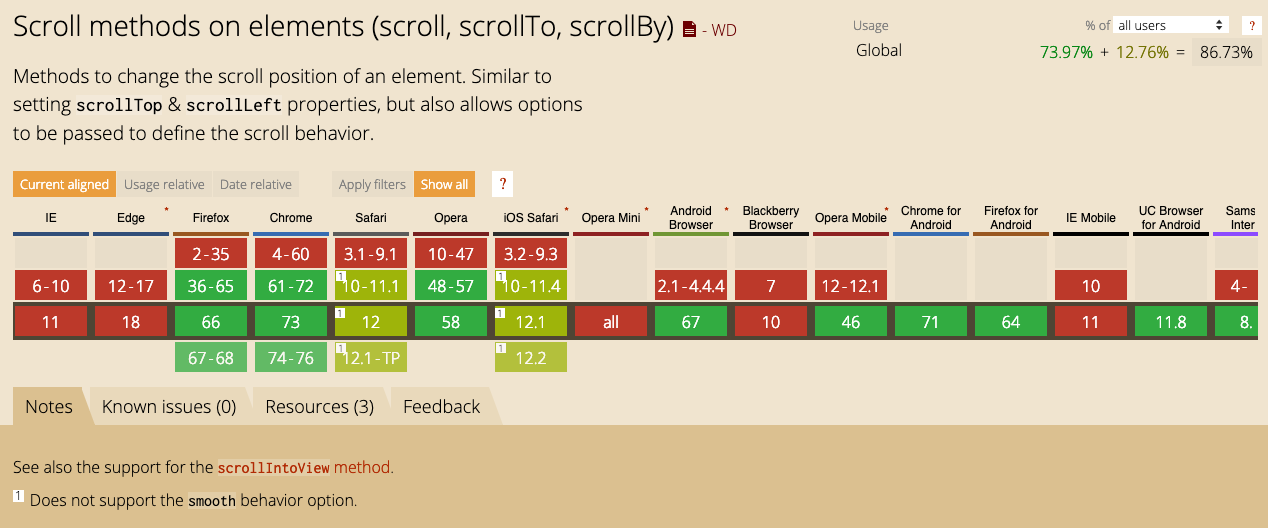
The various methods and properties of JavaScript are broken out in this site by various popular browsers in a matrix to show which are (and which are not) supported by each browser. In general, however, you won't need to worry too much about whether or not your code will run on a given browser unless you're using cutting-edge features.
Now, we've shown an example of JavaScript interacting with Python as our backend using Flask, but we can use practically any backend system, as long as it's prepared to accept inbound HTTP traffic. Python, PHP, Ruby, Java—the possibilities are all there, as long as the backend expects to be working with a frontend.
A note about libraries such as jQuery: we won't be using jQuery in this book. While useful for shortcuts and simplification of some methods, one of its major draws (at least for many developers such as myself) was its under-the-hood standardization of JavaScript between browsers. Remember that Ajax fetch call we made? It used to be the case that an Ajax call had to be written in two different ways, one for each main type of JavaScript interpreter. However, browser standardization has eased most of the cross-browser nightmares. jQuery still provides many tools that are useful, especially for the user interface (UI), such as plugins that make it unnecessary to write components from scratch. Whether or not you use jQuery or similar libraries is up to you or will be dictated by the project's needs. Libraries such as React, which we will be discussing, are designed to fill a very different need than libraries such as jQuery.


