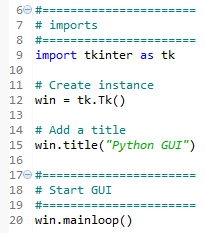
In line 9, we import the built-in tkinter module and alias it as tk to simplify our Python code. In line 12, we create an instance of the Tk class by calling its constructor (the parentheses appended to Tk turns the class into an instance). We are using the tk alias so we don't have to use the longer word tkinter. We are assigning the class instance to a variable named win (short for a window) so that we can access the class attributes via this variable. As Python is a dynamically typed language, we did not have to declare this variable before assigning to it, and we did not have to give it a specific type. Python infers the type from the assignment of this statement. Python is a strongly typed language, so every variable always has a type. We just don't have to specify its type beforehand like in other languages. This makes Python a very powerful and productive language to program in.
A little note about classes and types: In Python, every variable always has a type. We cannot create a variable that does not have a type. Yet, in Python, we do not have to declare the type beforehand, as we have to do in the C programming language.
Python is smart enough to infer the type. C#, at the time of writing this book, also has this capability.
Using Python, we can create our own classes using the class keyword instead of the def keyword.
In order to assign the class to a variable, we first have to create an instance of our class. We create the instance and assign this instance to our variable, for example:
class AClass(object):
print('Hello from AClass')
class_instance = AClass()
Now, the class_instance variable is of the AClass type.
If this sounds confusing, do not worry. We will cover object-oriented programming (OOP) in the coming chapters.
In line 15, we use the instance variable (win) of the class to give our window a title by calling the title() method, passing in a string.
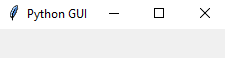
You might have to enlarge the running GUI to see the entire title.
In line 20, we start the window's event loop by calling the mainloop method on the class instance, win. Up to this point in our code, we have created an instance and set one attribute (the window title), but the GUI will not be displayed until we start the main event loop.
An event loop is a mechanism that makes our GUI work. We can think of it as an endless loop where our GUI is waiting for events to be sent to it. A button click creates an event within our GUI, or our GUI being resized also creates an event.
We can write all of our GUI code in advance and nothing will be displayed on the user's screen until we call this endless loop (win.mainloop() in the preceding code). The event loop ends when the user clicks the red X button or a widget that we have programmed to end our GUI. When the event loop ends, our GUI also ends.
This recipe used the minimum amount of Python code to create our first GUI program. However, throughout this book we will use OOP when it makes sense.
We've successfully learned how to create our first Python GUI. Now, let's move on to the next recipe.