
A label is a very simple widget that adds value to our GUI. It explains the purpose of the other widgets, providing additional information. This can guide the user to the meaning of an Entry widget, and it can also explain the data displayed by widgets without the user having to enter data into it.
Adding a label to the GUI form
Getting ready
We are extending the first recipe, Creating our first Python GUI. We will leave the GUI resizable, so don't use the code from the second recipe (or comment the win.resizable line out).
How to do it...
Perform the following steps to add a label to the GUI from:
- Start with the First_GUI.py module and save it as GUI_add_label.py.
- Import ttk:
from tkinter import ttk
- Use ttk to add a label:
ttk.Label(win, text="A Label")
- Use the grid layout manager to position the label:
.grid(column=0, row=0)
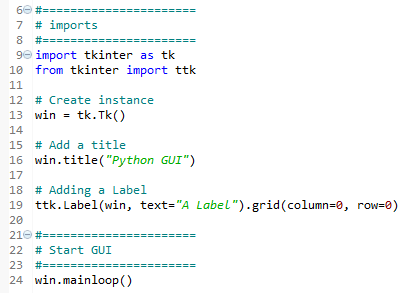
In order to add a Label widget to our GUI, we will import the ttk module from tkinter. Please note the two import statements on lines 9 and 10.
The following code is added just above win.mainloop(), which is located at the bottom of the first and second recipes (GUI_add_label.py):
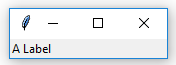
- Run the code and observe how a label is added to our GUI:
Let's go behind the scenes to understand the code better.
How it works...
In line 10 of the preceding code, we import a separate module from the tkinter package. The ttk module has some advanced widgets such as a notebook, progress bar, labels, and buttons that look different. These help to make our GUI look better. In a sense, ttk is an extension within the tkinter package.
We still need to import the tkinter package, but we need to specify that we now want to also use ttk from the tkinter package.
ttk stands for themed tk. It improves our GUI's look and feel. You can find more information at https://docs.python.org/3/library/tkinter.ttk.html.
Line 19 adds the label to the GUI, just before we call mainloop.
We pass our window instance into the ttk.Label constructor and set the text attribute. This becomes the text our Label will display. We also make use of the grid layout manager, which we'll explore in much more depth in Chapter 2, Layout Management.
Observe how our GUI suddenly got much smaller than in the previous recipes. The reason why it became so small is that we added a widget to our form. Without a widget, the tkinter package uses a default size. Adding a widget causes optimization, which generally means using as little space as necessary to display the widget(s). If we make the text of the label longer, the GUI will expand automatically. We will cover this automatic form size adjustment in a later recipe in Chapter 2, Layout Management.
Try resizing and maximizing this GUI with a label and watch what happens. We've successfully learned how to add a label to the GUI form.
Now, let's move on to the next recipe.