
ScrolledText widgets are much larger than simple Entry widgets and span multiple lines. They are widgets like Notepad and wrap lines, automatically enabling vertical scroll bars when the text gets larger than the height of the ScrolledText widget.
Using scrolled text widgets
Getting ready
This recipe extends the previous recipe, Using radio button widgets. You can download the code for each chapter of this book from https://github.com/PacktPublishing/Python-GUI-Programming-Cookbook-Third-Edition/.
How to do it...
By adding the following lines of code, we create a ScrolledText widget:
- Start with the GUI_radiobutton_widget.py module and save it as GUI_scrolledtext_widget.py.
- Import scrolledtext:
from tkinter import scrolledtext
- Define variables for the width and height:
scrol_w = 30
scrol_h = 3
- Create a ScrolledText widget:
scr = scrolledtext.ScrolledText(win, width=scrol_w, height=scrol_h, wrap=tk.WORD)
- Position the widget:
scr.grid(column=0, columnspan=3)
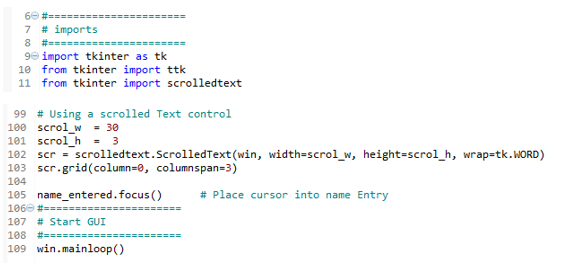
The preceding steps will finally produce the following code (GUI_scrolledtext_widget.py):
- Run the code. We can actually type into our widget, and if we type enough words, the lines will automatically wraparound:
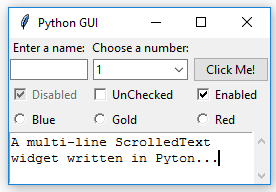
Once we type in more words than the height of the widget can display, the vertical scroll bar becomes enabled. This all works out of the box without us needing to write any more code to achieve this:

Let's go behind the scenes to understand the code better.
How it works...
In line 11, we import the module that contains the ScrolledText widget class. Add this to the top of the module, just below the other two import statements.
Lines 100 and 101 define the width and height of the ScrolledText widget we are about to create. These are hardcoded values we are passing into the ScrolledText widget constructor in line 102.
These values are magic numbers found by experimentation to work well. You might experiment by changing scol_w from 30 to 50 and observe the effect!
In line 102, we are also setting a property on the widget by passing in wrap=tk.WORD. By setting the wrap property to tk.WORD, we are telling the ScrolledText widget to break lines by words so that we do not wraparound within a word. The default option is tk.CHAR, which wraps any character regardless of whether we are in the middle of a word.
The second screenshot shows that the vertical scroll bar moved down because we are reading a longer text that does not entirely fit into the x, y dimensions of the ScrolledText control we created.
Setting the columnspan attribute of the grid layout to 3 for the ScrolledText widget makes this widget span all of the three columns. If we do not set this attribute, our ScrolledText widget would only reside in column one, which is not what we want.
We've successfully learned how to use scrolled text widgets. Now, let's move on to the next recipe.