
To develop the second BPEL process, we will follow similar steps as in the previous section, where we developed the first BPEL process. This process will be oversimplified too, but this and the previous process will present a solid basis for an even more sophisticated BPEL process, which we will create in Chapter 2, Service Invocation.
To start, double-click on the Bookstore composite in our existing project tree. This will open the SOA composite view, which shows the main building blocks (service components) of our application. So far, we have a BPEL process named
BookstoreABPEL, which is exposed as SOAP web service through a WSDL interface.Add a second BPEL process named
BookstoreBBPEL. To achieve this, drag-and-drop the BPEL Process component from the right-hand side toolbar to the Components space of the SOA composite:
Doing this will add the BPEL process component and immediately open the dialog box, where we need to specify the BPEL process name and other details, such as the BPEL version, XML namespace, select the process template, and define the service name. Again, use the BPEL 2.0 specification, name the process
BookstoreBBPEL, select the namespace from thepacktpub.comdomain, and select the Synchronous BPEL Process template, as shown on the following screenshot:
After clicking on OK, we will see the composite with the added BPEL process. On the left-hand side in the project tree, we can see that several artifacts have been generated, including the WSDL interface and the corresponding XSD (XML Schema).
We are now ready to implement the process. To do so, double-click on the
BookstoreBBPELcomponent represented by the blue rectangle. This will open the BPEL design perspective.Use the same schemas as in the
BookstoreABPELprocess. To achieve this, we can edit the WSDL file of theBookstoreBBPELprocess namedBookstoreB.wsdl. Let's double-click on the file, click on the source tab, and modify the import of the schema. Instead of using theBookstoreBBPEL.xsdfile, use theBookstoreBPEL.xsd. We also need to modify the XML namespace under the client namespace alias:
We also need to modify WSDL a little bit. We basically need to do the same changes as we did earlier in this chapter for the
BookstoreABPELprocess. To summarize, rename the operation name fromprocesstogetBookData. Modify both message elements toBookDataandBookDataResponserespectively, and modify the schema location to use theBookstoreBPEL.xsdfile:
Let's now go back to the
BookstoreBBPELprocess design window tab. In contrast to the first example, we will hardcode the response for a few predefined book ISSNs for which the BPEL process will return different stock quantities. For the 1111-1111 ISSN, it will return 10 books; for the 2222-2222 ISSN, it will return 20 books; for the 3333-3333 ISSN, it will return 30 books. For all other ISSNs, we will return five books.First, add the
<if>activity to the BPEL process by dragging-and-dropping the If icon from the lower-right side of the toolbar (look under Structured Activities). Drop the<if>activity between the receiveInput and replyOutput activities.As we have four choices that we need to cover, first add the two Else If branches. Click on the
<if>activity so that a big green plus sign will appear. Clicking on it will reveal Else If:
Let's now click on the Else If branch twice. Next, we need to add expressions, which will serve as the conditions for the if and elseif branches. Let's click on the first label. Name it
ISSN1.Next, right-click on the first if and select Edit. We could enter the condition directly, but will use the Expression Builder instead. Let's click on the Fx icon, to start Expression Builder.
In Expression Builder, use the equals operator to compare strings. Compare the ISSN within the
inputVariablepayload and compare it with the'1111-1111' string:
After clicking on OK, we will see the expression in the initial Edit If dialog box:

Enter other two conditions in the same way, first for the 2222-2222 ISSN, and 3333-3333 ISSN.
For each
<if>branch, we now have to add the corresponding<assign>activity, which will set the stock quantity output variable. We already know how to use the<assign>activity, as we have used it in the previous example. However, this time, set the stock quantity within the<if>activity only. Set the other parameter, theBookISSNin the output variable after the<if>activity, as it is the same for allifbranches.First, let's add the
<assign>by dragging-and-dropping the activity from the right-hand toolbar. It will appear as Assign1. Let's double-click on the Assign1 activity and create a copy rule, where we will copy the number 10 to the stock quantity: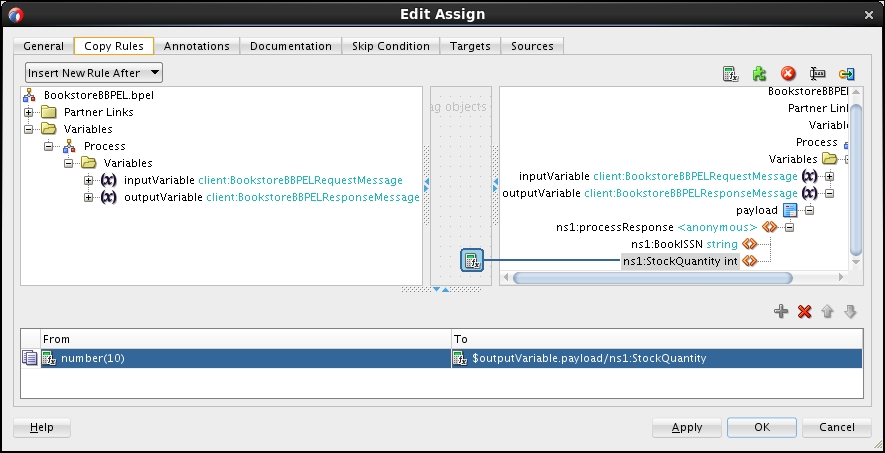
Let's now rename the Assign1 activity to a more meaningful name. We can do this under the General tab, as shown in the following screenshot:

Add the other three
<assign>activities to the BPEL process the same way. The first activity will assign the quantity of20, the second30, and the last (under theelsebranch) the quantity of5.Let's now add the final assign that will copy the
BookISSNfrom the input variable to the output variable. Add the assign after the<if>activity and before thereplyOutputactivity:
The assign will copy
BookISSNfrominputVariabletoBookISSNofoutputVariable. Please note that it would be the same if this assign activity would be added after the receive activity and before theifactivity, as shown in the following screenshot:
In the second BPEL example, we used the <if> activity, which is similar to the syntax of the if clause in other programming languages. Using the <if> activity, we can create branches in the BPEL process. In each branch, we used the corresponding <assign> activity to set the appropriate stock quantity.
We will say more about the <if> activity in the later chapters of this book. However, let's now look at the BPEL source code to get a feeling of how the source code looks like. As we've seen before, the process starts with a <receive> activity, which is responsible for receiving the input request, sent by the process client:

Next, the <if> activity starts. Each if and elseIf branch contains the condition, which is expressed as the XPath expression. Within the <if> branch, the <assign> activity is nested:

Please remember that we can always edit (or even write) the source code, which will reflect in the modified graphical representation and vice versa. We are not ready to write the BPEL code yet, but it is important to understand that the source code is the basis for the execution and that the graphical representation is created from the source code.
After the <if> activity, another <assign> is located. This assigns copies the BookISSN activity from the input to the output variable:

Finally, the process finishes with the <reply> activity. In this activity, the process returns the results to the client, which has invoked it. Remember that we selected a synchronous BPEL process, which always returns a reply. Later in this book, we will become familiar with asynchronous processes as well, which might not return responses:

We are now ready to deploy and test this BPEL process, which we will do in the next section.