
In order to use CloudFlare, you'll need to have a domain and also the access to change the DNS nameservers for it. It should not result in any downtime for your site.
First, we will add the site in CloudFlare and let it scan our DNS entries. After that completes, we will have to ensure that the DNS entries are valid by cross-referencing with our current DNS server. Finally, we will move the nameservers over to CloudFlare.
For this example, I'll be moving my domain letsgrababeer.com over to CloudFlare.
Getting CloudFlare set up is pretty simple as compared to most DNS providers. However, the terms used on the Internet to describe DNS are old, and as such, not the easiest to digest when you're new to them. The following are the important concepts behind DNS:
IP address: IP addresses are numeric addresses for computers. It's similar to a street address, and it tells computers where other computers are. When you go to any site, it's through an IP address. They usually look something like this: 74.125.224.72. In fact, that's actually Google's IP address; try typing it into your browser.
Domain Name System (DNS): DNS describes the entire process of making domain names route to IP addresses. For example, how www.google.com becomes 74.125.224.72.
Nameserver: This is a part of the DNS system that routes domain names to their IP addresses.
Domain name registrar: This is the server that tells us which nameservers are used with what domain. This is different than the nameserver. In our case, the domain name registrar will be the place we registered the domain (GoDaddy, Namecheap, and so on) and the nameserver will be CloudFlare.
DNS record: This is an individual part of a domain's DNS. DNS records allow you to have things like subdomains (for example, plus.google.com points to a different server than www.google.com). It also allows you to have an e-mail on the same domain as a website. The following is a list of the most common DNS record types:
A record: It uses a name to point to a specific IP address (for www.google.com it is 74.125.224.72)
CNAME record: This points a name to another name (for www.google.com it is google.com)
Mail Exchanger (MX) record: This defines whether a mail server needs to receive any e-mails sent to the domain.
Zone file: This is a list of DNS records. In our case, CloudFlare will contain the zone file for our domain.
Time To Live (TTL): It defines how long a computer should remember a DNS record before asking again.
Text (TXT): This is often used to add verification codes, anti-spam techniques, and other arbitrary text. It doesn't affect the domain's connectivity.
The following statement is from the RFC that defined the Internet Protocol:
A name indicates what we seek. An address indicates where it is. A route indicates how to get there. [RFC 791]
First create a CloudFlare account at www.cloudflare.com. Also, log in to your DNS provider and go to the DNS configuration page. This is most likely your domain registrar (GoDaddy, Namecheap, and so on), unless you have changed it. On my current DNS provider (Namecheap), this is the All Host Records tab. You should see things like A, CNAME, and MX records.
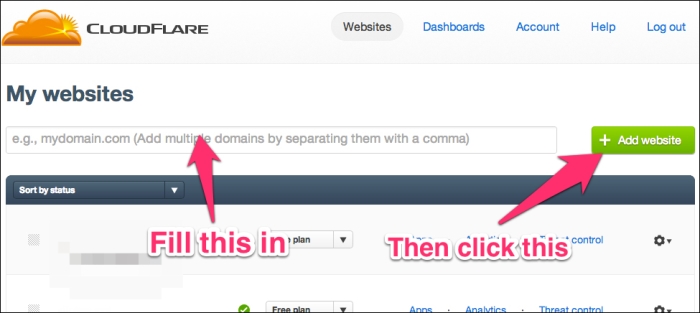
Begin the DNS transfer at https://www.cloudflare.com/my-websites. Fill in the textbox with your domain name and click on Add website:
Now CloudFlare is doing a scan of your DNS information so that it will be able to serve the traffic from CloudFlare's nameservers:

Click on Continue setup once that is completed.
You will now be at the DNS configuration screen:
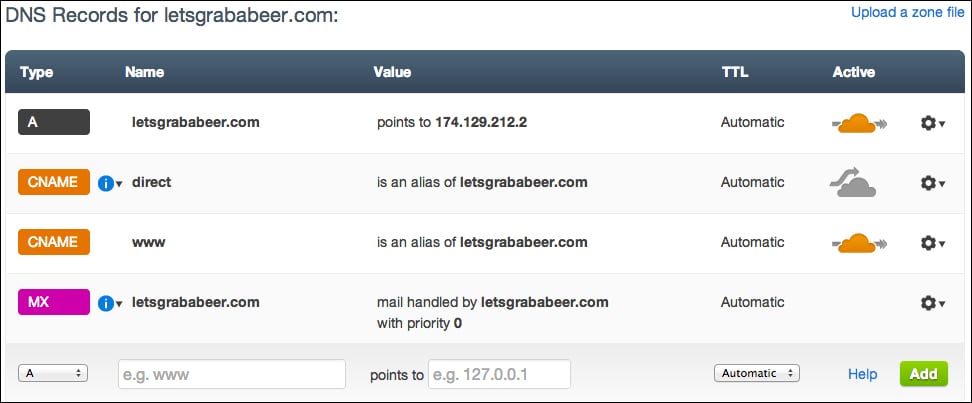
CloudFlare has grabbed all your DNS records from your current host. We call this a zone file. Each row here represents a different DNS record. Let's take a moment to analyze what each column of this table means:
Type: DNS record type (A, CNAME, MX, or TXT)
Name: The subdomain that will match to that record
Value: When a client requests a given name, this is the response they will receive. In the case of an A record, for example, it will return the IP address of the website.
TTL: Time to live defines how long the client will cache the record. Automatic is usually best here.
Active: This defines whether the request will be routed through CloudFlare for optimization or not.
Let me also bring up my current DNS configuration on my domain registrar. Here, we use Namecheap, so yours will look different depending on which you're currently with:

You'll see that this zone file is very simple. If it had more than just a single A record, I would want to make sure that it is included in CloudFlare's zone file before we switch over to use CloudFlare.
What is interesting here is that there are a few records that I have not specified in my old zone file that CloudFlare has added. They are as follows:
direct: CloudFlare provides a direct subdomain to access your site. This can be helpful in case you're having issues with CloudFlare. If I were to access direct.letsgrababeer.com instead of letsgrababeer.com, I would be directly accessing my site without going through CloudFlare. This can be helpful if you need to use FTP or for debugging.
www: This CNAME allows users to access letsgrababeer.com through www.letsgrababeer.com as well. It works like a redirect by saying that anything requesting
wwwwill receive the A record.mx: Since there was no mail server, CloudFlare added this record to allow mail to be received by the same web server at the A record.