
Analysis of a hostile program requires a safe and secure lab environment, as you do not want to infect your system or the production system. A malware lab can be very simple or complex depending on the resources available to you (hardware, virtualization software, Windows license, and so on). This section will guide you to set up a simple personal lab on a single physical system consisting of virtual machines (VMs). If you wish to set up a similar lab environment, feel free to follow along or skip to the next section (Section 6: Malware Sources).
Before you begin setting up a lab, you need a few components: a physical system running a base operating system of Linux, Windows, or macOS X, and installed with virtualization software (such as VMware or VirtualBox). When analyzing the malware, you will be executing the malware on a Windows-based virtual machine (Windows VM). The advantage of using a virtual machine is that after you finish analyzing the malware, you can revert it to a clean state.
Note
VMware Workstation for Windows and Linux is available for download from https://www.vmware.com/products/workstation/workstation-evaluation.html, and VMware Fusion for macOS X is available for download from https://www.vmware.com/products/fusion/fusion-evaluation.html. VirtualBox for different flavors of operating systems is available for download from https://www.virtualbox.org/wiki/Downloads.
To create a safe lab environment, you should take the necessary precautions to avoid malware from escaping the virtualized environment and infecting your physical (host) system. The following are a few points to remember when setting up the virtualized lab:
- Keep your virtualization software up to date. This is necessary because it might be possible for malware to exploit a vulnerability in the virtualization software, escape from the virtual environment, and infect your host system.
- Install a fresh copy of the operating system inside the virtual machine (VM), and do not keep any sensitive information in the virtual machine.
- While analyzing a malware, if you don't want the malware to reach out to the Internet, then you should consider using host-only network configuration mode or restrict your network traffic within your lab environment using simulated services.
- Do not connect any removable media that might later be used on the physical machines, such as USB drives.
- Since you will be analyzing Windows malware (typically Executable or DLL), it is recommended to choose a base operating system such as Linux or macOS X for your host machine instead of Windows. This is because, even if a Windows malware escapes from the virtual machine, it will still not be able to infect your host machine.
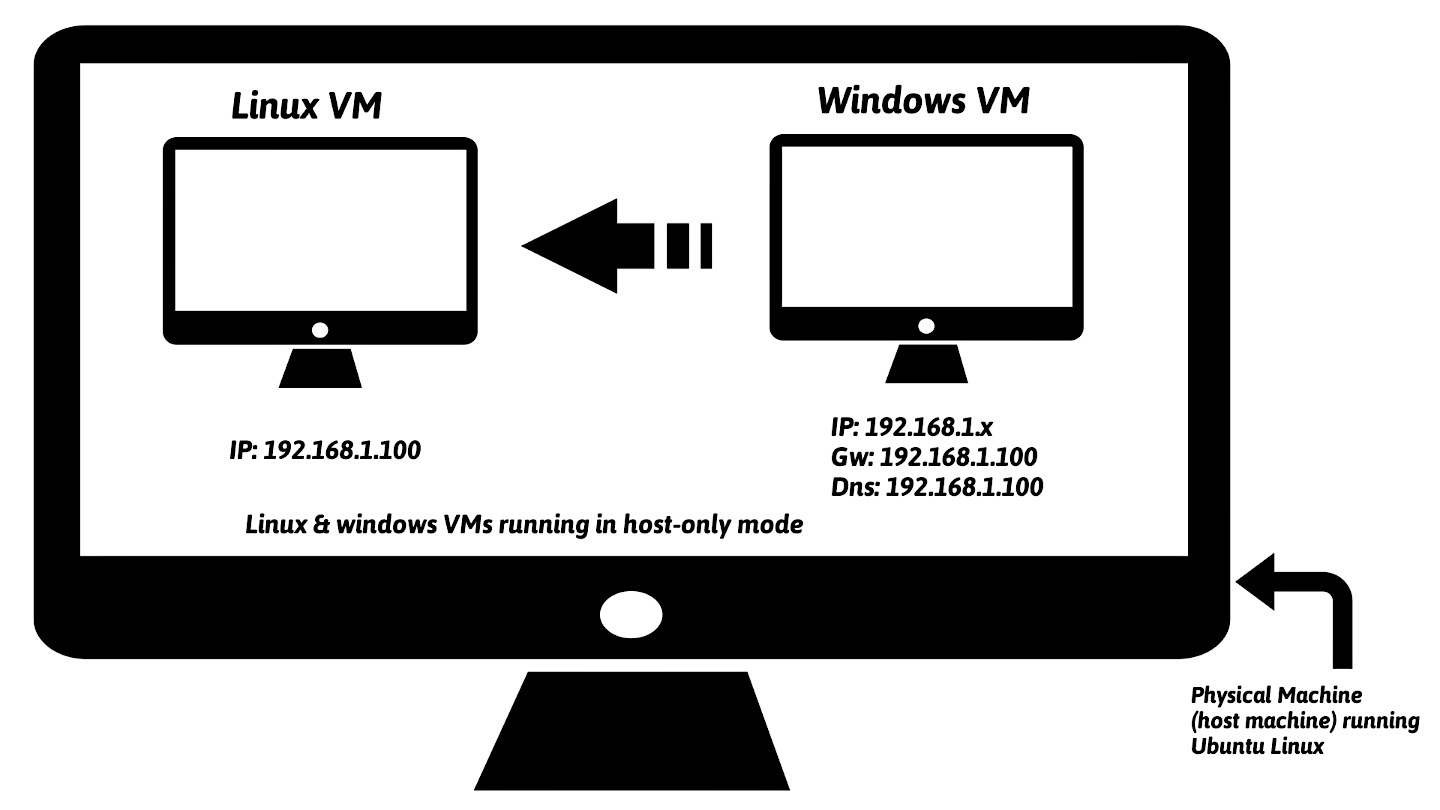
The lab architecture I will be using throughout the book consists of a physical machine (called host machine) running Ubuntu Linux with instances of Linux virtual machine (Ubuntu Linux VM) and Windows virtual machine (Windows VM). These virtual machines will be configured to be part of the same network and use Host-only network configuration mode so that the malware is not allowed to contact the Internet and network traffic is contained in the isolated lab environment.
Windows VM is where the malware will be executed during analysis, and the Linux VM is used to monitor the network traffic and will be configured to simulate Internet services (DNS, HTTP, and so on) to provide an appropriate response when the malware requests for these services. For example, the Linux VM will be configured such that when the malware requests a service such as DNS, the Linux VM will provide the proper DNS response. Chapter 3, Dynamic Analysis, covers this concept in detail.
The following figure shows an example of a simple lab architecture, which I will use in this book. In this setup, the Linux VM will be preconfigured to IP address 192.168.1.100, and the IP address of the Windows VM will be set to 192.168.1.x (where x is any number from 1 to 254 except 100). The default gateway and the DNS of the Windows VM will be set to the IP address of the Linux VM (that is, 192.168.1.100) so that all the Windows network traffic is routed through the Linux VM. The upcoming section will guide you to set up the Linux VM and Windows VM to match with this setup.
Note
You need not restrict yourself to the lab architecture shown in the preceding Figure; different lab configurations are possible, it is not feasible to provide instructions on every possible configuration. In this book, I will show you how to set up and use the lab architecture shown in the preceding figure.
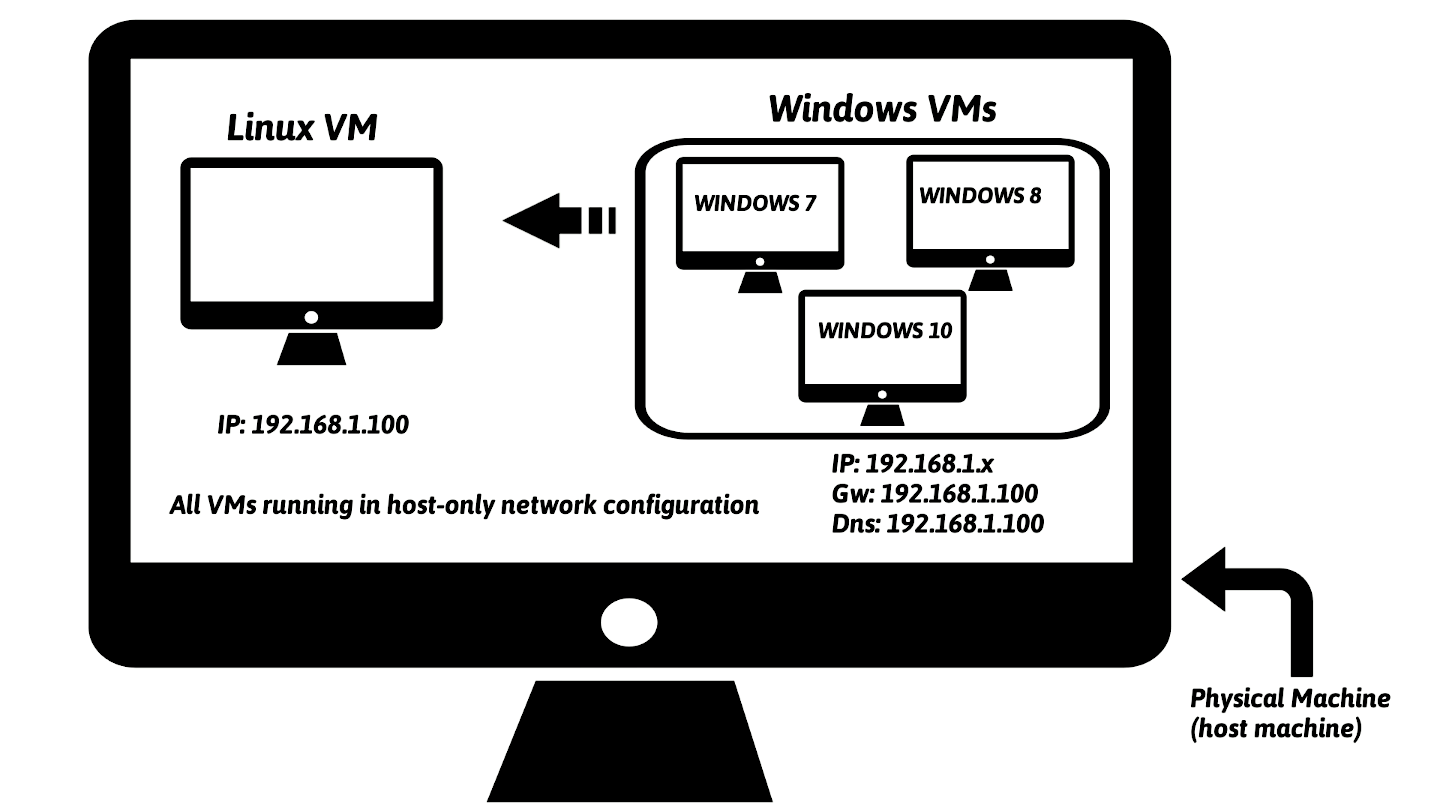
It is also possible to set up a lab consisting of multiple VMs running different versions of Windows; this will allow you to analyze the malware specimen on various versions of Windows operating systems. An example configuration containing multiple Windows VMs will look similar to the one shown in the following diagram:
To set up the Linux VM, I will use Ubuntu 16.04.2 LTS Linux distribution (http://releases.ubuntu.com/16.04/). The reason I have chosen Ubuntu is that most of the tools covered in this book are either preinstalled or available through the apt-get package manager. The following is a step-by-step procedure to configure Ubuntu 16.04.2 LTS on VMware and VirtualBox. Feel free to follow the instructions given here depending on the virtualization software (either VMware or VirtualBox) installed on your system:
Note
If you are not familiar with installing and configuring virtual machines, refer to VMware's guide at http://pubs.vmware.com/workstation-12/topic/com.vmware.ICbase/PDF/workstation-pro-12-user-guide.pdf or the VirtualBox user manual (https://www.virtualbox.org/manual/UserManual.html).
- Download Ubuntu 16.04.2 LTS from http://releases.ubuntu.com/16.04/ and install it in VMware Workstation/Fusion or VirtualBox. If you wish to install any other version of Ubuntu Linux, you are free to do so as long as you are comfortable installing packages and solving any dependency issues.
- Install the Virtualization Toolson Ubuntu; this will allow Ubuntu's screen resolution to automatically adjust to match your monitor's geometry and provide additional enhancements, such as the ability to share clipboard content and to copy/paste or drag and drop files across your underlyinghost machineand theLinux virtual machine. To install virtualization tools on VMware Workstation or VMware Fusion, you can follow the procedure mentioned at https://kb.vmware.com/selfservice/microsites/search.do?language=en_US&cmd=displayKC&externalId=1022525or watch the video at https://youtu.be/ueM1dCk3o58. Once installed, reboot the system.
- If you are using VirtualBox, you must install Guest Additions software. To accomplish this, from the VirtualBox menu, select
Devices|Insert guest additions CD imageRunto invoke the installer from the virtual CD. Authenticate with your password when prompted and reboot. - Once the Ubuntu operating system and the virtualization tools are installed, start the Ubuntu VM and install the following tools and packages.
- Install pip; pip is a package management system used to install and manage packages written in Python. In this book, I will be running a few Python scripts; some of them rely on third-party libraries. To automate the installation of third-party packages, you need to installpip. Run the following command in the terminal to install and upgradepip:
$ sudo apt-get update
$ sudo apt-get install python-pip
$ pip install --upgrade pip
The following are some of the tools and Python packages that will be used in this book. To install these tools and Python packages, run these commands in the terminal:
$ sudo apt-get install python-magic
$ sudo apt-get install upx
$ sudo pip install pefile
$ sudo apt-get install yara
$ sudo pip install yara-python
$ sudo apt-get install ssdeep
$ sudo apt-get install build-essential libffi-dev python python-dev \ libfuzzy-dev
$ sudo pip install ssdeep
$ sudo apt-get install wireshark
$ sudo apt-get install tshark
- INetSim (http://www.inetsim.org/index.html) is a powerful utility that allows simulating various Internet services (such as DNS, and HTTP) that malware frequently expects to interact with. Later, you will understand how to configure INetSim to simulate services. To install INetSim, use the following commands. The use of INetSim will be covered in detail in Chapter 3, Dynamic Analysis. If you have difficulties installing INetSim, refer to the documentation (http://www.inetsim.org/packages.html):
$ sudo su
# echo "deb http://www.inetsim.org/debian/ binary/" > \ /etc/apt/sources.list.d/inetsim.list
# wget -O - http://www.inetsim.org/inetsim-archive-signing-key.asc | \
apt-key add -
# apt update
# apt-get install inetsim
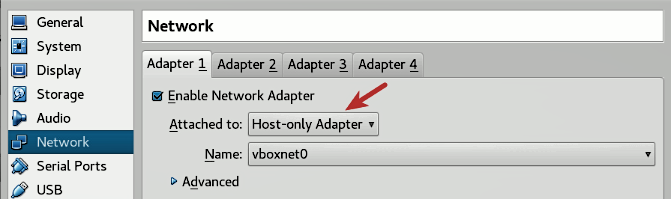
- You can now isolate Ubuntu VM within your lab by configuring the virtual appliance to use Host-only network mode. On VMware, bring up the
Network Adapter Settingsand chooseHost-only modeas shown in the following Figure. Save the settings and reboot.

In VirtualBox, shut down Ubuntu VM and then bring up Settings. Select Network and change the adapter settings to Host-only Adapter as shown in the following diagram; click on OK.
Note
On VirtualBox, sometimes when you choose the Host-only adapter option, the interface name might appear as Not selected. In that case, you need to first create at least one host-only interface by navigating to File| Preferences | Network | Host-only networks | Add host-only network. Click on OK; then bring up the Settings. Select Network and change the adapter settings to Host-only Adapter, as shown in the following screenshot. Click on OK.
- Now we will assign a static IP address of
192.168.1.100to the Ubuntu Linux VM. To do that, power on the Linux VM, open the terminal window, type the commandifconfig, and note down the interface name. In my case, the interface name isens33. In your case, the interface name might be different. If it is different, you need to make changes to the following steps accordingly. Open the file/etc/network/interfacesusing the following command:
$ sudo gedit /etc/network/interfacesAdd the following entries at the end of the file (make sure you replace ens33 with the interface name on your system) and save it:
auto ens33
iface ens33 inet static
address 192.168.1.100
netmask 255.255.255.0
The /etc/network/interfaces file should now look like the one shown here. Newly added entries are highlighted here:
# interfaces(5) file used by ifup(8) and ifdown(8)
auto lo
iface lo inet loopback

auto ens33
iface ens33 inet static
address 192.168.1.100
netmask 255.255.255.0
Then restart the Ubuntu Linux VM. At this point, the IP address of the Ubuntu VM should be set to 192.168.1.100. You can verify that by running the following command:
$ ifconfig
ens33 Link encap:Ethernet HWaddr 00:0c:29:a8:28:0d
inet addr:192.168.1.100 Bcast:192.168.1.255 Mask:255.255.255.0
inet6 addr: fe80::20c:29ff:fea8:280d/64 Scope:Link
UP BROADCAST RUNNING MULTICAST MTU:1500 Metric:1
RX packets:21 errors:0 dropped:0 overruns:0 frame:0
TX packets:49 errors:0 dropped:0 overruns:0 carrier:0
collisions:0 txqueuelen:1000
RX bytes:5187 (5.1 KB) TX bytes:5590 (5.5 KB)
- The next step is to configure INetSim so that it can listen to and simulate all the services on the configured IP address
192.168.1.100. By default, it listens on the local interface (127.0.0.1), which needs to be changed to192.168.1.100. To do that, open the configuration file located at/etc/inetsim/inetsim.confusing the following command:
$ sudo gedit /etc/inetsim/inetsim.confGo to the service_bind_address section in the configuration file and add the entry shown here:
service_bind_address 192.168.1.100
The added entry (highlighted) in the configuration file should look like this:
# service_bind_address
#
# IP address to bind services to
#
# Syntax: service_bind_address <IP address>
#
# Default: 127.0.0.1
#
#service_bind_address 10.10.10.1
service_bind_address 192.168.1.100
By default, INetSim's DNS server will resolve all the domain names to 127.0.0.1. Instead of that, we want the domain name to resolve to 192.168.1.100 (the IP address of Linux VM). To do that, go to the dns_default_ip section in the configuration file and add an entry as shown here:
dns_default_ip 192.168.1.100
The added entry (highlighted in the following code) in the configuration file should look like this:
# dns_default_ip
#
# Default IP address to return with DNS replies
#
# Syntax: dns_default_ip <IP address>
#
# Default: 127.0.0.1
#
#dns_default_ip 10.10.10.1
dns_default_ip 192.168.1.100
Once the configuration changes are done, Save the configuration file and launch the INetSim main program. Verify that all the services are running and also check whether the inetsim is listening on 192.168.1.100, as highlighted in the following code. You can stop the service by pressing CTRL+C:
$ sudo inetsim
INetSim 1.2.6 (2016-08-29) by Matthias Eckert & Thomas Hungenberg
Using log directory: /var/log/inetsim/
Using data directory: /var/lib/inetsim/
Using report directory: /var/log/inetsim/report/
Using configuration file: /etc/inetsim/inetsim.conf
=== INetSim main process started (PID 2640) ===
Session ID: 2640
Listening on: 192.168.1.100
Real Date/Time: 2017-07-08 07:26:02
Fake Date/Time: 2017-07-08 07:26:02 (Delta: 0 seconds)
 Forking services...
 * irc_6667_tcp - started (PID 2652)
 * ntp_123_udp - started (PID 2653)
 * ident_113_tcp - started (PID 2655)
 * time_37_tcp - started (PID 2657)
 * daytime_13_tcp - started (PID 2659)
 * discard_9_tcp - started (PID 2663)
 * echo_7_tcp - started (PID 2661)
 * dns_53_tcp_udp - started (PID 2642)
 [..........REMOVED.............]
 * http_80_tcp - started (PID 2643)
 * https_443_tcp - started (PID 2644)
 done.
Simulation running.
- At some point, you need the ability to transfer files between the host and the virtual machine. To enable that on VMware, power off the virtual machine and bring up the
Settings. SelectOptions|Guest Isolationand check bothEnable drag and dropandEnable copy and paste.Savethe settings.
On Virtualbox, while the virtual machine is powered off, bring up Settings | General | Advanced and make sure that both Shared Clipboard and Drag 'n' Drop are set to Bidirectional. Click on OK.
- At this point, the Linux VM is configured to use
Host-onlymode, and INetSim is set up to simulate all the services. The last step is to take a snapshot (clean snapshot) and give it a name of your choice so that you can revert it back to the clean state when required. To take a snapshot onVMware workstation, click onVM|Snapshot|Take Snapshot. OnVirtualbox, the same can be done by clicking onMachine|Take Snapshot.
Note
Apart from the drag and drop feature, it is also possible to transfer files from the host machine to the virtual machine using shared folders; refer to the following for VirtualBox (https://www.virtualbox.org/manual/ch04.html#sharedfolders) and to the following for VMware (https://docs.vmware.com/en/VMware-Workstation-Pro/14.0/com.vmware.ws.using.doc/GUID-AACE0935-4B43-43BA-A935-FC71ABA17803.html).
Before setting up the Windows VM, you first need to install a Windows operating system (Windows 7, Window 8, and so on) of your choice in the virtualization software (such as VMware or VirtualBox). Once you have Windows installed, follow these steps:
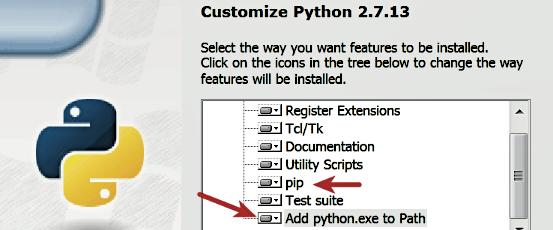
- Download Python from https://www.python.org/downloads/. Be sure to download Python 2.7.x (such as 2.7.13); most of the scripts used in this book are written to run on the Python 2.7 version and may not run correctly on Python 3. After you've downloaded the file, run the installer. Make sure you check the option to install
pipandAdd python.exe to Path, as shown in the following screenshot. Installing pip will make it easier to install any third-party Python libraries, and adding Python to the path will make it easier to run Python from any location.
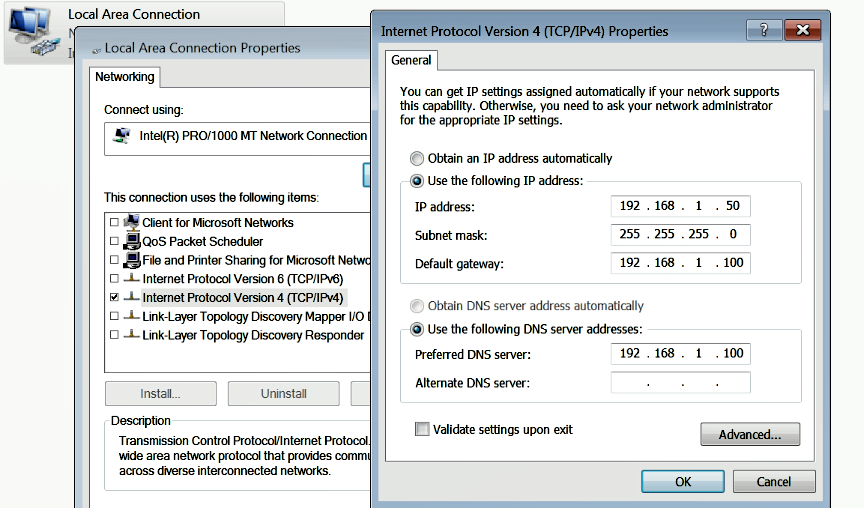
- Configure your Windows VM to run in
Host-onlynetwork configuration mode. To do that inVMwareorVirtualBox, bring up theNetwork Settingsand choose theHost-only mode; save the settings and reboot (this step is similar to the one covered in the Setting Up and Configuring Linux VM section). - Configure the IP address of the Windows VM to
192.168.1.x(choose any IP address except192.168.1.100because the Linux VM is set to use that IP) and set up yourDefault gatewayand theDNS serverto the IP address of Linux VM (that is,192.168.1.100), as shown in the following screenshot. This configuration is required so that when we execute the hostile program on the Windows VM, all of the network traffic will be routed through the Linux VM.
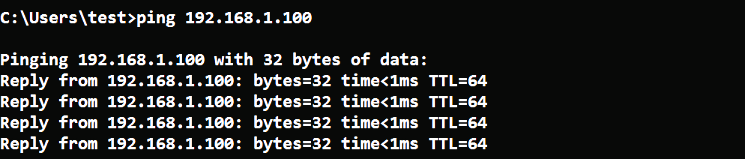
- Power on both the
Linux VMand theWindow VM, and make sure they can communicate with each other. You can check for the connectivity by running the ping command, as shown in this screenshot:
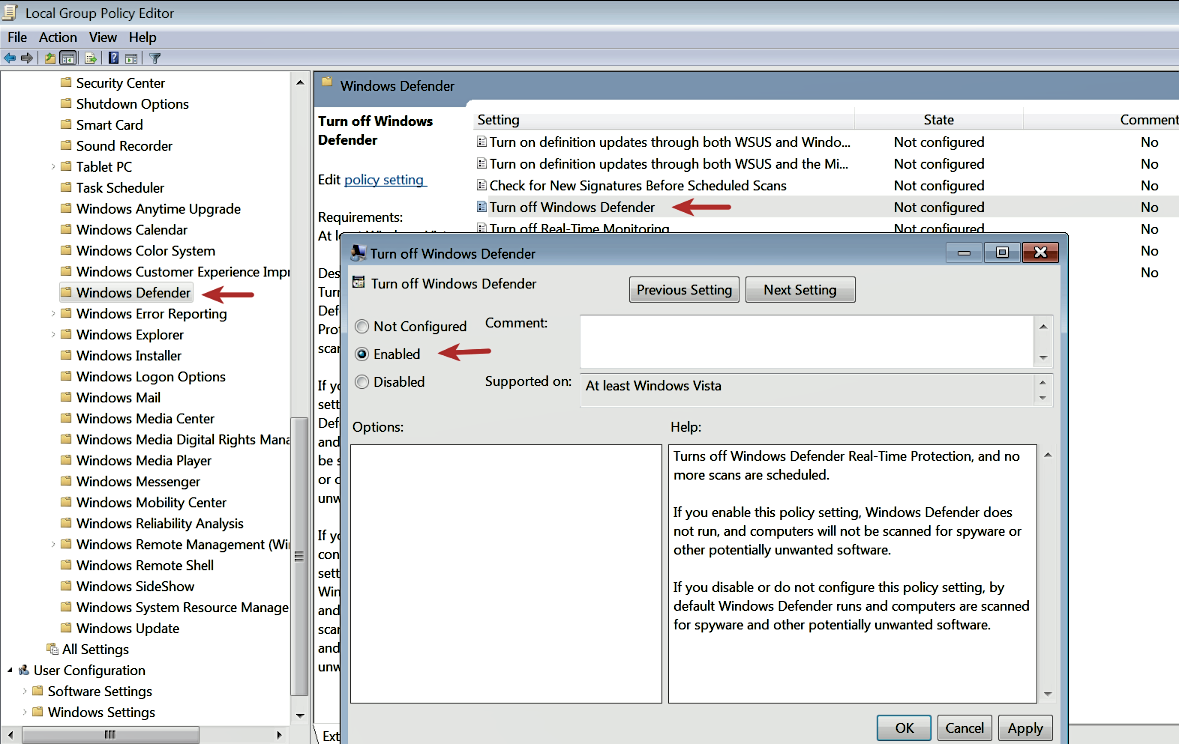
- Windows Defender Service needs to be disabled on your Windows VM as it may interfere when you are executing the malware sample. To do that, press the Windows key + R to open the Run menu, enter gpedit.msc, and hit
Enterto launch theLocal Group Policy Editor. In the left-hand pane ofLocal Group Policy Editor, navigate toComputer Configuration|Administrative Templates|Windows Components|Windows Defender. In the right-hand pane, double-click on theTurn off Windows Defender policyto edit it; then selectEnabledand click onOK:
- To be able to transfer files (drag and drop) and to copy clipboard content between the host machine and the Windows VM, follow the instructions as mentioned in Step 7 of the Setting Up and Configuring Linux VM section.
- Take a clean snapshot so that you can revert to the pristine/clean state after every analysis. The procedure to take a snapshot was covered in Step 10 of the Setting Up and Configuring Linux VM section.
At this point, your lab environment should be ready. The Linux and Windows VMs in your clean snapshot should be in Host-only network mode and should be able to communicate with each other. Throughout this book, I will be covering various malware analysis tools; if you wish to use those tools, you can copy them to the clean snapshot on the virtual machines. To keep your clean snapshot up to date, just transfer/install those tools on the virtual machines and take a new clean snapshot.