
In this section, we will explain what a Caesar cipher is and how to implement it in Python. Then, we will consider other shift values, modular arithmetic, and ROT13.
A Caesar cipher is an ancient trick where you just move every letter forward three characters in the alphabet. Here is an example:
- Plaintext:
ABCDEFGHIJKLMNOPQRSTUVWXYZ - Ciphertext:
DEFGHIJKLMNOPQRSTUVWXYZABC
So, HELLO becomes KHOOR.
To implement it, we're going to use the string.find() method. The interactive mode of Python is good for testing new methods, hence it's easy to create a string. You can make a very simple script to implement the Caesar cipher with a string namedalphafor alphabet. You can then take input from the user, which is the plaintext method, then set a value,n, which equals the length of the string, and the string out is equal to an empty string. We then have a loop that goes throughnrepetitions, finding the character from string in and then finding the location of that character in the alpha string. It then prints out those three values so that we can make sure that the script is working correctly, then it adds3to loc(location) and puts the corresponding character in string out, and again prints out partial values so that we can see that the script is working correctly. At the end, we print our final output. Adding extra print statements is a very good way to begin your programming because you can detect mistakes.
Let's go ahead and open the Terminal and follow these steps to implement Caesar cipher in Python:
- We will use Python in interactive mode first and then make a string that just has some letters in order to test this method:
>>> str = "ABCDE"
>>> str.find("A")
0
>>> str.find("B")
1
>>> exit()
- Because we understand how the string methods work, we'll exit and go into the
nanotext editor to look at the first version of our script:
$ nano caesar1.py- When you run the command, you will get the following code:
alpha = "ABCDEFGHIJKLMNOPQRSTUVWXYZ"
str_in = raw_input("Enter message, like HELLO: ")

n = len(str_in)
str_out = ""

for i in range(n):
   c = str_in[i]
   loc = alpha.find(c)
   print i, c, loc,
   newloc = loc + 3
   str_out += alpha[newloc]
   print newloc, str_out

print "Obfuscated version:", str_out
You can see the alphabet and the input from the user in the script. You calculate the length of the string, and for each character, C is going to be the one character on processing, loc will be the numerical location of that character, newloc will be loc plus 3, and we can then add that character to string out. Let's see this.
- Leave using Ctrl+X and then enter the following command:
$ python caesar1.py- When you run this command, you will get the following output:
Enter message, like HELLO:- If we enter
HELLO, it prints out the correct answer ofKHOOR:
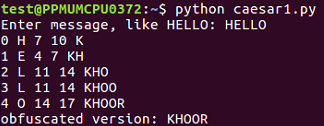
When we run this script, it takes the input of HELLO and it breaks it up character by character so that it processes each character on a separate line. H is found to be the 7th character, so adding 3 gives me 10, which results in K. It shows us character by character how it works. So, the first version of the script is a success.
To clean the code further, we will remove the unnecessary print statements and switch to a shift variable. We will create a variable shift variable. Which also comes from raw inputs, but we have to convert it to an integer because raw input is interpreted as text as you can't add text to an integer. This is the only change in the script that follows. If you give it ashiftvalue of3, you getKHOOR; if you give it ashiftvalue of10, you getROVVY; but if you put in ashiftvalue of14, it crashes, saying string index out of range. Here, the problem is, we've added multiple times to theloc variable, and eventually, we move pastZ, and the variable is no longer valid. In order to improve that, after adding something to the variable, we'll check to see whether it's greater than or equal to26, and whether 26 can be subtracted from it. Once you run this, you can use a shift of14, which will work. We can use a shift of24, and it works too. However, if we use a shift of44, it's out of range again. This is because just subtracting26once when it's over26is not really enough, and the right solution here is modular arithmetic. If we put% 26, it will calculate the number modulus26, which will prevent it from ever leaving the range of0through25. It will divide it by26and keep only the remainder, as expected in this case. We're going to see the modular function many more times as we move forward in cryptography. You can put in anyshift value of your choice, such as 300, and it will never crash, but will turn that into a number between0and25.
Let's see how the script works with other shift values:
- Take a look at the script Caesar:
$ nano caesar2.py- When you run it, you will get the following:

- This is the script that allows us to vary the
shiftvalue but does not handle anything about theshiftvalue getting too large. Let's run the following command:
$ python caesar2.py- If you enter
HELLOand give it a shift of3, it's fine, but if we run it again and give it a shift of20, it crashes:

So, as expected, there are some limitations in this one.
- Let's move on to
caesar3:
$ nano caesar3.py- After running it, we get the following output:
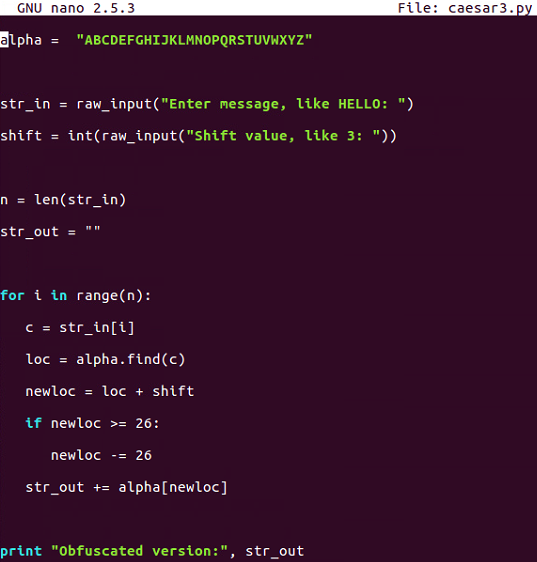
Caesar3 attempts to solve that problem by catching it if we know that the addition causes it to be greater than or equal to 26 and subtracting 26 from it.
- Let's run the following command:
$ python caesar3.py- We will give it
shiftcharacters and ashiftof20, and it will be fine:

- If we give it a shift of
40, it does not work:
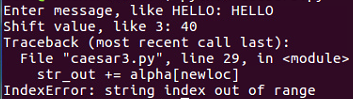
There is some improvement, but we are still not able to handle any value of shift.
- Let's go up to
caesar4:
$ nano caesar4.py- When you run the command, you will get this:
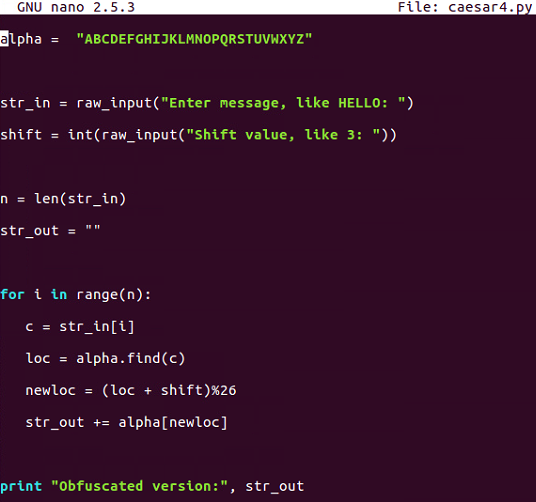
This is the one that uses modular arithmetic with the percent sign, and that's not going to fail.
- Let's run the following command:
$ python caesar4.py- When you run the command, you will get this:
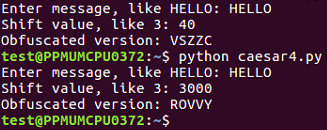
This is the script that handles all the values of the Caesar shift.
ROT13 is nothing more than a Caesar cipher with a shift equal to 13 characters. In the script that follows, we will hardcode the shift to be13. If you run one cycle of ROT13, it changesHELLOtoURYYB, and if you encrypt it again with the same process, putting in thatURYYB, it'll turn back intoHELLO, because the first shift is just by13characters and shifting by another13characters takes the total shift to26, which wraps right around, and that is what makes this one useful and important:
- Now let's look at the ROT13 script using the following command:
$ nano rot13.py- When you run the preceding command, you can see the script file:
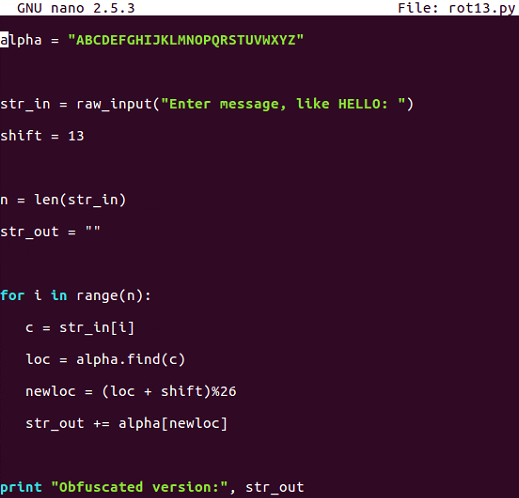
- It's just exactly equal to our last Caesar cipher shift, with a script with a shift of
13. Run the script as shown here:
$ python rot13.pyThe following is the output:

- If we enter the message
URYYBand run that, it turns back intoHELLO:

This is important because there are quite a few cryptographic functions that have this property; where you encrypt something once and encrypt it again, you reverse the process. Instead of making it more encrypted, it becomes unencrypted. In the next section, we will cover base64 encoding.