
The Provisioning Services infrastructure allows computers to be provisioned from a single shared image. This technology is widely used in XenDesktop, the desktop virtualization product by Citrix. System administrators prepare a small pool of images and, using Provisioning Services, deploy them to the users. Provisioning Services also becomes very helpful in a XenApp infrastructure, when you need to deploy several session host servers.
The use of this technology offers many benefits. With Provisioning Services, system administrators create and maintain a small number of images (or a single image if all the applications are installed on all the servers) for their servers. If a new application has to be published or an update for an installed application is available, the administrator only has to modify the "master" image and when servers reboot, the change will be deployed on every farm. Server consistency is so assured that there's no risk that some of your servers weren't updated or still run the older version of the application. You may also perform a test of the new image assigning it to a couple of test servers and, if everything is ok, deploy it to the production servers.
If something goes wrong (the updated application doesn't work, an installed patch conflicts with some other component, and so on) and you kept the previous version of the image, a rollback is very easy. Just assign the old image to your servers and reboot them.
Provisioning Services also help to reduce storage costs. The image is streamed via network from a central repository; a local storage is usually required for runtime data caching, but in some scenarios you can remove it entirely.
The use of Provisioning Services certainly requires some more effort during the installation phase, but from my experience I suggest you to consider using this feature if your farm has more than 5 to 10 servers. The time you spend to deploy the Provisioning Services infrastructure is less than the time you would spend for the daily tasks to maintain your farm. In the following sections, you will learn the key concepts of this technology; for a real implementation, please refer to the Citrix documentation.
The Provisioning Services infrastructure is composed by several components.
At a minimum, you need:
A license server; it could be the same license server in your XenApp farm.
A database; you can place Provisioning Services database on the same database server that hosts your farm's data store.
One or more Provisioning Servers; these run stream services, the software used to stream virtual images to provisioned servers.
A store, where the images of your servers are saved. You can place the store on the Provisioning Servers or on an external file server.
The following diagram displays the Provisioning Services infrastructure:
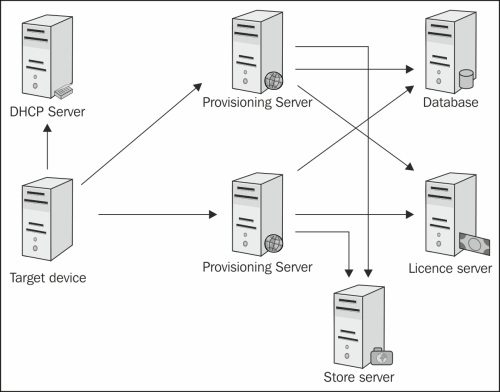
High level view of a PS infrastructure
A Provisioning Services infrastructure is logically divided into a hierarchy of items.
When you install your first Provisioning Server (PVS), a new farm is created. Do not confuse this farm with the farm of your XenApp infrastructure; they don't share configurations or items. A Provisioning Services farm may serve more XenApp and XenDesktop farms.
A farm contains three major components:
Sites
Views
Stores
Provisioning Services sites allow administrators to logically group items that belong to the same physical site (for example, all the resources located in the headquarters or in a branch office). You need at least one site, which is created when you install your first Provisioning Server. Administrators may create different sites to delegate administrative tasks. You can indeed create accounts that can only administer items in a given site.
A site contains some elements, the most important of them are:
A target device belongs to one device collection. Views provide an alternative method for grouping and managing target devices; a target device may indeed belong to different views. You can create views at farm level or at site level; a view at site level may only contain devices from the same site, while views at farm level may contain all the target devices in that farm.
You can perform some administrative tasks at view level, so views become useful with a large number of target devices. For example, you can reboot all the session host servers that publish an application adding them to a view and issuing the Restart... command at the view folder.
A store is a storage location where you save your vDisks. It may be a local hard disk or a network share.
vDisks are disk image files. They consist of a .vhd file (contains the data of the virtual disk), any properties files (.pvp, contain disk geometry, and configuration), and, if applicable, a chain of differencing disks (.avhd).
vDisks may be configured in the following two modes:
In shared image mode, target devices can only read the content of the vDisk. Write requests can be cached in four different ways as follows:
In cache on device hard drive option, write requests are cached on a local hard drive of the target. This is the most common setup, as it frees up the Provisioning Server and doesn't require a large amount of RAM memory. Target servers must have a local hard drive.
In cache in device RAM option, write requests are cached in the target device's memory. This is the fastest method for caching but consumes memory of the target device, reducing the total memory available for running applications.
In cache on a server option, write requests are handled by the Provisioning Server and cached on a temporary file; in the Store properties you can set the location of these files. This method should be used only if the target device doesn't have a local storage because it increases the network usage and the Provisioning Server load.
All the previous options are volatile; write cache is lost when the target device reboots. With the cache on a server persistent option, you can set the cache file to be persistent: Provisioning Server creates a cache file for each target device and doesn't clean it if the target reboots. A drawback is that any changes to the original vDisk invalidate all the cache files.
Note
Invalid cache files are not automatically deleted. Remember to periodically check if any exist and manually delete them to free some space.
The following screenshot displays the different ways of caching write requests to disks:
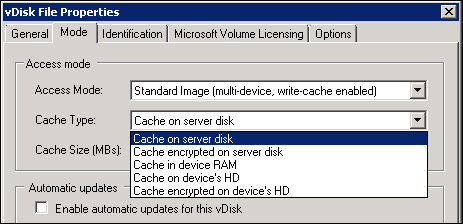
vDisk modes
When a target device boots, it first needs a bootstrap program, a small software that runs before the operating system. Provisioning Services use a particular bootstrap program to set up the streaming session with a Provisioning Server. Through this session the target device is then able to receive the assigned vDisk and boot the operating system.
Provisioning Services supports three ways to send the bootstrap program to a target device:
The most common configuration is the use of a DHCP server. You can configure an existing DHCP server in your network or use the DHCP server provided with the Provisioning Server.
The boot process in this scenario is performed in the following three steps:
The target device requests an IP address from the DHCP server. The response includes the scope options 66 and 67 with the name and the location of the bootstrap file.
Using Trivial File Transfer Protocol (TFTP), the target device requests the bootstrap file from the Provisioning Server. This downloads it to the target.
The target device establishes a stream session with the Provisioning Server and boots the assigned vDisk.

Boot steps of a target device
As an alternative to network booting, you can use Citrix Boot Device Manager to create a bootstrap file on a USB flash device or a CDROM.
Begin by building a XenApp master server. A best practice is to choose the session-host only mode during the XenApp installation. Join the server to your farm or use the wizard to create a new farm if this is the first server you deploy. Install all the needed applications and publish them to your users.
Launch the Citrix XenApp Server Role Manager, select Edit Configuration | Prepare this server for imaging and provisioning as shown in the following screenshot:
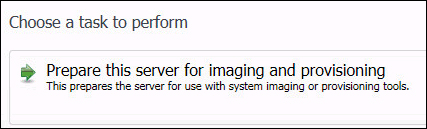
Preparing the server for imaging and provisioning
Choose to remove the server from the farm but don't choose to clear the database location unless you plan to create an Active Directory policy to configure it.
Now, install the Provisioning Services Target Device software. At the end of the setup, the Imaging Wizard should start automatically. If not, run it from the Provisioning Services folder in the Start menu.
First, you need to connect to your PVS farm; enter the name (or the IP address) of one of the servers in your farm and the network port. If you're running the wizard with a user that can administer the farm, choose to use the Windows credentials, otherwise enter the appropriate credentials.
PVS can configure and manage Windows licensing. Choose the licensing method (none, KMS, or MAK) you deployed in your infrastructure.
The Imaging Wizard can create a new vDisk for you; as an alternative, if you've previously created an empty vDisk, you can choose it.
The final step is to create a target device in your PVS farm that corresponds to the server you're running the wizard on. Select the name of the device, the MAC address associated with the NIC you chose during the installation of the target device software, and the collection to add the device to.
Review the information, then click on Finish to start the conversion process. After some minutes your vDisk will be ready to use; just remember to change the access mode to Standard image before booting new servers with it.
You can manually create new session host servers (for example, from the vSphere client if you're on a VMware infrastructure) or use the Streamed VM Setup wizard from the PVS console to create your servers at once. The wizard supports XenServer, Microsoft Hyper-V, and VMware vSphere.
If you need to modify the vDisk, make a copy, change the mode to Private, and assign it to a server. Boot the server, perform the changes, and before shutting it down, remember to launch the Prepare server again for the imaging and provisioning wizard.