
Citrix offers a complete solution to perform load tests in XenApp and XenDesktop environments: Citrix EdgeSight for Load Testing.
This product is available on the Citrix website; at the moment I'm writing the latest version, 3.8.1.
Note
You need a valid XenApp license to download and run the product. It's included in the Enterprise or Platinum version
Using EdgeSight for Load Testing, you are able to simulate real user sessions to analyze how your farm performs with different loads; it's a very helpful tool to correctly design your infrastructure.
EdgeSight for Load Testing has two components:
The following screenshot displays the EdgeSight for Load Testing components:
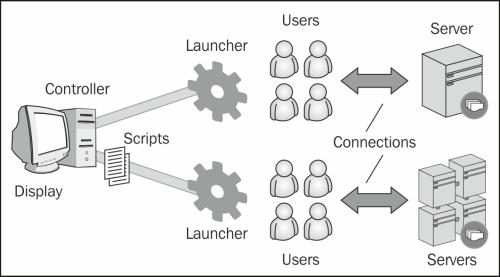
EdgeSight for Load Testing components
You need to change the remote desktop services configuration on the session host servers on which load tests will be applied, using the Remote Desktop Session Host Configuration tool.
It's very common to use the Citrix Web Interface to provide users a portal where they may view and run their applications. If you want to test this component with EdgeSight, you need to install on the server an optional component named Web Interface Support that hosts the Web Interface, included in the EdgeSight for Load Testing setup package.
Using this component, simulated users will be able to log on to the Web Interface, retrieve the published application you want to test, and run it.
You may install both Controller and Launcher on the same test machine, or you may install Launcher on dedicated servers. If you need to simulate a large number of users, the second scenario is preferable; if the test machine is under high load, test results may be mistaken.
The system requirements are as follows:
2 GHz or faster CPU
1 GB RAM
1 GB of free disk space
Windows Vista, Windows 7, or Windows Server 2003, 2008, or 2008 R2
The Launcher requires ICA Client, version 10 or later for testing XenApp systems and version 12 or later for testing XenDesktop systems.
The Controller must be able to connect to Launchers on port TCP/18747 and to connect to your license server (default port is TCP/27000).
Before being able to run any tests, you need to configure your license server. When a test is performed, the Controller checks for a valid XenApp Enterprise or Platinum license. If a license is found, you can run as many users as required.
Open the Controller, in the toolbar you can find a button to open the Licensing Server Configuration dialog, enter the address and the port number of your license server and click on OK.
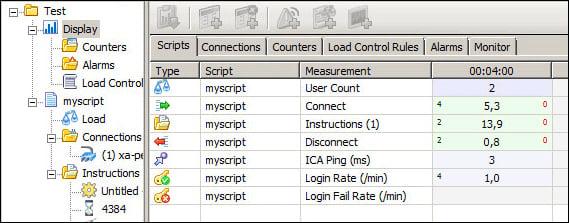
A script is a single part of a test; it defines the following:
The actions (instructions) that will be performed
The users that will perform the actions
Where (connections) the actions will be performed
How many users and how long the test will last (load)
To create a new script, select Test – Add script....
In your script, you need to define how users will connect to your XenApp infrastructure.
Right-click on the Connections node and select Add connection...; enter the name of the Launcher server from which connections will begin.
If you want to connect to a published desktop, select Server and enter the server name in the Connect To field.
If you prefer to launch an application through the Citrix Web Interface, select Web Interface and click on the Browse... button.
Insert the address of the server that hosts the Web Interface. You usually don't need to change the port number (80 is the default) or Login and Application Page addresses (you selected those addresses when you installed the Web Interface Support component). Enter the account details of a user that could connect and click on Search.
In the Applications tab, you should see all the applications published for that user, select the application your script will test and click on Select.
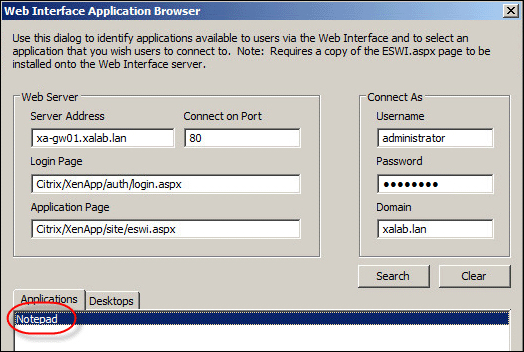
Creating a connection to the Web Interface
For each connection you created, you have to define virtual users. Virtual users are used by Launchers to perform the test. You have to create the users, (usually in your Active Directory) and enable them to connect to your farm, and launch the application(s) you want to test.
If you named your test users like:
testuser1
testuser2
testuser3, and so on
with the same password, the Add Users to Connection dialog helps you to add them at one time. Enter the number of the users to be added in the Count field, then type the base username in the Username field and tick the # checkbox.
Complete the Password and Domain fields and click on OK, EdgeSight will add all the users for you as shown in the following screenshot:
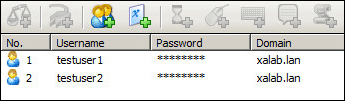
Adding new virtual users
The load defines how long a test will last, how many users will execute it, and at what rate users connect to the server.
If you select the Concurrency checkbox, the system attempts to maintain a given number of virtual users during the test, ramping their count between the start and end values.
If you select the Rate checkbox, the system attempts to create new virtual users at the rate specified.
The easiest way to define the actions virtual users will perform is to record them during an interactive session.
You may select the user that will connect to the server by left-clicking on the user's icon or let the system choose the first user for you.
Select the Instructions folder and click on the Record Test button. The recording session begins and EdgeSight records all the commands you enter. The session ends when you close the connection or if you click on Stop/Cancel Test button in the main toolbar. If you stop a recording, you can restart it by clicking on the Continue button, while if you cancel it, no instructions are saved.
At the end of the recording, instructions are listed in the Instructions folder.
You can change the recorded instructions or add new ones. Instructions are keyboard/mouse commands or even complex Jscript scripts. You can also group instructions in folders and add breakpoints for debugging.