
VXLANs are great, but they don't work out of the box. In the following sections, we discuss how to set them up.
As you already have vCloud set up, you must have a vCloud Network and Security appliance (vCNS) deployed (formally known as vShield), and it should be configured to use your vCenter. For this recipe, you will need to be able to log in to the vCNS appliance with an administrator account.
Additionally, we need a VLAN on which the VXLANs will exist, and having a DHCP in that VLAN makes things easier. If no DHCP is accessible on this VLAN, you will need to provide one IP address per ESXi server in this VLAN.
The Segment ID you have to enter in step 14 in the How to do it… section is rather important, especially when you have multiple vCNS or vCloud installations (not multiple cells). Each of these installations should have a different range. If this is your first VXLAN installation, just use the range that is supplied in the steps.
Last but not least, you should have a multicast address range (see http://en.wikipedia.org/wiki/Multicast_address); this is best arranged with the network administrator. If you can't figure out what to use, the range given in the steps will work fine for a VXLAN that exists only in one location.
Open a browser and browse to the vCNS appliance
https://[ip of vCNS].Log in to the appliance (the default username is
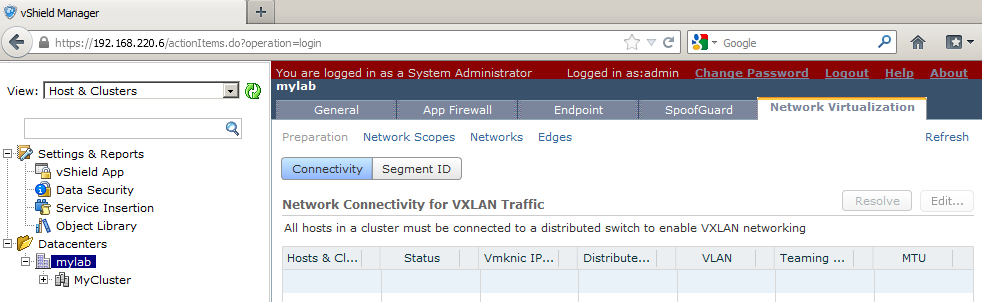
adminand the password isdefault).Make sure that you have switched to the Host & Clusters view.
Expand the
Datacentersfolder.Click on your data center.
On the right side of the screen, you should now find multiple menus; one of them says Network virtualization, so click on it.
Now select Preparation and then Connectivity as shown in the following screenshot:
Click on Edit.
Select your Cluster.
Select the Distributed Switch as well as the VLAN ID for the VXLAN that you want to use and click on Next as shown in the following screenshot:

Now select a Teaming policy (for example, Fail Over) and its MTU (for example, 1600) as shown in the following screenshot:

Click on Finish.
Wait until the agents are installed on all the ESXi servers. The status should then show Normal (you might need to refresh).
Click on Segment ID and then on Edit as shown in the following screenshot:

You have to now enter a range for the Segment IDs (for example,
5000-6000).Now enter the Multicast address range (for example,
225.1.1.1-225.1.2.254).Click on Finish.
We are now done with vCNS and can leave the rest to vCloud Director.
Log in to vCloud Director and click on Network pools.
The VXLAN pool, which is automatically created with your PvDC, should now show a green tick. If this is not the case, right-click on it and select Repair.
VXLANs were created by VMware together with Cisco. The idea was to solve the problems of modern data centers. Typically, these problems relate to the inflexibility of VLAN and Switching boundaries due to too much subnetting, IP, and VLAN management. The idea behind VXLANs is to create virtualized networking that is used on top of the common networking layer. They are in use just like the Network isolation-backed Network Pools we discussed in the other recipe; however, VXLANs have the benefit of being routable, flexible, and can transcend to different locations. This makes them extremely flexible and elegant to use.
VXLANs are actually like VLANs; the main difference is that VLANs (802.1q) have a 12-bit namespace whereas VXLANs have a 24-bit one, which increases the number of VLANs from 4,096 to more than 16 million unique namespaces.
VXLANs use layer 2 in layer 3 encapsulation. This means they use the Internet Protocol (IP, layer 3) to propagate the networks (from layer 2 upward), making them routable and far more flexible across network borders. One could envision VXLANs as a tunnel between two endpoints where additional networks exist.
VXLANs don't really exist in vCloud Director; VXLANs are defined in the vCNS appliance. vCNS creates the VXLAN tunnel endpoints and manages the VXLANs for the whole virtual infrastructure. For all this to happen, vCNS must install an agent on each ESXi server. This is done when you click on Finish, as explained in step 12 in the How to do it… section of this recipe. These agents provide the connection between VMs and the VXLANs. As the VXLAN packages are bigger than the common network packages, we have to adjust the MTU to avoid frame fragmentation. A safe setting is 1600. Each agent will be deployed and connected to a new vmknic. The IP for the vmknic is assigned via DHCP; however, this can be changed in vCNS for each ESXi server.
The Fail Over policy that you set on the Distributed Switches depends on what the physical switching architecture can do. If EtherChannels are set up, choose them. Link Aggregation Control Protocol (LACP) can be chosen either in active or passive mode. LACP in an active mode sends out packages to talk to LACP-activated devices, whereas in a passive mode it waits until a LACP-activated device talks to it. If in doubt about all of this, please involve your network team.
If you want to configure VXLANs with Static IPs for each vmknic, follow the ensuing procedure:
Navigate to Hosts & Clusters View | Datacenter | [your datacentre] | Network Virtualization | Connectivity as shown in the following screenshot:

Write down which vmknic is used for VXLANs.
Log in to vCenter as an administrator.
Set a fixed IP for each of the vmknics on each ESXi server.
The following are some links for further reading:
VMware's easy to read explanation at http://www.vmware.com/solutions/datacenter/vxlan.html
Cisco's Digging deeper into VXLAN at http://blogs.cisco.com/datacenter/digging-deeper-into-vxlan
A good case study on VXLANs at http://it20.info/2012/05/typical-vxlan-use-case/