
Containerization is an alternative to a virtual machine, which involves the encapsulation of applications and providing it with its own operating environment. The basic foundation for containers is Linux Containers (LXC) which is a user space interface for Linux kernel containment features. With the help of powerful API and simple tools, it lets Linux users create and manage application containers. LXC containers are in-between chroot and a fully-fledged virtual machine. Another key difference between containerization and traditional hypervisors is that containers share the Linux kernel used by the operating system running the host machine, thus multiple containers running in the same machine use the same Linux kernel. It gives the advantage of being fast with almost zero performance overhead compared to VMs.
Major use cases of containers are listed in the following sections.
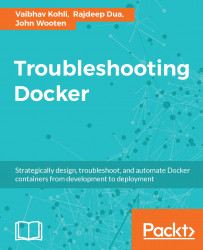
OS containers can be easily imagined as a Virtual Machine (VM) but unlike a VM they share the kernel of the host operating system but provide user space isolation. Similar to a VM, dedicated resources can be assigned to containers and we can install, configure, and run different applications, libraries, and so on, just as you would run on any VM. OS containers are helpful in case of scalability testing where a fleet of containers can be deployed easily with different flavors of distros, which is much less expensive compared to the deployment of VMs. Containers are created from templates or images that determine the structure and contents of the container. It allows you to create a container with the identical environment, same package version, and configuration across all containers mostly used in the case of development environment setups.
There are various container technologies such as LXC, OpenVZ, Docker, and BSD jails which are suitable for OS containers:
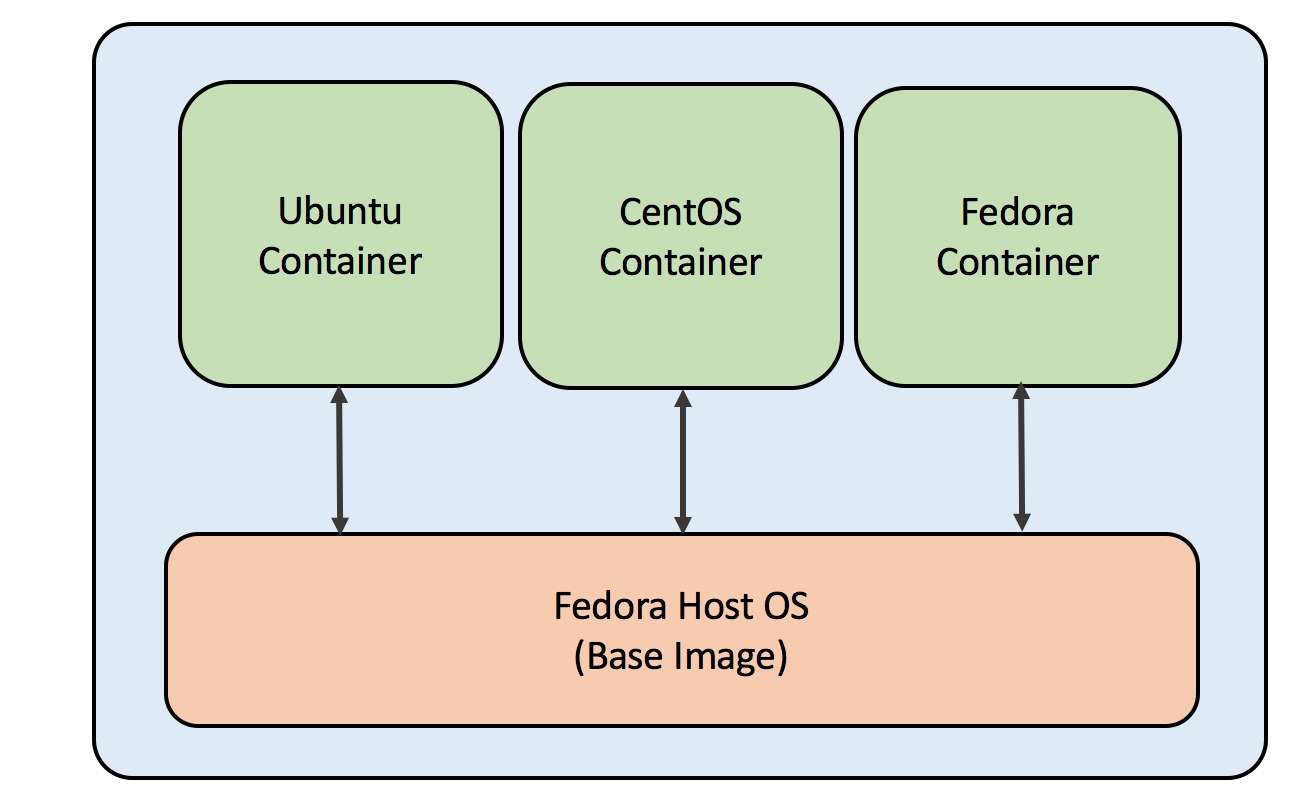
An OS-based container
Application containers are designed to run a single service in the package, while OS containers which were explained previously, can support multiple processes. Application containers are attracting a lot of attraction after the launch of Docker and Rocket.
Whenever a container is launched, it runs a single process. This process runs an application process, but in the case of OS containers it runs multiple services on the same OS. Containers usually have a layered approach as in the case of Docker containers, which helps with reduced duplication and increased re-use. Containers can be started with a base image common to all components and then we can go on adding layers in the file system that are specific to the component. A layered file system helps to rollback changes as we can simply switch to old layers if required. The run command which is specified in Dockerfile adds a new layer for the container.
The main purpose of application containers is to package different components of the application in separate containers. The different components of the application are packaged separately in containers then they interact with help of APIs and services. The distributed multi-component system deployment is the basic implementation of microservice architecture. In the preceding approach, a developer gets the freedom to package the application as per their requirement and the IT team gets the privilege to deploy the container on multiple platforms in order to scale the system both horizontally as well as vertically:
Note
A hypervisor is a Virtual Machine Monitor (VMM), used to allow multiple operating systems to run and share the hardware resources from the host. Each virtual machine is termed as a guest machine.
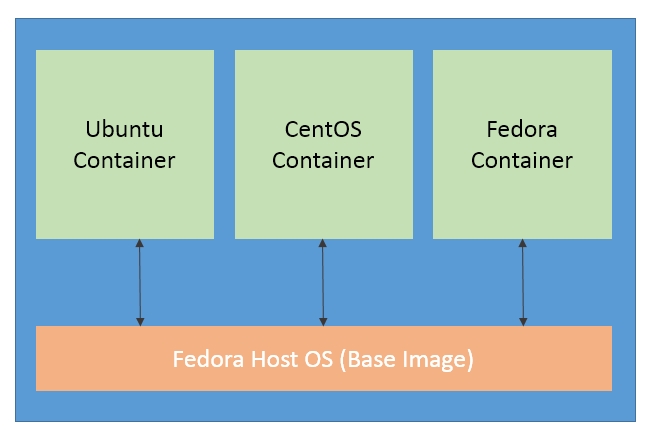
Docker layers
The following simple example explains the difference between application containers and OS containers:
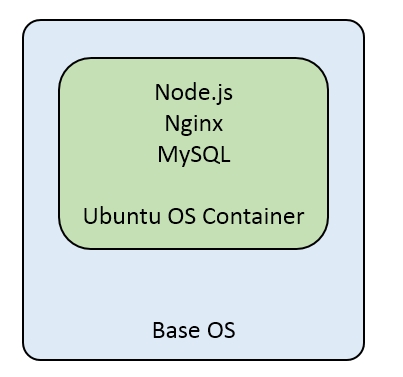
Let's consider the example of web three-tier architecture. We have a database tier such as MySQL or Nginx for load balancing and the application tier is Node.js:
An OS container
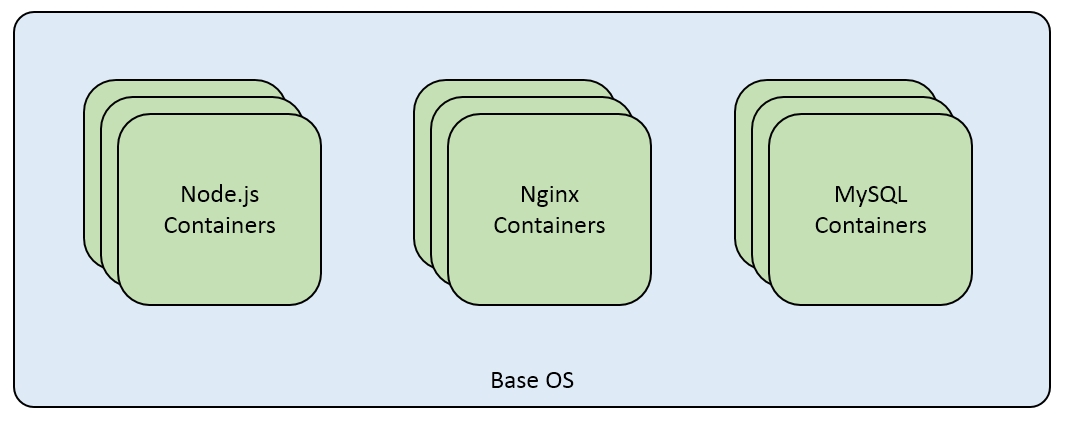
In the case of an OS container, we can pick up by default Ubuntu as the base container and install services MySQL, nginx, and Node.js using Dockerfile. This type of packaging is good for a testing or development setup where all the services are packaged together and can be shipped and shared across developers. But deploying this architecture for production cannot be done with OS containers as there is no consideration of data scalability and isolation. Application containers help to meet this use case as we can scale the required component by deploying more application-specific containers and it also helps to meet load balancing and recovery use cases. For the previous three-tier architecture, each of the services will be packaged into separate containers in order to fulfill the architecture deployment use case:
Application containers scaled up
The main differences between OS and application containers are:
|
OS Container |
Application Container |
|
Meant to run multiple services on the same OS container |
Meant to run a single service |
|
Natively, no layered filesystem |
Layered filesystem |
|
Example: LXC, OpenVZ, BSD Jails |
Example: Docker, Rocket |
Docker is a container implementation that has gathered enormous interest in recent years. It neatly bundles various Linux kernel features and services such as namespaces, cgroups, SELlinux, AppArmor profiles, and so on, with Union file systems such as AUFS and BTRFS to make modular images. These images provide highly configurable virtualized environments for applications and follow the write-once-run-anywhere principle. An application can be as simple as running a process to having highly scalable and distributed processes working together.
Docker is gaining a lot of traction in the industry because of its performance savvy and universally replicable architecture, meanwhile providing the following four cornerstones of modern application development:
Autonomy
Decentralization
Parallelism
Isolation
Furthermore, wide-scale adaptation of Thoughtworks's microservices architecture or Lots of Small Applications (LOSA) is further bringing potential to Docker technology. As a result, big companies such as Google, VMware, and Microsoft have already ported Docker to their infrastructure, and the momentum is continued with the launch of myriad of Docker start-ups namely Tutum, Flocker, Giantswarm, and so on.
Since Docker containers replicate their behavior anywhere, be it your development machine, a bare-metal server, virtual machine, or data center, application designers can focus their attention on development, while operational semantics are left to DevOps. This makes team workflow modular, efficient, and productive. Docker is not to be confused with VM, even though they are both virtualization technologies. Where Docker shares an OS, meanwhile providing a sufficient level of isolation and security to applications running in containers, it later completely abstracts out OS and gives strong isolation and security guarantees. But Docker's resource footprint is minuscule in comparison to VM, and hence preferred for economy and performance. However, it still cannot completely replace VM, and the usage of container is complementary to VM technology:
VM and Docker architecture
Following are some of the advantages of using Docker containers in microservice architecture:
Rapid application deployment: With minimal runtime, containers can be deployed quickly because of the reduced size as only the application is packaged.
Portability: An application with its operating environment (dependencies) can be bundled together into a single Docker container that is independent from the OS version or deployment model. The Docker containers can be easily transferred to another machine that runs Docker container and executed without any compatibility issues. Windows support is also going to be part of future Docker releases.
Easily Shareable: Pre-built container images can be easily shared with the help of public repositories as well as hosted private repositories for internal use.
Lightweight footprint: Even the Docker images are very small and have a minimal footprint to deploy a new application with the help of containers.
Reusability: Successive versions of Docker containers can be easily built as well as rolled back to previous versions easily whenever required. It makes them noticeably lightweight as components from the pre-existing layers can be reused.
These are some of the basic steps involved in the lifecycle of a Docker container:
Build the Docker image with the help of Dockerfile which contains all the commands required to be packaged. It can run in the following way:
Docker buildTag name can be added in following way:
Docker build -t username/my-imagename .If Dockerfile exists at a different path then the Docker
buildcommand can be executed by providing-fflag:Docker build -t username/my-imagename -f /path/DockerfileAfter the image creation, in order to deploy the container
Docker runcan be used. The running containers can be checked with the help of theDocker pscommand, which lists the currently active containers. There are two more commands to be discussed:Docker pause: This command uses cgroups freezer to suspend all the processes running in a container. Internally it uses the SIGSTOP signal. Using this command process can be easily suspended and resumed whenever required.Docker start: This command is used to start one or more stopped containers.
After the usage of container is done, it can either be stopped or killed; the
Docker stop:command will gracefully stop the running container by sending the SIGTERM and then SIGKILL command. In this case, the container can still be listed by usingDocker ps -acommand.Docker killwill kill the running container by sending SIGKILL to the main process running inside the container.If there are some changes made to the container while it is running, which are likely to be preserved, a container can be converted back to an image by using the
Docker commitafter the container has been stopped:
The Docker lifecycle
Listed here are eight Docker design patterns with examples. Dockerfile is the base structure from which we define a Docker image, it contains all the commands to assemble an image. Using the Docker build command, we can create an automated build that executes all the preceding mentioned command-line instructions to create an image:
$ Docker build
Sending build context to Docker daemon 6.51 MB
...
Design patterns listed here can help in creating Docker images that persist in volumes and provide various other flexibility so that they can be recreated or replaced easily at any time.
For creating a web-based application or blog, we can create a base image which can be shared and help to deploy the application with ease. This pattern helps out as it tries to package all the required services on top of one base image, so that this web application blog image can be reused anywhere:
    FROM debian:wheezy
    RUN apt-get update
    RUN apt-get -y install ruby ruby-dev build-essential git
    # For debugging
    RUN apt-get install -y gdb strace
    # Set up my user
    RUN useradd -u 1000 -ms /bin/bash vkohli
       RUN gem install -n /usr/bin bundler
    RUN gem install -n /usr/bin rake
    WORKDIR /home/vkohli/
    ENV HOME /home/vkohli
    VOLUME ["/home"]
    USER vkohli
    EXPOSE 8080
The preceding Dockerfile shows the standard way of creating an application-based image.
Note
A Docker image is a zipped file which is a snapshot of all the configuration parameters as well as the changes made in the base image (kernel of the OS).
It installs some specific tools (Ruby tools rake and bundler) on top of the Debian base image. It creates a new user, adds it to the container image, and specifies the working directory by mounting "/home" directory from the host, which is explained in detail in the next section.
Sharing the volume at host level allows other containers to pick up the shared content that they require. This helps in faster rebuilding of the Docker image or when adding, modifying, or removing dependencies. For example, if we are creating the homepage deployment of the previously mentioned blog, the only directory required to be shared is the /home/vkohli/src/repos/homepage directory with this web app container through the Dockerfile in the following way:
  FROM vkohli/devbase
          WORKDIR /home/vkohli/src/repos/homepage
          ENTRYPOINT bin/homepage web
For creating the development version of the blog we can share the folder /home/vkohli/src/repos/blog where all the related developer files can reside. And for creating the dev-version image we can take the base image from the pre-created devbase:
FROM vkohli/devbase
WORKDIR /
USER root
# For Graphivz integration
RUN apt-get update
RUN apt-get -y install graphviz xsltproc imagemagick
       USER vkohli
         WORKDIR /home/vkohli/src/repos/blog
         ENTRYPOINT bundle exec rackup -p 8080
For development purposes, we have separate dependencies in development and production environments which easily get co-mingled at some point. Containers can be helpful in differentiating the dependencies by packaging them separately. As shown in the following code, we can derive the development tools container image from the base image and install development dependencies on top of it even allowing an ssh connection so that we can work upon the code:
FROM vkohli/devbase
RUN apt-get update
RUN apt-get -y install openssh-server emacs23-nox htop screen

# For debugging
RUN apt-get -y install sudo wget curl telnet tcpdump
# For 32-bit experiments
RUN apt-get -y install gcc-multilib
# Man pages and "most" viewer:
RUN apt-get install -y man most
RUN mkdir /var/run/sshd
ENTRYPOINT /usr/sbin/sshd -D
VOLUME ["/home"]
EXPOSE 22
EXPOSE 8080
As can be seen in the preceding code, basic tools such as wget, curl, and tcpdump are installed which are required during development. Even SSHD service is installed which allows an ssh connection into the development container.
Testing the code in different environments always eases the process and helps find more bugs in isolation. We can create a Ruby environment in a separate container to spawn a new Ruby shell and use it to test the code base:
FROM vkohli/devbase
RUN apt-get update
RUN apt-get -y install ruby1.8 git ruby1.8-dev
In the Dockerfile listed, we are using the base image as devbase and with the help of just one command docker run can easily create a new environment by using the image created from this Dockerfile to test the code.
We have build steps involved in the application that are sometimes expensive. In order to overcome this we can create a separate build container which can use the dependencies needed during the build process. The following Dockerfile can be used to run a separate build process:
FROM sampleapp
RUN apt-get update
RUN apt-get install -y build-essential [assorted dev packages for libraries]
VOLUME ["/build"]
WORKDIR /build
CMD ["bundler", "install","--path","vendor","--standalone"]
/build directory is the shared directory that can be used to provide the compiled binaries, also we can mount the /build/source directory in the container to provide updated dependencies. Thus by using build container we can decouple the build process and the final packaging part in separate containers. It still encapsulates both the process and dependencies by breaking the preceding process into separate containers.
The purpose of this container is to package the installation steps in separate containers. Basically, it is in order to provide the deployment of containers in a production environment.
A sample Dockerfile to package the installation script inside a Docker image is shown as follows:
ADD installer /installer
CMD /installer.sh
The installer.sh can contain the specific installation command to deploy containers in a production environment and also provide the proxy setup with DNS entry in order to have the cohesive environment deployed.
In order to deploy the complete application in a container, we can bundle multiple services to provide the complete deployment container. In this case we bundle web app, API service, and database together in one container. It helps to ease the pain of interlinking various separate containers:
services:
  web:
    git_url: [email protected]:vkohli/sampleapp.git
    git_branch: test
    command: rackup -p 3000
    build_command: rake db:migrate
    deploy_command: rake db:migrate
    log_folder: /usr/src/app/log
    ports: ["3000:80:443", "4000"]
    volumes: ["/tmp:/tmp/mnt_folder"]
    health: default
  api:
    image: quay.io/john/node
    command: node test.js
    ports: ["1337:8080"]
    requires: ["web"]
databases:
  - "mysql"
  - "redis"
As we have talked about container usage in a development environment, there is one big category missing-the usage of a container for infrastructure services such as proxy setup which provides a cohesive environment in order to provide the access to an application. In the following mentioned Dockerfile example, we can see that haproxy is installed and links to its configuration file are provided:
FROM debian:wheezy
ADD wheezy-backports.list /etc/apt/sources.list.d/
RUN apt-get update
RUN apt-get -y install haproxy
ADD haproxy.cfg /etc/haproxy/haproxy.cfg
CMD ["haproxy", "-db", "-f", "/etc/haproxy/haproxy.cfg"]
EXPOSE 80
EXPOSE 443
The haproxy.cfg file is the configuration file responsible for authenticating a user:
backend test
    acl authok http_auth(adminusers)
    http-request auth realm vkohli if !authok
    server s1 192.168.0.44:8084